

In previous tutorial articles, we learned about adding React Table with multiple functionalities, adding React Modal, and React Form to React ecosystem. Now, this tutorial article will feature the combination of all three tutorials. The main goal of this article is to bring all of the previous stuff that we have learned together into one to demonstrate how these different components are used in real solutions rather than individually.
The idea is to make use of the react-hook-form library along with the react-modal library to post the data in the Table provided by the react-table library. We are going to show the form in the modal that opens up to add the product information on the table. And upon submit, we are going to post the product to Fakestore API and get the result.
Let's get started!
Add Form to Modal
First, we are going to add the form fields to the Modal component. For that, we need to import the necessary component as well as useForm hook as shown in the code snippet below:
**import { useForm } from "react-hook-form";
import Modal from "react-modal";**
Then, we need to define the states and function to handle form as well as handle the opening and closing of modal as shown in the code snippet below:
const { register, handleSubmit, watch, errors } = useForm();
  const [addproductModal, openAddproductModal] = useState(false);
In case you want to learn about the state functions, you can refer to previous articles on Modal as well as Forms.
Now, we need to implement the functions to handle the opening and closing of Modal as shown in the code snippet below:
const addNewProduct = () => {
    openAddproductModal(true);
  };
  const closeAddNewProduct = () => {
    openAddproductModal(false);
  };
Then, we need to add the form elements and inputs inside the Modal component with required props as shown in the code snippet below:
<Modal
          isOpen={addproductModal}
          onRequestClose={closeAddNewProduct}
          contentLabel="Example Modal"
        >
          <button class="btn btn-danger" onClick={closeAddNewProduct}>
            close
          </button>
          <div class="col-md-12">
            <div class="card flex-md-row mb-4 shadow-sm h-md-500">
              <div class="card-body d-flex flex-column align-items-start">
                <h6 class="mb-0">
                  <a class="text-dark" href="#">
                    Add product on FakstoreAPI
                  </a>
                </h6>
                <div className="m-auto">
                  <form
                    className="container wasValidated"
                    onSubmit={handleSubmit(AddProduct)}
                  >
                    <div className="form-group">
                      <label htmlFor="title">Title</label>

                      <input
                        className={
                          errors?.title
                            ? "is-invalid form-control"
                            : "form-control"
                        }
                        name="title"
                        ref={register({
                          required: true,
                          minLength: { value: 5, message: "require minimum 5" }
                        })}
                      />
                      <div className="invalid-feedback">
                        {errors?.title?.message}
                      </div>
                    </div>
                    <div className="form-group">
                      <label htmlFor="price">Price</label>
                      <input
                        name="price"
                        ref={register({
                          required: {
                            value: true,
                            message: "price is required"
                          }
                        })}
                        type="number"
                        className={
                          errors?.price
                            ? "is-invalid form-control"
                            : "form-control"
                        }
                        id="price"
                      />

                      <div className="invalid-feedback">
                        {errors?.price?.message}
                      </div>
                    </div>

                    <button type="submit" className="btn btn-primary">
                      Submit
                    </button>
                  </form>
                </div>
              </div>
            </div>
          </div>
        </Modal>
Here, we have used the register method to register the validation rules to the respective input fields as references. We also used handleSubmit method made available by useForm hook to trigger the AddProduct function as a callback. All the modal and form styles use Bootstrap style classes.
 View Website
 View Website
 View Website
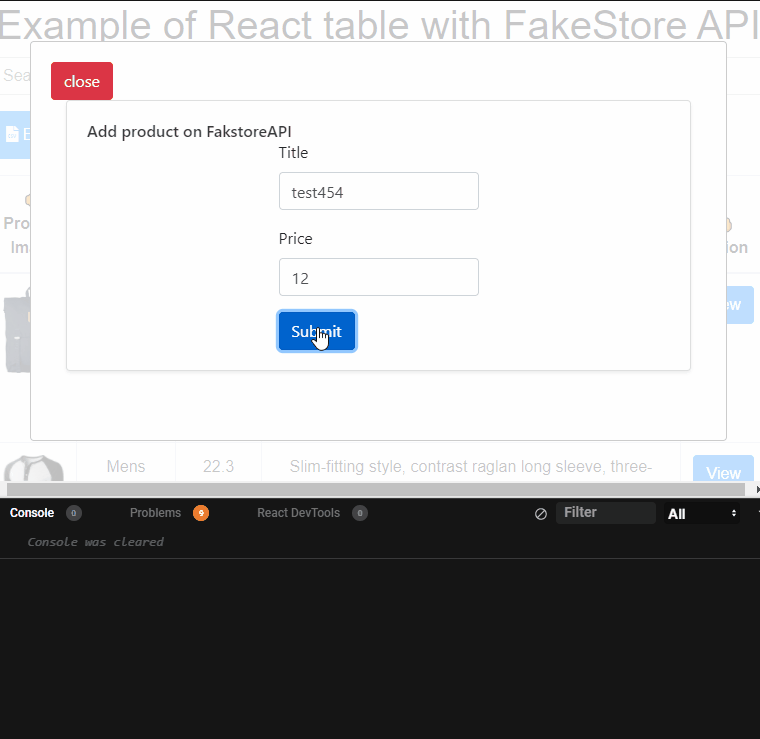
Hence upon clicking the Add new product button, we will see a Modal with form inputs as shown in the demo below:

Function to post a product
Now as we enter the valid inputs in the input fields of the form, we need to submit it as well. On submitting the form handleSubmit submit method is called which triggers the AddProduct method with new product data as the parameter. Then using the new product info entered in the input fields to apply post request to Fakestore API and get the response which we are going to log in to the console. The overall implementation of the function is shown in the code snippet below:
const AddProduct = (newProduct) => {
    fetch("https://fakestoreapi.com/products", {
      method: "POST",
      body: JSON.stringify({
        title: newProduct.title,
        price: newProduct.price
      })
    })
      .then((res) => res.json())
      .then((json) => console.log(json));
  };
Hence, we can see the result of form submit in the demo below:
Here, the response only shows the success result but actually the data is not stored. This is just for the test purpose.
Comments (0)