

Have you seen Twitter profiles that show their latest followers in the profile banner? And wondering how to do it? There are two ways you can do it.
- Pay for a no-code service that updates the profile banner with the latest followers.
- Create a bot that updates the profile banner with the latest followers. Do this all for free!
So, we will create a Twitter bot. First, you need to have these things:
- Twitter developer account
- API key and secret (Twitter bot)
- Access token and secret (Once you've authorized the app, you will get an access token and secret)
- GitHub account (To update the profile banner)
- Node & npm (Manage packages)
- your Twitter account ID
Now, We'll start. First, we create a .env file with the following credentials:
appKey=(your api key)
appSecret=(your api secret)
accessToken=(your access token)
accessSecret=(your access secret)
Then, we'll install some packages:
npm install dotenv jimp twitter-api-v2
After that, go to your Twitter profile and save the banner in a folder called static. Your directory structure should look like this:
static\
    (banner.png)
package.json
package-lock.json
.env
Then we create an index.js file.
Now we import the modules.
import { TwitterApi } from "twitter-api-v2";
import jimp from "jimp";
import dotenv from "dotenv";
Then initialize the dotenv module and the Twitter Client.
dotenv.config();

const client = new TwitterApi({
    appKey: process.env.appKey,
    appSecret: process.env.appSecret,
    accessToken: process.env.accessToken,
    accessSecret: process.env.accessSecret,
});
We store all the followers in an array.
 View Website
 View Website
 View Website
let followers_glob = [];
Then, we create a function that gets the latest followers and stores them in the array.
async function saveUserPics() {
    const followers = await client.v2.followers("REPLACE_WITH_YOUR_TWITTER_ID", {
        max_results: 3,
    });

    followers_glob = followers.data.map((fol) => fol.username);

    const user_names = [];

    followers.data.forEach(({ username }) => user_names.push(username));

    const save_pic = async (username) => {
        const URL = `https://unavatar.io/twitter/${username}`;

        const image = await jimp.read(URL);
        image.write(`${username}.png`);
    };


    Promise.all(user_names.map(save_pic)).then(image)
}
Also, don't forget to replace the REPLACE_WITH_YOUR_TWITTER_ID with your Twitter ID.
Then, we create a function that updates the profile banner.
async function image() {
    const image = await jimp.read("static/1500x500.png");
    let mask = await jimp.read(`${followers_glob[0]}.png`);
    const font = await jimp.loadFont("fonts/fnt.fnt");

    image.resize(1500, 500);
    image.print(font, 100, 110, "Latest followers");

    mask.resize(100, 100);
    mask.circle();
    image.composite(mask, 110, 216);

    mask = await jimp.read(`${followers_glob[1]}.png`);
    mask.resize(80, 80);
    mask.circle();
    image.composite(mask, 230, 170);

    mask = await jimp.read(`${followers_glob[2]}.png`);
    mask.resize(80, 80);
    mask.circle();
    image.composite(mask, 240, 260);

    image.write("static/test.png", async () => {
        // await client.v1.updateAccountProfileBanner("./static/test.png");

        // Uncomment the line above to update the profile banner.
    });
}
Make sure to change the numbers before updating the profile banner!
Also, I use a custom font, copy this folder to your project and rename it to fonts.
Now, finally, we execute the function.
saveUserPics();
If you try node index.js and go to static/test.png you will see the banner.
Update profile banner
We have created a program that updates the profile banner. But, you can't do this every time you get a new follower. So, we will create a cron job using GitHub Actions.
Create a GitHub repo, and upload the code (without the .env file). Now go to the settings tab.

Go to Secrets > Actions from the sidebar.
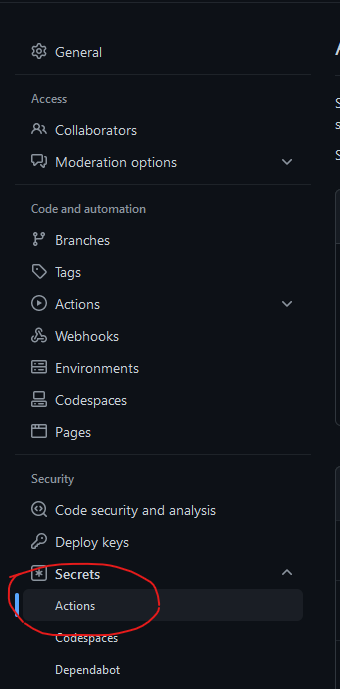
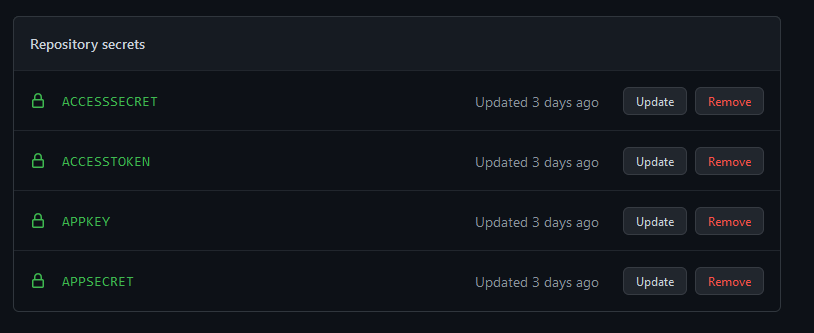
Now create all the secrets that we have in the .env file.
Once you have created the secrets, you should see the following:
Now create a .github/workflows/update.yml file. And paste the following code:
name: Update status

# Controls when the workflow will run
on:
  schedule:
    - cron: "0 0 * * *"

  push:
    branches: [ "main" ]

  workflow_dispatch:

jobs:
  # This workflow contains a single job called "build"
  build:
    # The type of runner that the job will run on
    runs-on: ubuntu-latest

    # Steps represent a sequence of tasks that will be executed as part of the job
    steps:
      # Checks-out your repository under $GITHUB_WORKSPACE, so your job can access it
      - uses: actions/checkout@v3

      # Runs a set of commands using the runners shell
      - name: Setup env vars
        run: |
          touch .env
          echo appKey=${{ secrets.APPKEY }} >> .env
          echo appSecret=${{ secrets.APPSECRET }} >> .env
          echo accessToken=${{ secrets.ACCESSTOKEN }} >> .env
          echo accessSecret=${{ secrets.ACCESSSECRET }} >> .env

      # Runs a single command using the runners shell
      - name: Install & run
        run: npm i && node index.js
This runs the index.js file every day at midnight. And it also updates the profile banner every time you get a new follower.
The end
Thank you for reading this tutorial. Here are the links if you need more information.
GitHub - https://github.com/Posandu/twitter-cron Follow me on Twitter – https://twitter.com/Posandu
Comments (0)