We managed to make our React table feature-full by adding sorting, filtering, grouping, and pagination features to it. These features will make the information represented in the table easier and efficient to read and analyze. Now in most cases, tables representing a particular set of data may not be only required for virtual viewing of data but also to make documentation and detailed case studies. In that case, the data represented in the table might be required in the spreadsheet or any other format to make an advanced statistical analysis. For that reason, we need a way to export the table in the form of PDF, Excel, or CSV.
In this tutorial, we are going to learn how to export the React Table with data into a PDF, Excel or CSV format. For this, we are going to make use of multiple packages which we will come across as tutorial progress.
Let's get started!
Install Dependencies
First, we are going to install some required packages for this tutorial. All the necessary packages can be installed at once by executing the following command in the terminal:
yarn add react-table-plugin papaparse xlsx jspdf jspdf-autotable
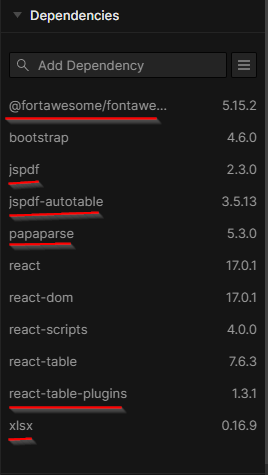
In case you are using codesandbox, you will need to add the following dependencies:

Some of the packages that will be involved in exporting feature are explained below:
jspdf : It is a client side JavaScript package that enables us to generate PDF.
jspdf-autotable: This plugin works alongside jspdf plugin and adds the ability to generate PDF tables either by parsing HTML tables or by using JavaScript data directly.
 View Website
 View Website
 View Website
papaparse: This plugin enables us to parse the CSV using JavaScript.
react-table-plugins: This plugin is mainly used here for exporting data from tables.
xlsx: This plugin is used to parse the data into various spreadsheet formats.
Import necessary packages
Now, we need to import the necessary package with the components they have in offer as shown in the code snippet below:
import { useExportData } from "react-table-plugins";
import Papa from "papaparse";
import XLSX from "xlsx";
import JsPDF from "jspdf";
import "jspdf-autotable";
Activate function
Then, we need to associate the useExportData hook with useTable hook as shown in the code snippet below:
const {

    // for export
    exportData
  } = useTable(
    {
      columns,
      data,
      getExportFileBlob
    },
    useFilters,
    useGroupBy,
    useSortBy,
    useExpanded,
    usePagination,
    useExportData
  );
Handing file export
Here, we have a function called getExportFileBlob that handles the exporting of table data into file. The exporting of file is mainly based on the file type( CSV, XLSX, PDF). The modules from the required packages are used to export the file with proper formating. The overall implementation is provided in the code snippet below:
function getExportFileBlob({ columns, data, fileType, fileName }) {
    if (fileType === "csv") {
      // CSV example
      const headerNames = columns
        .filter((c) => c.Header != "Action")
        .map((col) => col.exportValue);
      const csvString = Papa.unparse({ fields: headerNames, data });
      return new Blob([csvString], { type: "text/csv" });
    } else if (fileType === "xlsx") {
      // XLSX example

      const header = columns
        .filter((c) => c.Header != "Action")
        .map((c) => c.exportValue);
      const compatibleData = data.map((row) => {
        const obj = {};
        header.forEach((col, index) => {
          obj[col] = row[index];
        });
        return obj;
      });

      let wb = XLSX.utils.book_new();
      let ws1 = XLSX.utils.json_to_sheet(compatibleData, {
        header
      });
      XLSX.utils.book_append_sheet(wb, ws1, "React Table Data");
      XLSX.writeFile(wb, `${fileName}.xlsx`);

      // Returning false as downloading of file is already taken care of
      return false;
    }
    //PDF example
    if (fileType === "pdf") {
      const headerNames = columns
        .filter((c) => c.Header != "Action")
        .map((column) => column.exportValue);
      const doc = new JsPDF();
      doc.autoTable({
        head: [headerNames],
        body: data,
        styles: {
          minCellHeight: 9,
          halign: "left",
          valign: "center",
          fontSize: 11
        }
      });
      doc.save(`${fileName}.pdf`);

      return false;
    }

    // Other formats goes here
    return false;
  }
Adding a Export button
Lastly, we need to add an export that buttons for each file type. These buttons onClick event will trigger the same exportData function but with a different file type sent as a parameter. The overall implementation is provided in the code snippet below:
<div className="form-group input-group">
        <button
          class="btn btnexport mr-1"
          onClick={() => {
            exportData("csv", true);
          }}
        >
          <i class="fa fa-file-csv"></i> Export as CSV
        </button>{" "}
        <button
          class="btn btnexport mr-1"
          onClick={() => {
            exportData("xlsx", true);
          }}
        >
          <i class="fa fa-file-excel"></i> Export as xlsx
        </button>{" "}
        <button
          class="btn btnexport mr-1"
          onClick={() => {
            exportData("pdf", true);
          }}
        >
          <i class="fa fa-file-pdf"></i>
          Export as PDF
        </button>
      </div>
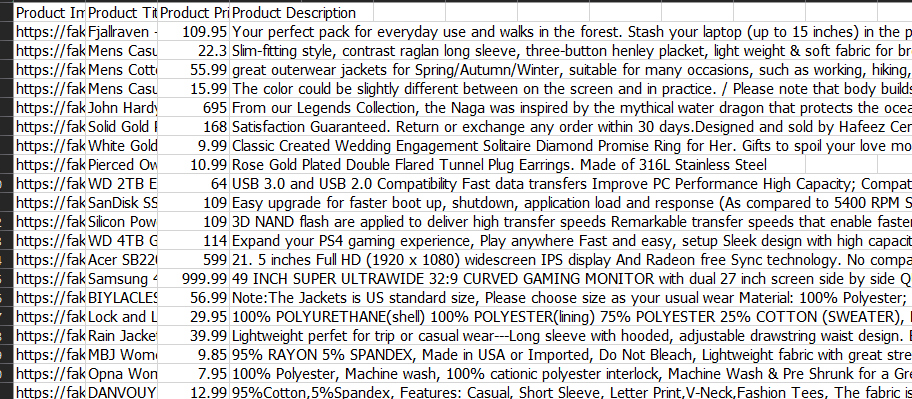
Hence, if we click the export CSV button then, we will get the CSV file as displayed in the screenshot below:

Conclusion
The major objective of this tutorial was to implement the exporting feature for the data in the React table in the React project. Due to the availability of specific packages for each file type export, the implementation has been easy and efficient as well. Here, we learned how to export the table data in three different formats: CSV, XLSX, and PDF. These file types are the standards by which the data is exported nowadays. The feature itself in the React table is very useful so that the further study of information in the table can be done and documented.
The overall code, as well as the demo for this tutorial, is available on Codesandbox.


Comments (0)