

 If you’re looking to build a website using Nextjs and MDX files you’ve come to the right place.
In this guide you’ll mainly be focusing on the sourcing of data and learning how Contentlayer works rather than how to make a pretty looking website.
What is Contentlayer?
Note: Contentlayer still in development and some APIs might change!
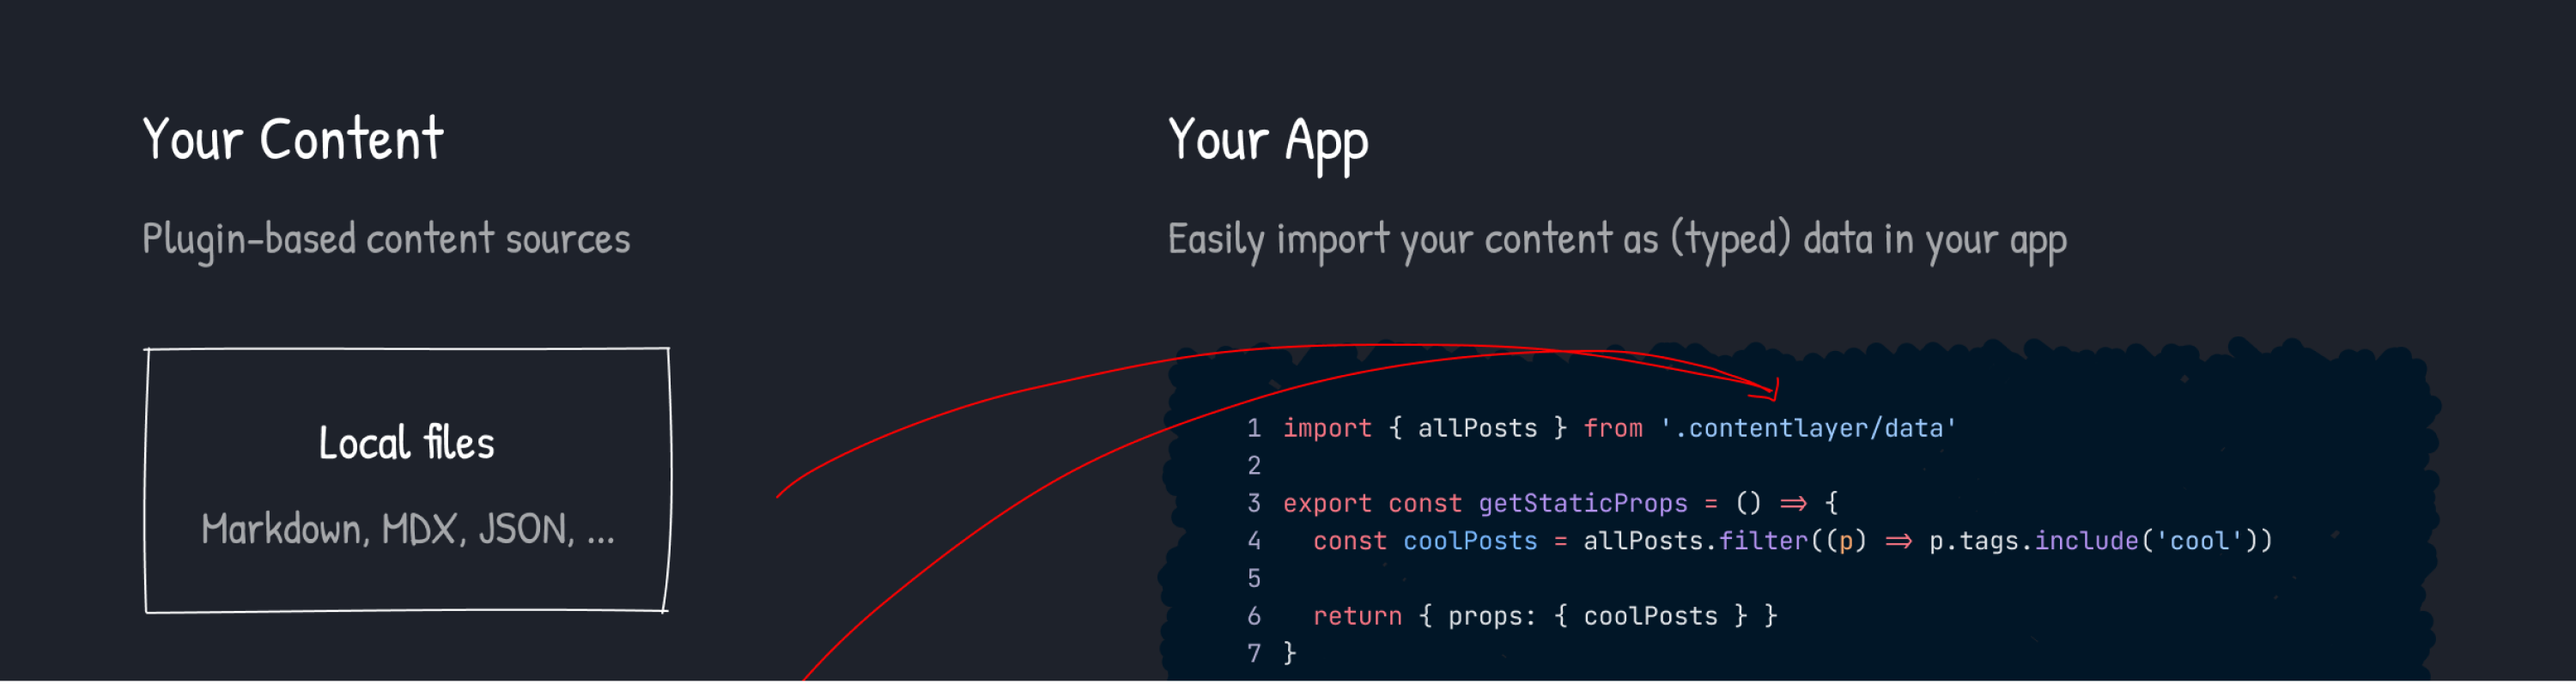
Contentlayer is the glue between your content and your code - making it super easy to import MD(X) and CMS content in your app.
For many years it's been commonplace to separate your website code from its content. This makes both content editing and developing more efficient and prone to fewer bugs.
The code for your website is often built on top of a front-end framework or static site generator, such as Gatsby or Next.js (among many, many others). And the content is often either housed in a headless content management system like Contentful or Sanity (also among many others), but can also be stored in local files.
Some frameworks are opinionated about how your content should be loaded into your code. For instance, Gatsby has a large marketplace of plugins and a GraphQL layer that can be used together to load content into your code.
Other frameworks like Next.js take no stance on content, and leave it up to you. That is where Contentlayer shines.
You can find the full documention for Contentlayer here.
 View Website
 View Website
 View Website
Setup Project
Just to demonstrate how quickly we can start working, let's start with a new blank Next.js project.
Create a new Next.js project.
npx create-next-app@latest --ts contentlayer-podcast
Next.js provides an integrated TypeScript experience out of the box just felow the nextjs guide .
That command will place the project in a contentlayer-podcast directory. Change into that directory.
cd contentlayer-podcast
Setting up Contentlayer
Install Contentlayer in your Next.js app
npm install contentlayer next-contentlayer
Define Content Type
Before you get to adding content you’ll first need to create a config file to define your content type and what fields that hold the content.
Create contentlayer.config.js file in the root of the project with the following code.
contentlayer.config.js
import {
  defineDocumentType,
  ComputedFields,
  makeSource
} from 'contentlayer/source-files'
import readingTime from 'reading-time';

export const Post = defineDocumentType(() => ({
  name: 'Post',
  filePathPattern: `blog/*.mdx`,
bodyType: 'mdx',
  fields: {
    title: {
      type: 'string',
      description: 'The title of the post',
      required: true,
    },
    date: {
      type: 'date',
      description: 'The date of the post',
      required: true,
    },
    summary: {
      type: 'string',
      required: true
    },
    image: {
      type: 'string',
      required: true
    }
  },
  computedFields
}));

const computedFields: ComputedFields = {
  readingTime: {
    type: 'json',
    resolve: (doc) => readingTime(doc.body.raw)
  },
  wordCount: {
    type: 'number',
    resolve: (doc) => doc.body.raw.split(/\s+/gu).length
  },

  slug: {
    type: 'string',
    resolve: (doc) => doc._raw.sourceFileName.replace(/\.mdx$/, '')
  }
};

export default makeSource({
  contentDirPath: 'data',
  documentTypes: [Post],
});
Wrap the Next.js configuration using the withContentlayer method.
Create a new file called next.config.mjs in the root of your project, and add the following content.
next.config.js
const { withContentlayer } = require('next-contentlayer');

/**
 * @type {import('next').NextConfig}
 */
module.exports = withContentlayer()({
  swcMinify: true,
  reactStrictMode: true,

});
Add ReadingTime Helper and Date formating
Before we get into the pages, add a library to add Medium's like reading time estimation :
yarn add reading-time --production
Add a library to help us with formatting the date :
yarn add date-fns
Create some posts
- Add
data/blogfolder in the root of your app(Where your content will live). - Add
.mdxfiles(e.g.content-layer-tutorial.mdx). - Add your content.
data/blog/content-layer.md
---
title: Content Layer Tutorial
summary: To understand how nextjs transform markdown to html, you need to know a bit more about how contentlayer works.
image: /static/images/content-layer.png
date: 2022-02-05
---
<Image
  alt={`content layer`}
  src={`/static/images/content-layer.png`}
  width={1501 / 2}
  height={712 / 2}
  priority
/>

If you’re looking to build a website using Nextjs and MDX files you’ve come to the right place.

In this guide you’ll mainly be focusing on the sourcing of data and learning how **[Contentlayer](https://github.com/contentlayerdev/contentlayer)** works rather than how to make a pretty looking website.

## **What is Contentlayer?**

> Note: Contentlayer still in development and some APIs might change!

**[Contentlayer](https://github.com/contentlayerdev/contentlayer)** turns your content into data - making it super easy to import MD(X) and CMS content in your app.

You can find the [full documention for Contentlayer here](https://www.contentlayer.dev/docs).

I'm looking forward to seeing the adoption of Content Layer as it will be on stable version.
Fetch and display your posts
pages/index.js
import Head from 'next/head'
import Link from 'next/link'
import { format, parseISO } from 'date-fns'
import { allPosts } from '.contentlayer/data'
import { pick } from "@contentlayer/client";

export function getStaticProps() {
  const posts =  allPosts
    .map((post) => pick(post, ['slug', 'title', 'summary', 'date']))
    .sort(
      (a, b) =>
        Number(new Date(b.date)) - Number(new Date(a.date))
    );

  return { props: { posts } };
}

function PostCard(post) {
  return (
    <div>
      <time dateTime={post.date} >
        {format(parseISO(post.date), 'LLLL d, yyyy')}
      </time>
      <h2>
        <Link href={`/blog/${post.slug}`}>
          <a>{post.title}</a>
        </Link>
      </h2>
    </div>
  )
}

export default function Home({ posts }) {
  return (
    <div>
      <Head>
        <title>Contentlayer Blog Example</title>
      </Head>

      <h1>Contentlayer Blog Example</h1>

      {posts.map((post, idx) => (
        <PostCard key={idx} {...post} />
      ))}
    </div>
  )
}
Create dynamic routes for each post
In this section you should know how dynamic routes works in Next.js,
Add blog/[slug].tsx inside pages folder.
pages/blog/[slug].tsx
import Head from 'next/head';
import { useMDXComponent } from 'next-contentlayer/hooks';
import { format, parseISO } from 'date-fns'
import components from '/components/MDXComponents';
import { allPosts } from '.contentlayer/data';
import type { Post } from '.contentlayer/types';
import Link from 'next/link';

export default function Post({ post }: { post: Post }) {
const Component = useMDXComponent(post.body.code);
  return (
    <>
      <Head>
        <title>{post.title}</title>
      </Head>
      <article>
        <div>
          <Link href="/">
            <a>Home</a>
          </Link>
        </div>
        <div >
          <h1 >{post.title}</h1>
          <time dateTime={post.date}>
             {format(parseISO(post.date), 'LLLL d, yyyy')}
          </time>
        </div>
             <Component
        components={
          {
            ...components
          } as any
        }
      />
      </article>
    </>
  );
}

export async function getStaticPaths() {
  return {
    paths: allPosts.map((p) => ({ params: { slug: p.slug } })),
    fallback: false
  };
}

export async function getStaticProps({ params }) {
  const post = allPosts.find((post) => post.slug === params.slug);

  return { props: { post} };
}
Optionnel, add mdx support to use JSX in your markdown content. Here we import Image and CustomLink components so we can embed them within markdown post. 🚀
/components/MDXComponents.tsx
import Link from 'next/link';
import Image from 'next/image';

const CustomLink = (props) => {
  const href = props.href;
  const isInternalLink = href && (href.startsWith('/') || href.startsWith('#'));

  if (isInternalLink) {
    return (
      <Link href={href}>
        <a {...props}>{props.children}</a>
      </Link>
    );
  }

  return <a target="_blank" rel="noopener noreferrer" {...props} />;
};

function RoundedImage(props) {
  return <Image alt={props.alt} className="rounded-lg" {...props} />;
}

const MDXComponents = {
  Image: RoundedImage,
  a: CustomLink,
};

export default MDXComponents;
Now run the app using yarn devand we are done 🎉, Check http://localhost:3000 to see the results!
Conclusion
In this article, we’ve learned how to work with Next.js, Contentlayer and MDX by building a podcast page. We learned how to set up Next.js apps, generate dynamic URLs, work with Markdown data. I hope you had as much fun building this as I did writing the tutorial.
An online demo of the application that we built is hosted on Vercel and the code is available on GitHub.
Feel free to reach out to me in the comments below if you have any questions.
Comments (0)