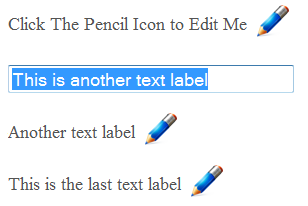
Using jQuery you can easily create some great web user interactivity. One simple interface I wanted to create was to have an html label display some particular text and next to this text there would be an edit button. When the user clicks on the edit button the current label is hidden and a text box is shown. Then when the text box loses focus or the user hits enter the text box will then be hidden and the label will be shown again. In this post I'll show you how this can easily be done:

If you would like to checkout a demo of this functionality, you can click on the following link: https://devdojo.com/go/examples/jquery-easy-editable-text-fields/ The jQuery code used to perform this functionality is fairly straight forward and I will go through these in further detail; alternatively, if you would just like to download the sample code you can scroll to the bottom to download a zipped version. jQuery Code:
$(document).ready(function(){

	$('.edit').click(function(){
		$(this).hide();
		$(this).prev().hide();
		$(this).next().show();
		$(this).next().select();
	});

	$('input[type="text"]').blur(function() {
         if ($.trim(this.value) == ''){
			 this.value = (this.defaultValue ? this.defaultValue : '');
		 }
		 else{
			 $(this).prev().prev().html(this.value);
		 }

		 $(this).hide();
		 $(this).prev().show();
		 $(this).prev().prev().show();
          });

	  $('input[type="text"]').keypress(function(event) {
		  if (event.keyCode == '13') {
			  if ($.trim(this.value) == ''){
				 this.value = (this.defaultValue ? this.defaultValue : '');
			 }
			 else
			 {
				 $(this).prev().prev().html(this.value);
			 }

			 $(this).hide();
			 $(this).prev().show();
			 $(this).prev().prev().show();
		  }
	  });

});
Okay, let's look at the first click function:
$('.edit').click(function(){
		$(this).hide();
		$(this).prev().hide();
		$(this).next().show();
		$(this).next().select();
	});
This event fires when the pencil(edit) button is clicked. When that happens the edit button is told to hide as well as the previous element (which is the text label). Then the next element (the text box) is said to be shown and selected. Pretty Simple. The next function will perform the functionality when the user clicks away from the text box. When the text box is blurred or loses focus the following event will be triggered.
$('input[type="text"]').blur(function() {
         if ($.trim(this.value) == ''){
			 this.value = (this.defaultValue ? this.defaultValue : '');
		 }
		 else{
			 $(this).prev().prev().html(this.value);
		 }

		 $(this).hide();
		 $(this).prev().show();
		 $(this).prev().prev().show();
     });
Okay now in this function if the value of the text box is blank we will assign the previous default value of the text box. If the value is not blank we will set the label value equal to the text box value. Finally anytime the text box loses focus we want to hide the text box and show the edit button and label again. Next we want to do add the same functionality to the text box, as we did in the previous step, when the user clicks the enter key:
$('input[type="text"]').keypress(function(event) {
		  if (event.keyCode == '13') {
			  if ($.trim(this.value) == ''){
				 this.value = (this.defaultValue ? this.defaultValue : '');
			 }
			 else
			 {
				 $(this).prev().prev().html(this.value);
			 }

			 $(this).hide();
			 $(this).prev().show();
			 $(this).prev().prev().show();
		  }
	  });
When the keycode '13' (enter key) is pressed on a textbox perform the same functionality we just covered in the previous step for the blur event. And there ya go! Not too complex, just a little jQuery functionality. Here are the resources for this code below.

Comments (0)