
Hello there! Today we will be integrating user authentication with your Node.js CLI, we will also cover how to create one, and we will make an API to authenticate user details! Without wasting much more time, let's go!
Creating our CLI
Start by creating a folder and initializing our project 🎉:
mkdir mycli
cd mycli
npm init -y
Now, let's make a test command like mycli-help, so to do that, create an index.js file and paste the following code:
#!/usr/bin/env node

console.log("Hello World!");
Simply, what we are doing here is adding the shebang which serves as a way for your operating system program loader to locate and use toe parse the correct interpreter for your executable file. This only works in Unix Systems though.
In computing, a shebang is the character sequence consisting of the character's number sign and exclamation mark (#!) at the beginning of a script.
From: Wikipedia: https://en.wikipedia.org/wiki/Shebang_(Unix)
And we are simply printing in the console Hello World!, so let's edit our package.json, so add this scripts JSON keypair:
  "scripts": {
    "start": "node index.js"
  }
And add this bin which tells the app which file should be run once this command is executed:
  "bin": {
    "mycli-help": "index.js"
  }
Now, let's install the CLI and give it a try:
 View Website
 View Website
 View Website
npm i . -g
mycli-help
You should get Hello World!, now let's uninstall it and work on our API 🚀:
npm uninstall mycli -g
Setting up our API + Prisma
Start by creating a new Next.js app using npx:
npx create-next-app
cd my-auth-api
After that, let's set up our Prisma schema and our MySQL database, so first of all let's get the database, for this guide, we will use PlanetScale or generally a MySQL database, it should be the same process, just update your Schema configs.
So, head over to PlanetScale and create a new database if you don't have one yet, it will take a few minutes to get ready, just be patient, once done, click on Connect, choose Prisma from the dropdown menu and copy the .env file content:
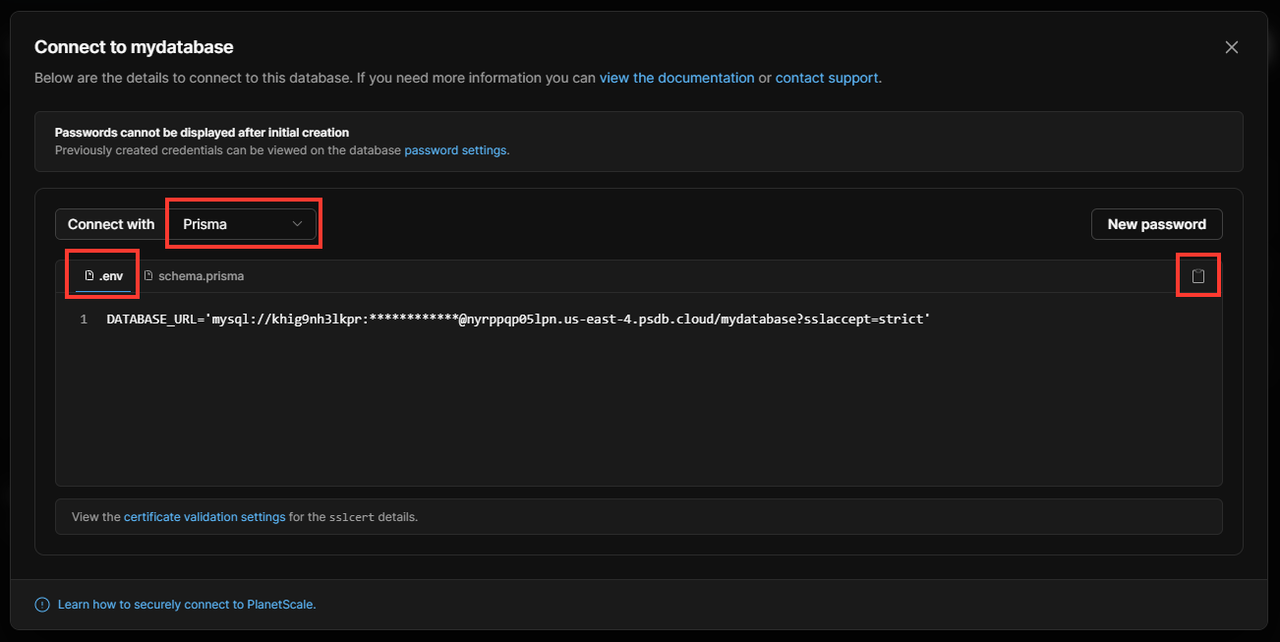
Now, let's create a .env file and paste the environment variables you just copied from PlanetScale. Now, let's setup Prisma 🚀:
yarn add prisma @prisma/client
Now, let's check out our prisma/schema.prisma and update the configs, etc. to the following:
generator client {
  provider = "prisma-client-js"
}

datasource db {
  provider = "mysql"
  url = env("DATABASE_URL")
  relationMode = "prisma"
}
Now, let's define our Account Model, like this:
model Account {
  id Int @default(autoincrement()) @id
  username String @unique
  password String
}
Now, let's sync our database 🚀:
npx prisma db push
Now, your database is in sync with your schema, now let's work on our API.
Now, remove the pages/api/hello.js file, and let's create a file in pages/api/ called auth.js, so it should be pages/api/auth.js
Now, place this code in the auth.js file:
import { PrismaClient } from '@prisma/client'

export default function handler(req, res) {
  if (!req.body.username || !req.body.password) {
    res.status(400).json({
      error: 'Please provide username and password'
    })
  }
  const prisma = new PrismaClient()
  const findAccount = async (username, password) => {
    const account = await prisma.account.findFirst({
      where: {
        username,
        password: password,
      },
    })
    if (!account) {
      return res.json({
        status: 'error authentication failed'
      })
    } else {
      return res.json({
        status: 'authorized',
        accountAuthorized: username
      })
    }
  }
  findAccount(req.body.username, req.body.password)
}
Simply, what we are doing here, first of all, we are importing the PrismaClient to use Prisma:
import { PrismaClient } from '@prisma/client'
And after that, we are making the API and defining the Prisma Client so that we can use Prisma in the API, also we are checking if the username and password are provided in JSON:
  if (!req.body.username || !req.body.password) {
    res.status(400).json({
      error: 'Please provide username and password'
    })
  }
  const prisma = new PrismaClient()
After creating the Prisma client, let's use it to check if a record in our model matches with the credentials sent in a JSON request which will be sent from our CLI, so we use findFirst to check for a matching record and don't worry, as long as the username is unique with the help of @unique, same passwords but for different accounts won't effect, so after checking for a matching record, we either get null for the value of account because there is no such record matching, so we use a condition to return a response in JSON telling that there is an error authenticating the user, and otherwise, we will get the record details including id, username, password in account, but we don't need all of this, so we return a response in JSON with a message telling that authentication was successful and we provide the username which has been successfully authorized for confirmation:
const findAccount = async (username, password) => {
    const account = await prisma.account.findFirst({
      where: {
        username,
        password: password,
      },
    })
    if (!account) {
      return res.json({
        status: 'error authentication failed'
      })
    } else {
      return res.json({
        status: 'authorized',
        accountAuthorized: username
      })
    }
  }
Now, we will run the function and provide username and password, which are in res.body:
findAccount(req.body.username, req.body.password)
Now, the API is good to go! Just run:
yarn dev
Authenticating the user from CLI
Now, we got an API running and waiting for someone to call! We have to get 2 things from the user, a (username) and a (password), so let's code it inside our index.js:
#!/usr/bin/env node

var args = process.argv.slice(2);
var username = args[0];
var password = args[1];

if (!username || !password) {
    console.log('Please provide username and password');
    console.log('Usage: mycli-auth <username> <password>');
    process.exit(1);
}

var request = require('request');
var options = {
    url: 'http://localhost:3000/api/auth',
    method: 'POST',
    json: {
        username: username,
        password: password
    }
}
request(options, function (error, response, body) {
    if (!error && response.statusCode == 200) {
        console.log(body);
    }
}
);
So what we are doing is that we are checking if username and password are provided when executing the command, so if both or one of the credentials aren't provided, we will log an error with expected usage and exit.
If they are both provided, we import request and set options where the API is running accepting JSON requests, setting the method to POST, and in the JSON which we will send, we provide username and password, and then if we get a JSON back with status code 200 which means OK, we return the JSON to the user in the console, which is fine, as long as our JSON response is human readable and understandable, you may configure this if you wish 😉.
Now, before trying it, just install request:
npm install request
Now, just edit mycli-help to mycli-auth in bin in the package.json file, it should be like this:
  "bin": {
    "mycli-auth": "index.js"
  }
Now, test it out! But first, run npx prisma studio and go to http://localhost:5000 and check the Account model, add a user record which you will be using to authenticate, done? Now:
npm i . -g
mycli-auth <username> <password>
And.... congrats 🎉, you have successfully made your authentication feature!
Try it - No setup!
Just install from NPM:
npm i nodejs-cli-prisma-auth -g
And try authorizing with the sample admin user:
mycli-auth admin supersecret123
And kaboom 💥! Even here is the GitHub Repo: Omar8345/nodejs-prisma-auth!
Thanks for reading this article ✨, hope you learned something useful today!
Comments (0)