
PixiJS is an open source html5 game and animation framework for creating visual interfaces. It has been used on a lot of popular game and interactive websites. It's pretty cool to see the things you can build with Pixi. Here are a few examples of things you can build.
In this tutorial I will show you how to create your first PixiJS application. Let's dive into it.
🛠 Your First App
Here is what we'll be creating in this first example 👇
In thie example we have a simple index.html file with the following contents:
<!doctype html>
<html>
  <head>
    <style>
        body{
            background:#000000;
        }
    </style>
    <script src="https://pixijs.download/release/pixi.min.js"></script>
  </head>
  <body>
    <script>
      // Create a new pixi app and append it to the body
      let app = new PIXI.Application({ width: 640, height: 360 });
      document.body.appendChild(app.view);

      // Create a sprite and add it to the stage
      let sprite = PIXI.Sprite.from('sample.png');
      app.stage.addChild(sprite);

      // Add a ticker loop that moves the spaceship back and forth
      let elapsed = 0.0;
      app.ticker.add((delta) => {
        elapsed += delta;
        sprite.x = 100.0 + Math.cos(elapsed/50.0) * 100.0;
      });
    </script>
  </body>
</html>
As you can see above we have included the Pixi.js CDN link to the head of the document:
<script src="https://pixijs.download/release/pixi.min.js"></script>
Next, we create our first Pixi application and append it to the body of our document:
let app = new PIXI.Application({ width: 640, height: 360 });
document.body.appendChild(app.view);
Then, we need to create our first sprite or image and add it to the stage.
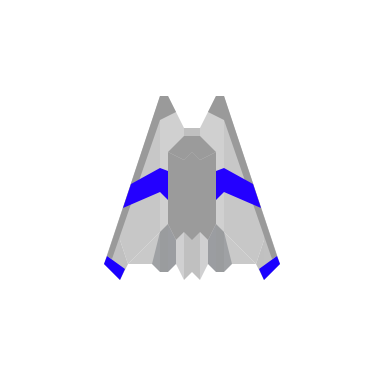
let sprite = PIXI.Sprite.from('https://cdn.devdojo.com/images/june2022/sample.png');
app.stage.addChild(sprite);
Here is the image that we are loading from our example 📸
 View Website
 View Website
 View Website
Finally, we create our ticker loop and move the sprite back and forth.
let elapsed = 0.0;
app.ticker.add((delta) => {
    elapsed += delta;
    sprite.x = 100.0 + Math.cos(elapsed/50.0) * 100.0;
});
That's all there is to it 👏 We've just created our first PixiJS application. In this example we have seen that you can add a sprite to the screen and move it back and forth. What about drawing graphics to the screen? That's simple enough, let's cover that next.
Similar guides can also be found on the PixiJS guides documentation.
✍️ Drawing Shapes on the Screen
Drawing simple shapes to the screen is very easy with Pixi. Here is a quick example of how we can draw a square or rectangle to the screen.
This can easily be accomplished with the following code:
<!doctype html>
<html>
  <head>
    <style>
        body{
            background:#000000;
        }
    </style>
    <script src="https://pixijs.download/release/pixi.min.js"></script>
  </head>
  <body>
    <script>
        // Create the Pixi Application
        const app = new PIXI.Application({
            width: 640,
            height: 360,
            backgroundColor: 0xffffff
        });

        // Create a Graphics object, set a fill color, draw a rectangle
        let obj = new PIXI.Graphics();
        obj.beginFill(0xff0000);
        obj.drawRect(10, 10, 100, 100);

        // Add it to the stage to render
        app.stage.addChild(obj);

        // Add the application to the body
        document.body.appendChild(app.view);
    </script>
  </body>
</html>
Let's quickly breakdown what's happening. After we include the CDN link to the pixi JS library, we are creating our Pixi application:
const app = new PIXI.Application({
    width: 640,
    height: 360,
    backgroundColor: 0xffffff
});
As you'll see above we've added the width and height along with specifying our backgroundColor.
Next, we draw a new shape to the screen using the new PIXI.Graphics(); function. We specify the fill color and where we want it to be positioned.
let obj = new PIXI.Graphics();
obj.beginFill(0xff0000);
obj.drawRect(10, 10, 100, 100);
Finally, we add the shape to the stage and append our application to our document.
app.stage.addChild(obj);
document.body.appendChild(app.view);
Pretty cool stuff, right! If you want to learn more about the different shapes you can draw to the screen, be sure to checkout the documentation on using the PIXI.Graphics() library here.
Next, what if we wanted to add some keyboard interaction to our Pixi application, that's pretty simple as well, how about we cover that next.
⌨️ Handling Keyboard Input
In order to capture keyboard input, we need to utilize the keydown and keyup event listeners and attach our desired functionality when the keys are pressed. We can easily do this and move an object around the screen. Here is a quick example of what we'll create in this section 👇
As you can see, when you press on the keys, the red square will move around the screen. In this example, there is no velocity so you have to press the key each time and then release it to get the block to move. In the next section we'll cover this; however, let's first see what this code from the above example looks like:
<!doctype html>
<html>
  <head>
    <style>
        body{
            background:#000000;
        }
    </style>
    <script src="https://pixijs.download/release/pixi.min.js"></script>
  </head>
  <body>
    <script>
        // Create the Pixi Application
        const app = new PIXI.Application({
            width: 640,
            height: 360,
            backgroundColor: 0xffffff
        });

        // Add the application to the body
        document.body.appendChild(app.view);

        let x = 10;
        let y = 10;
        // Create a Graphics object, set a fill color, draw a rectangle
        let obj = new PIXI.Graphics();
        obj.beginFill(0xff0000);
        obj.drawRect(x, y, 100, 100);

        // Add it to the stage to render
        app.stage.addChild(obj);

        function start() {
            // Define the keyboard code variables
            const left = keyboard(37),
                up = keyboard(38),
                right = keyboard(39),
                down = keyboard(40);

            left.press = () => {
                x -= 20;
            };
            left.release = () => {};

            right.press = () => {
                x += 20;
            };
            right.release = () => {};

            up.press = () => {
                y -= 20;
            };
            up.release = () => {};

            down.press = () => {
                y += 20;
            };
            down.release = () => {};

            app.ticker.add((delta) => gameLoop(delta));
        }

        function gameLoop(delta) {
            obj.x = x;
            obj.y = y;
        }

        // The keyboard helper
        function keyboard(keyCode) {
            const key = {};
            key.code = keyCode;
            key.isDown = false;
            key.isUp = true;
            key.press = undefined;
            key.release = undefined;

            // Key is pressed
            key.downHandler = (event) => {
                if (event.keyCode === key.code) {
                    if (key.isUp && key.press) {
                        key.press();
                    }
                    key.isDown = true;
                    key.isUp = false;
                }
                event.preventDefault();
            };

            // Key is released
            key.upHandler = (event) => {
                if (event.keyCode === key.code) {
                    if (key.isDown && key.release) {
                        key.release();
                    }
                    key.isDown = false;
                    key.isUp = true;
                }
                event.preventDefault();
            };

            // Attach keydown and keyup event listeners
            window.addEventListener("keydown", key.downHandler.bind(key), false);
            window.addEventListener("keyup", key.upHandler.bind(key), false);
            return key;
        }

        start();
    </script>
  </body>
</html>
We've already covered how we create a Pixi application and append it to the document body, so in this step we'll explain how the three main functions start(), gameLoop(), and keyboard() function.
In the start() function we are capturing all the key codes we want to watch for and then we can handle the press and the release of that specific key accordingly with these callbacks:
left.press = () => {};
left.release = () => {};
Next, we are calling our application ticker loop and assigning that to the gameLoop() function:
app.ticker.add((delta) => gameLoop(delta));
Our gameLoop() function will then update the x and y position of our square.
function gameLoop(delta) {
    obj.x = x;
    obj.y = y;
}
Finally, we have our keyboard() handler which adds the event listener for each of our keys and it also provides us with our .press() and .release() function callbacks.
function keyboard(keyCode) {
    const key = {};
    key.code = keyCode;
    key.isDown = false;
    key.isUp = true;
    key.press = undefined;
    key.release = undefined;

    // Key is pressed
    key.downHandler = (event) => {
        if (event.keyCode === key.code) {
            if (key.isUp && key.press) {
                key.press();
            }
            key.isDown = true;
            key.isUp = false;
        }
        event.preventDefault();
    };

    // Key is released
    key.upHandler = (event) => {
        if (event.keyCode === key.code) {
            if (key.isDown && key.release) {
                key.release();
            }
            key.isDown = false;
            key.isUp = true;
        }
        event.preventDefault();
    };

    // Attach keydown and keyup event listeners
    window.addEventListener("keydown", key.downHandler.bind(key), false);
    window.addEventListener("keyup", key.upHandler.bind(key), false);
    return key;
}
This function allows us to detect when a key is being pressed, if it's still being pressed, and if it has been released. This will allow us to add some nice functionality into our keypresses, such as velocity. That takes us to the final example in this tutorial where we will add a mario character to the screen and allow him to move around with the keyboard.
🕹 Moving a Character around the screen
In this last example we are going to add a mario character to our screen and allow him to move around nicely when we press our directional keys. Here is an example of what we'll be creating in this part 👇
As you can see above, we have a mario character that can move around the screen. In this example we are using velocity so the character movements are smooth and not rigid like we seen in the previous example. Here is the code that we used to accomplish this functionality:
<!doctype html>
<html>
  <head>
    <style>
        body{
            background:#000000;
        }
    </style>
    <script src="https://pixijs.download/release/pixi.min.js"></script>
  </head>
  <body>
    <script>
        // Create the Pixi Application
        const app = new PIXI.Application({
            width: 640,
            height: 360,
            backgroundColor: 0xffffff
        });

        let loader = PIXI.Loader.shared.add("https://cdn.devdojo.com/images/june2022/character.png").load(start);

        // Add the application to the body
        document.body.appendChild(app.view);

        let x = 10;
        let y = 10;
        // Create a Graphics object, set a fill color, draw a rectangle
        let obj = new PIXI.Graphics();
        obj.beginFill(0xff0000);
        obj.drawRect(x, y, 100, 100);

        // Add it to the stage to render
        // app.stage.addChild(obj);

        let mario = null;

        function start() {

            // Create the `mario` sprite
            mario = new PIXI.Sprite(PIXI.Loader.shared.resources["https://cdn.devdojo.com/images/june2022/character.png"].texture);
            mario.y = 290;
            mario.vx = 0;
            mario.vy = 0;
            app.stage.addChild(mario);

            // Define the keyboard code variables
            const left = keyboard(37),
                up = keyboard(38),
                right = keyboard(39),
                down = keyboard(40);

            left.press = () => {
                mario.vx = -5;
                mario.vy = 0;
            };
            left.release = () => {
                // If left is released and right key is not down and vy is equal to 0
                if (!right.isDown && mario.vy === 0) {
                    mario.vx = 0;
                }
            };

            right.press = () => {
                mario.vx = 5;
                mario.vy = 0;
            };
            right.release = () => {
                if (!left.isDown && mario.vy === 0) {
                    mario.vx = 0;
                }
            };

            up.press = () => {
                mario.vy = -5;
                mario.vx = 0;
            };
            up.release = () => {
                if (!down.isDown && mario.vx === 0) {
                    mario.vy = 0;
                }
            };

            down.press = () => {
                mario.vy = 5;
                mario.vx = 0;
            };
            down.release = () => {
                if (!up.isDown && mario.vx === 0) {
                    mario.vy = 0;
                }
            };

            app.ticker.add((delta) => gameLoop(delta));
        }

        function gameLoop(delta) {
            // Use the mario's velocity to make it move
            mario.x += mario.vx;
            mario.y += mario.vy
        }

        // The keyboard helper
        function keyboard(keyCode) {
            const key = {};
            key.code = keyCode;
            key.isDown = false;
            key.isUp = true;
            key.press = undefined;
            key.release = undefined;

            // Key is pressed
            key.downHandler = (event) => {
                if (event.keyCode === key.code) {
                    if (key.isUp && key.press) {
                        key.press();
                    }
                    key.isDown = true;
                    key.isUp = false;
                }
                event.preventDefault();
            };

            // Key is released
            key.upHandler = (event) => {
                if (event.keyCode === key.code) {
                    if (key.isDown && key.release) {
                        key.release();
                    }
                    key.isDown = false;
                    key.isUp = true;
                }
                event.preventDefault();
            };

            // Attach keydown and keyup event listeners
            window.addEventListener("keydown", key.downHandler.bind(key), false);
            window.addEventListener("keyup", key.upHandler.bind(key), false);
            return key;
        }

        start();
    </script>
  </body>
</html>
This code is very similar to our previous example except we are using a Sprite instead of a rectangle and we are using Velocity to move the character. Here is the code that we used to load our sprite:
mario = new PIXI.Sprite(PIXI.Loader.shared.resources["https://cdn.devdojo.com/images/june2022/character.png"].texture);
Then, when we want our character to move around the screen in the game loop we are increasing or decreasing the velocity so that way our character moves really smooth.
function gameLoop(delta) {
    // Use the mario's velocity to make it move
    mario.x += mario.vx;
    mario.y += mario.vy;
}
You can feel free to modify the movement to make it faster or slower. From here you'll probably want to add some collision detection and instead of the character moving up and down you may want to add some gravity.
🎬 Conclusion
This is the end of the tutorial. I hope you found this useful and I hope that you'll use this knowledge to create the next awesome game or interactive widget.
Be sure to check out the PixiJS guides and documentation because they are a great resource for learning all about this amazing library.
Comments (0)