
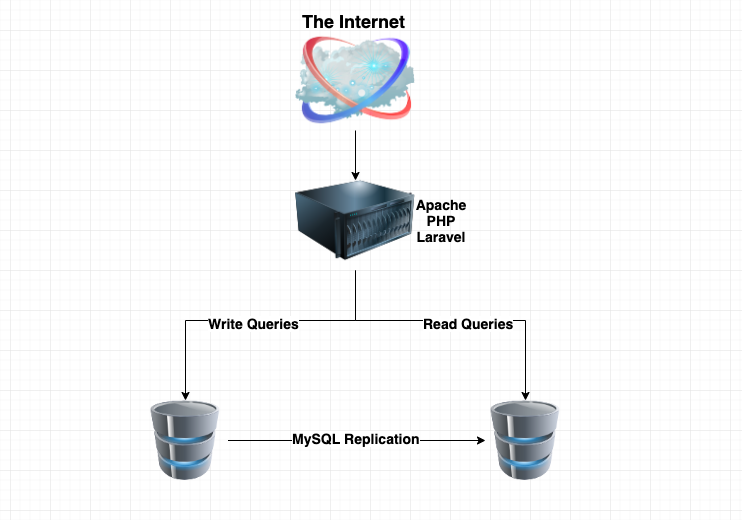
In this tutorial I'll show you how you could horizontally scale up your Laravel application by adding multiple database instances.
In case you are not familiar with the term 'horizontal scaling', it simply means that you scale up by adding more machines to your setup where 'vertical scaling' means that you scale by adding more power (CPU, RAM) to your current virtual machine.
For this demo I will setup the following:
- 1 CentOS server for my Apache, PHP and Laravel setup
- 2 MySQL servers with Master-Slave replication
- Configure Laravel to work with the Master-Slave setup
Prerequisites
- You would need 3 CentOS servers.
As I'll deploy the setup on Digital Ocean, if you do not already have an account you can use my referal link to get a free $50 credit that you could use to deploy your virtual machines and test this setup yourself on a few Digital Ocean servers:
Steps
The steps that we would take in this tutorial are:
- Deploy 3 servers on Digital Ocean - 1 Web Server and 2 Database Servers
- Install and Configure our Web server - Install Apache, PHP and Laravel
- Install and configure our database servers along with our MySQL replication
- Configure Laravel to work with the Master-Slave MySQL setup
- Install the Voyager admin panel on the new setup
That's pretty much it! At the end we would have something like this:
1. Deploy 3 servers on Digital Ocean
Once you've got your free $50 Digital Ocean credit go to your Digital Ocean dashbord then hit the 'Create Droplet' button and simply deploy 3 CentOS 7.x servers. Make sure that you keep a good naming convension, here's an example:
 View Website
 View Website
 View Website
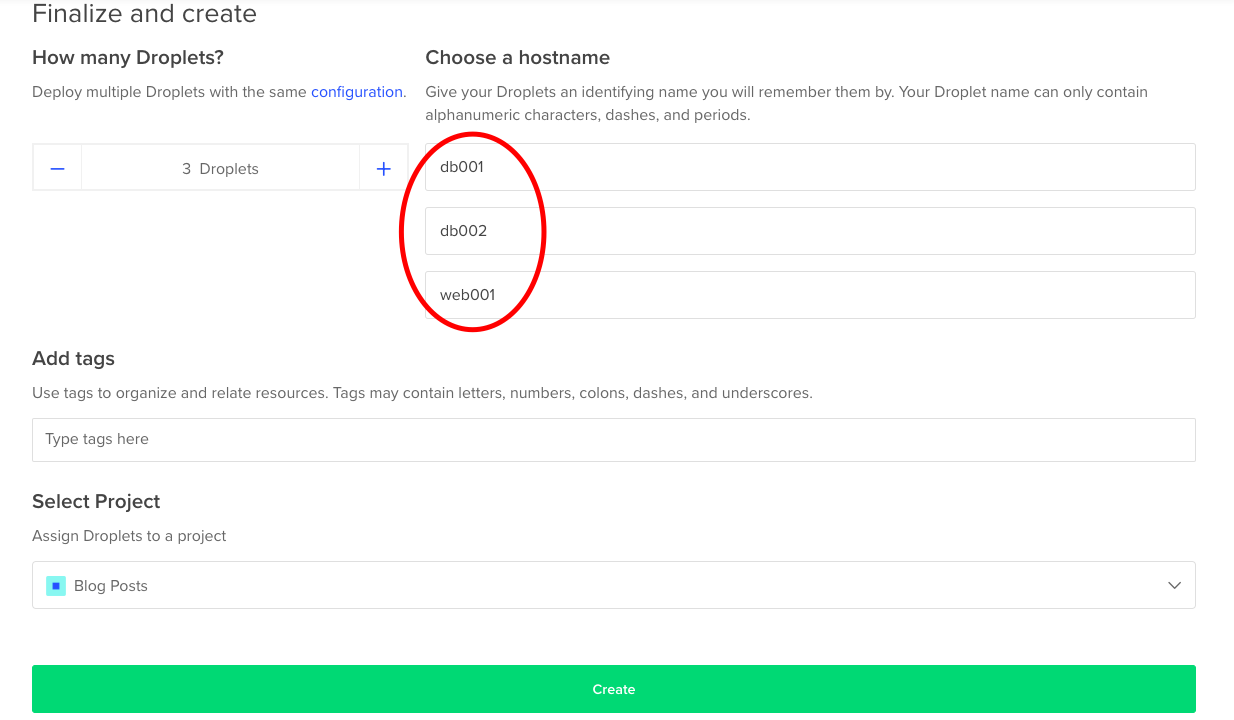
After that hit the 'Create' button. It would take less than 30 seconds for the VMs to be deployed.
Note that your droplet IPs!
2. Install and Configure our Web server
Let's begin with our web server configuration. Get your web server's IP address via your Digital Ocean control panel and SSH to the droplet.
2.1 Prepare our repositories
We would start by adding a few repositories which contain updated packages. This would allow us to install PHP 7.2. The two repos are called REMI and EPEL. To do that we just need to run the following commands in order to install and enable those repositories:
yum install epel-release
yum install http://rpms.remirepo.net/enterprise/remi-release-7.rpm
yum install yum-utils
yum-config-manager --enable remi-php72yum update -y2.2 Install Apache
We would really quickly deploy Apache and PHP. You can do that by running the following commnads:
yum install httpd -yThen start, enable and check the status of your Apache installation:
systemctl start httpd
systemctl enable httpd
systemctl status httpd
The output that you would see should look something like this:

2.3 Install PHP
After that install PHP:
yum install php php-zip php-mysql php-mcrypt php-xml php-mbstring2.4 Install Composer
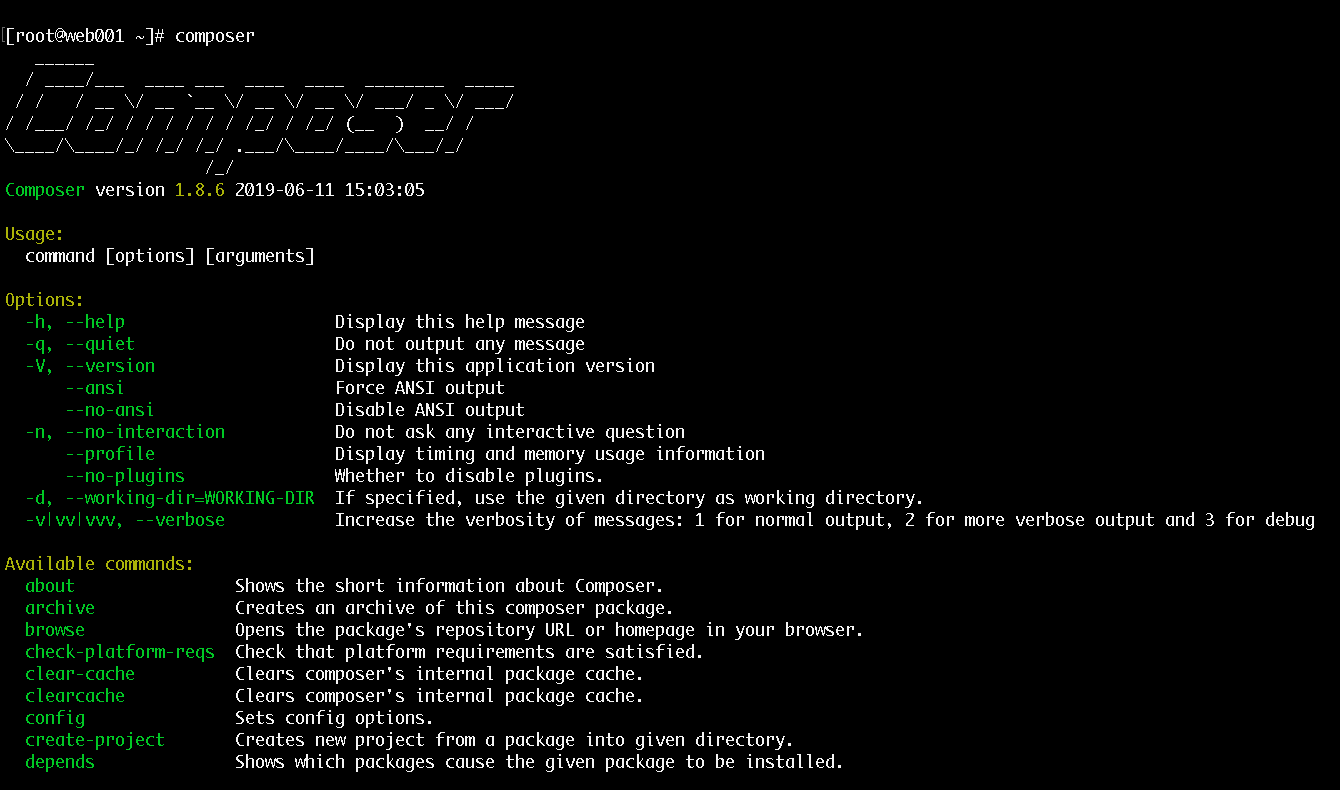
We would use Composer to install Laravel and its dependencies:
curl -sS https://getcomposer.org/installer | php
mv composer.phar /usr/bin/composer
chmod +x /usr/bin/composer
After that if you jusr tun composer you would see a simliar output:
2.5 Install Laravel
Once we have composer we can simply run this command here to install Laravel:
cd /var/www

composer create-project --prefer-dist laravel/laravel bobbyiliev
It might take a while for the installation to complete. Once it's done we can proceed with the final Apache configuration changes
2.6 Configure Apache
The best approach would be to create a virtual host for your domain name. I will be using devdojo.bobbyiliev.com
To do that you just need to add the following to the bottom of the file in the /etc/httpd/conf/httpd.conf file:
NOTE: change bobbyiliev with the path to your project!
<VirtualHost *:80>
       ServerName devdojo.bobbyiliev.com
       DocumentRoot /var/www/bobbyiliev/public

       <Directory /var/www/bobbyiliev>
              AllowOverride All
       </Directory>
</VirtualHost>
Then make sure that your permissions are set correctly:
chown -R apache.apache /var/www/bobbyiliev
chmod -R 755 /var/www/bobbyiliev/storage
chcon -R -t httpd_sys_rw_content_t /var/www/bobbyiliev/storage
setsebool httpd_can_network_connect_db 1
Finally run a config test and restart Apache:
apachectl -t
systemctl restart httpd
Then you should be able to see your Laravel app by visiting your domain name:
Install and configure our database servers along with our MySQL replication
We will start with the MySQL installation, the easiest way to do that is to just run these commands here on both of your database servers:
yum localinstall https://dev.mysql.com/get/mysql57-community-release-el7-11.noarch.rpm
yum install mysql-community-server
Then start your MySQL instance and make sure that it's enabled:
systemctl enable mysqld
systemctl start mysqld
After that to get your MySQL password just run:
grep 'temporary password' /var/log/mysqld.logThen secure your MySQL installation and set your root MySQL password:
mysql_secure_installationNote that you need to do this on both servers!
Once you have your MySQL running and you've got your passwords it's time to proceed with the replication setup.
Here's a really quick guide on how to install and configure your MySQL servers with MySQL Master to Slave replication:
CentOS MySQL Master-Slave Replication - Step by Step
Once you have your SQL servers and replication ready go ahead and create your database and database user that we would be using for our Laravel appliaction on your master database server.
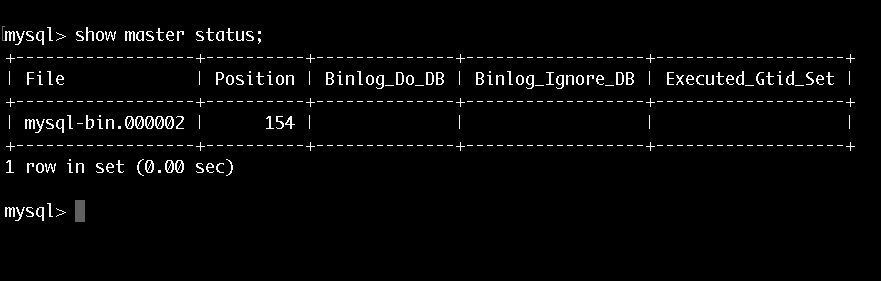
Verify that you are on the master:
mysql> show master status;You should see someting like this:
After that go ahead and create your laravel database and user:
mysql> CREATE DATABASE laravel_db;
mysql> GRANT ALL PRIVILEGES ON laravel_db.* TO 'larave_user'@'%' IDENTIFIED BY 'Laravel_Pa55word_here!';
mysql> FLUSH PRIVILEGES;
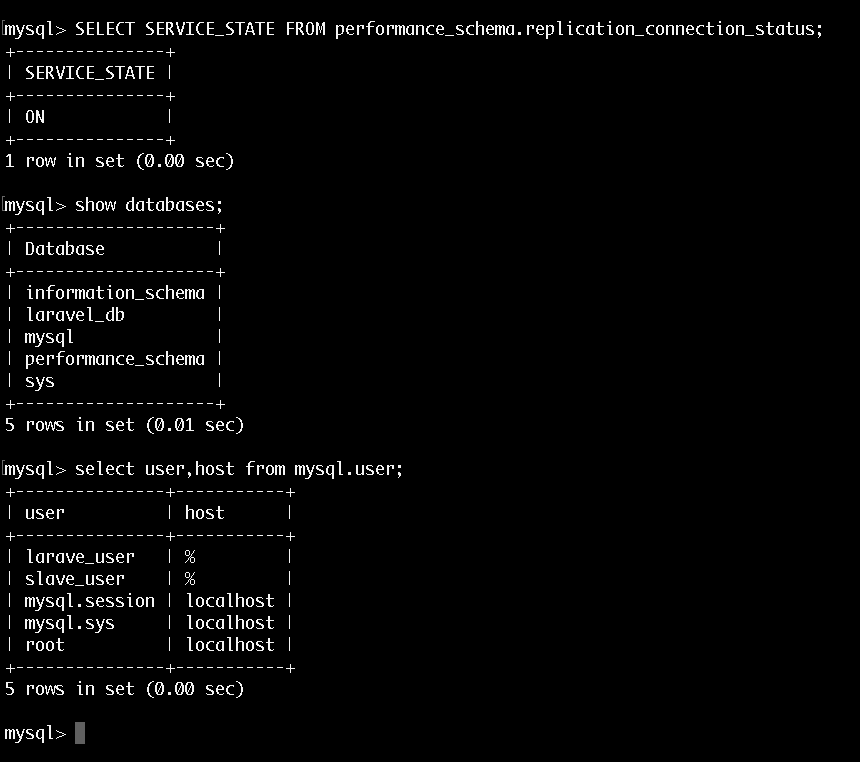
mysql> EXIT;Now if you've setup your MySQL replication correctly you would have to do this only on your Master server and the changes will be replicated to your slave server, here's an example if I check the slave now:
That is pretty mich it with the MySQL replication! We now have two MySQl servers: one is a master and one is a slave and all changes from the master are being replicated over to the slave.
Configure Laravel to work with the Master-Slave MySQL setup
Now that we have our Web server ready and our database servers ready as well, we can proceed and actually setup our Laravel application to work with our three servers.
You now need to get back to your web server and configure your Laravel application so that all write queries go to your Master and all read queries go to your slave server.
First in your .env file update your database user and password and comment out the DB_HOST part:
DB_CONNECTION=mysql
#DB_HOST=127.0.0.1
DB_PORT=3306
DB_DATABASE=laravel_db
DB_USERNAME=larave_user
DB_PASSWORD=Laravel_Pa55word_here!
After that in your config/database.php file under the mysql section specify your write and read servers:
        'mysql' => [
	    'read' => [
	        'host' => [
	            '157.230.25.155',
	        ],
	    ],
	    'write' => [
	        'host' => [
        	    '139.59.155.119',
	         ],
	    ],
The file should look something like that after your change:
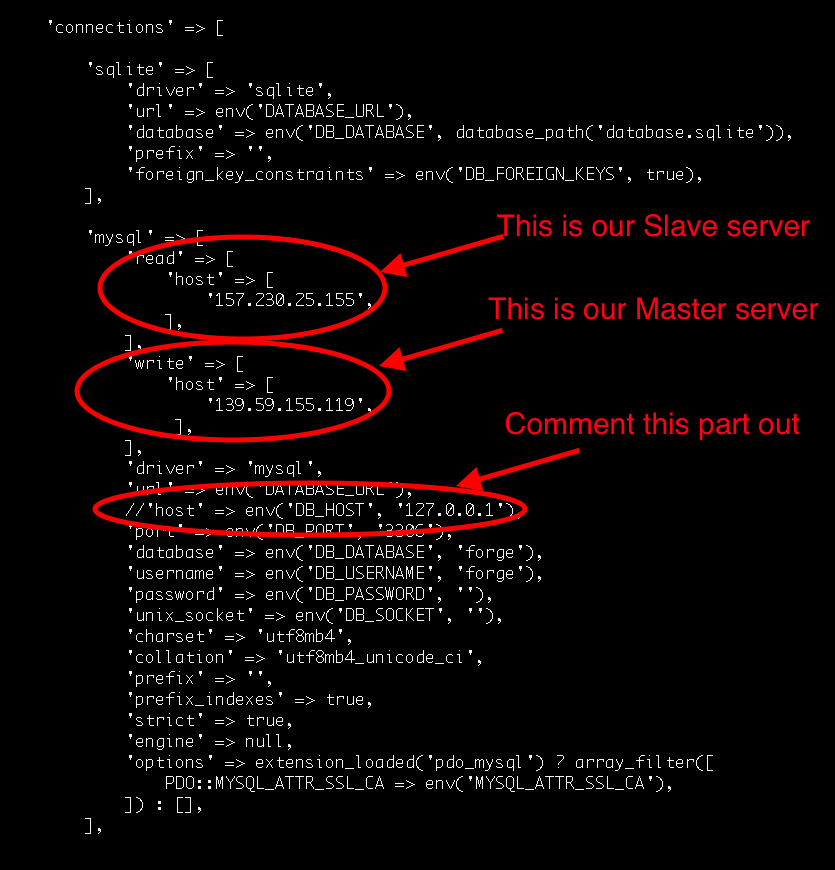
NOTE: you need to comment out or remove the host part after the url as we've specified that in the write and wirte section.
Now this is pretty much all we have to do! It's time to test our setup!
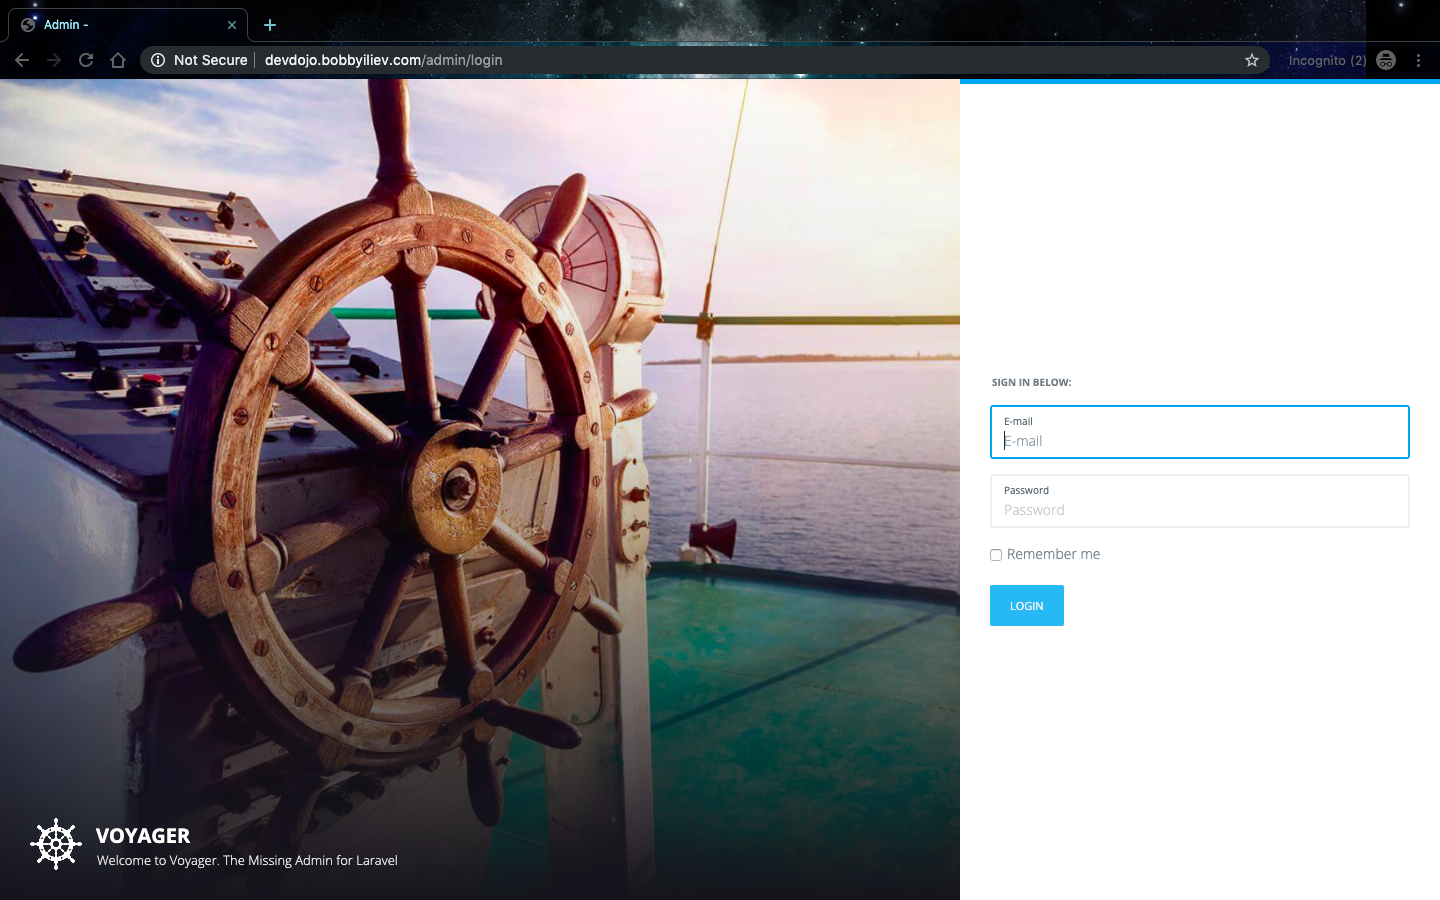
Install the Voyager admin panel on the new setup
Voyager is super easy to install. After creating your new Laravel application you can include the Voyager package with the following command:
composer require tcg/voyagerYou will also want to update your website URL inside of the APP_URL variable inside the .env file:
APP_URL=http://devdojo.bobbyiliev.comNext, add the Voyager service provider to the config/app.php file in the providers array:
'providers' => [
    // Laravel Framework Service Providers...
    //...

    // Package Service Providers
    TCG\Voyager\VoyagerServiceProvider::class,
    // ...

    // Application Service Providers
    // ...
],
Then finally yo install Voyager with dummy data simply run
php artisan voyager:install --with-dummyIf you followed the steps correctly you should now be able to browse through your voyager app and in the background the app would be using the three servers that we've configured!
Conclusion
Now you have your laravel application deployed on 1 Webserver and 2 Database servers. That way you can always easily scale up by adding more slave servers by just adding the new slave IP in your read servers array in your config/database.php file.
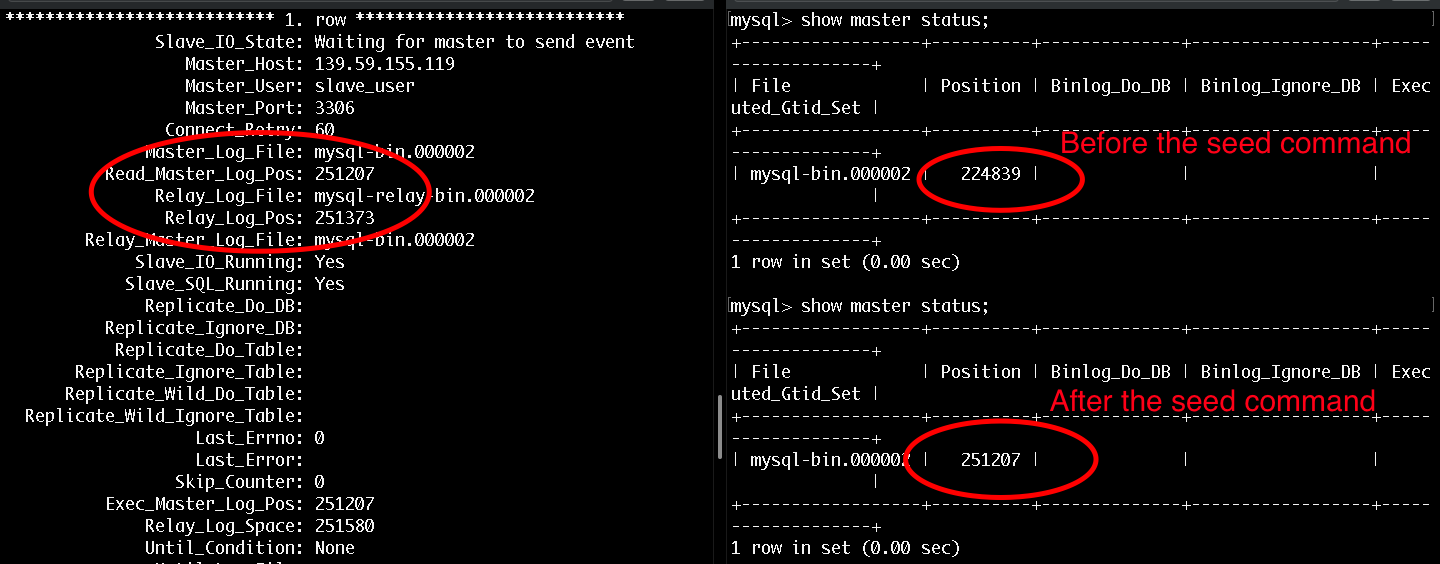
If you would like to actually check if the replication is working you can do the following:
1. Connect to the three servers
2. On the master server run:
show master status3. Note down the master position
4. On the slave server run:
show slave status \G5. Note down the Read_Master_Log_Pos and make sure that it matches the master position!
6. Then on your webserver you could run your database seeders again so that this would make some new in the database:
php artisan migrate:fresh --seed7. Go back to your database servers, check the values again and watch how the numbers change!
Hope that this helps! If you have any questions feel free to reach out to me!
Comments (0)