
Abstract
Did you ever go to ShaderToy and be blown away by the amazing stuff people are able to make with shaders? A lot of them use a technique called raymarching. Today, we will see how we can use some cool shaders from ShaderToy or ones that we developed ourselves in the context of three.js
Disclaimer: I am not a raymarching expert, I just learnt the basic stuffs to be able to make it work in the three.js ecosystem. If you do not know what is raymarching in details, I recommend you TheArtOfCode Youtube Channel or Michael Walczyk blog for more details about the theory of the raymarching technique. Here we will just see the integration part.
Feel free to contact me on twitter if you liked or disliked the post, if you found some of the things blurry, some typos, ...
Thank you in advance. ✨
Process introduction 📐
Reminder: What is raymarching in first place?
It's a technique that involves view rays extrapolated from the camera, along which we are going to march forward, to see if there is intersections with specific surfaces. These specific surfaces are defined by SDF (a.k.a. Signed distance functions). A ray is composed of two properties: An origin (the starting point) and a direction. The raymarching algorithm will take in input these two components.
If all of this is really new to you, you may have trouble to follow along, because I don't go in depth about the raymarching theory. Go back to the abstract and follow the links I put for you !
How to get the rays properties?
Let's put aside how we get the rays for a moment, and remember about the rendering pipeline.
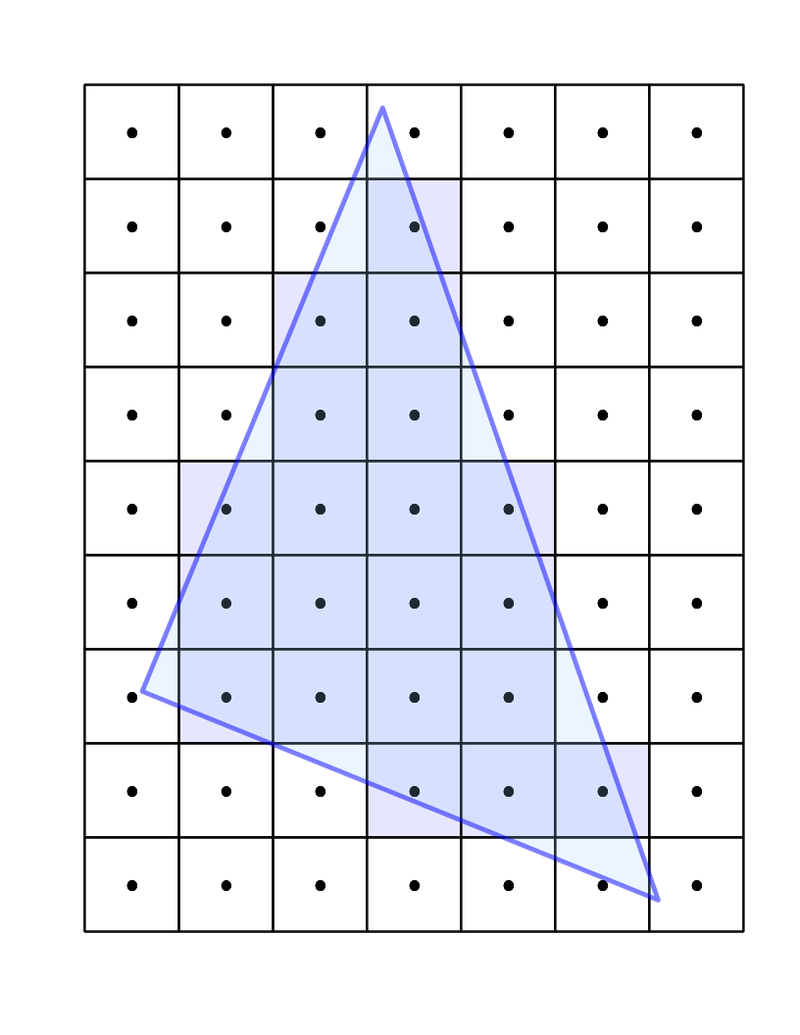
First, our vertex shader will run on each vertex of our primitive. Then, down the rendering pipeline, we get a lot of fragments. On each fragment, the fragment shader will be runned, with in inputs some interpolated values coming from the vertex shader.
 View Website
 View Website
 View Website
In each fragment, we will run the raymarcher. So basically, in each fragment, we will get a different ray, that we will follow along. Then, we will test intersections inside the raymarching loop, and determine the pixel color that we need to render in this direction.
The plan to make our raymarcher work in the context of three.js is to calculate each ray in the vertex shader from the real three.js camera. Then, pass down to the fragment shader through varying the ray origin and the ray direction.
**Reminder: The fragment shader will interpolate the values passed in varying. For the ray origin, it is the camera position for everyone, so it will be a constant value. For the ray direction, it will be interpolated from the calculation done in the vertex shader. Each fragment will have a specific ray direction. It is exactly what we need to make the raymarcher work in our context ! **
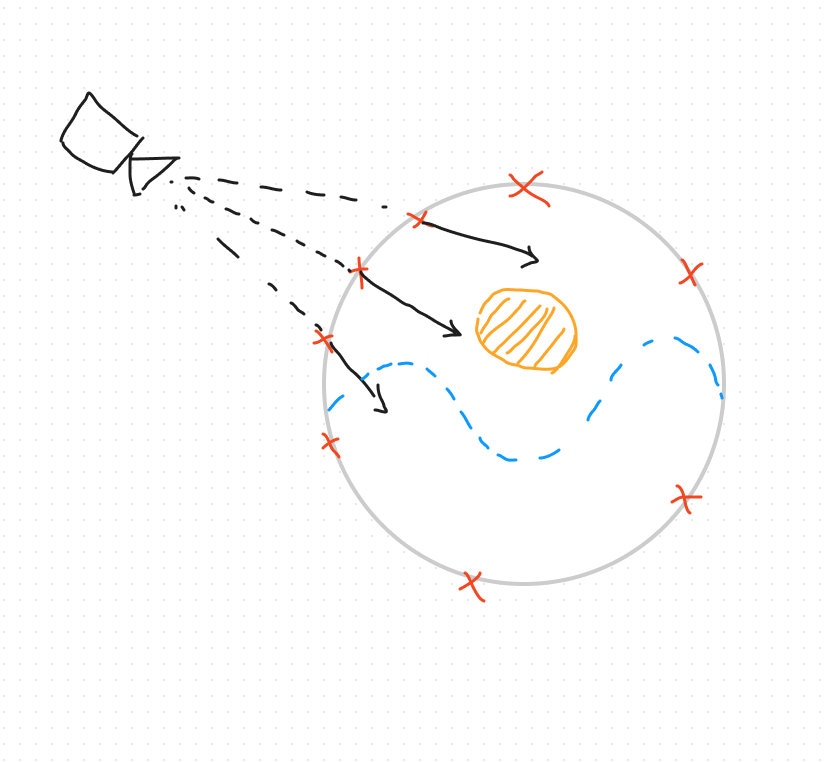
A little drawing could help no ?
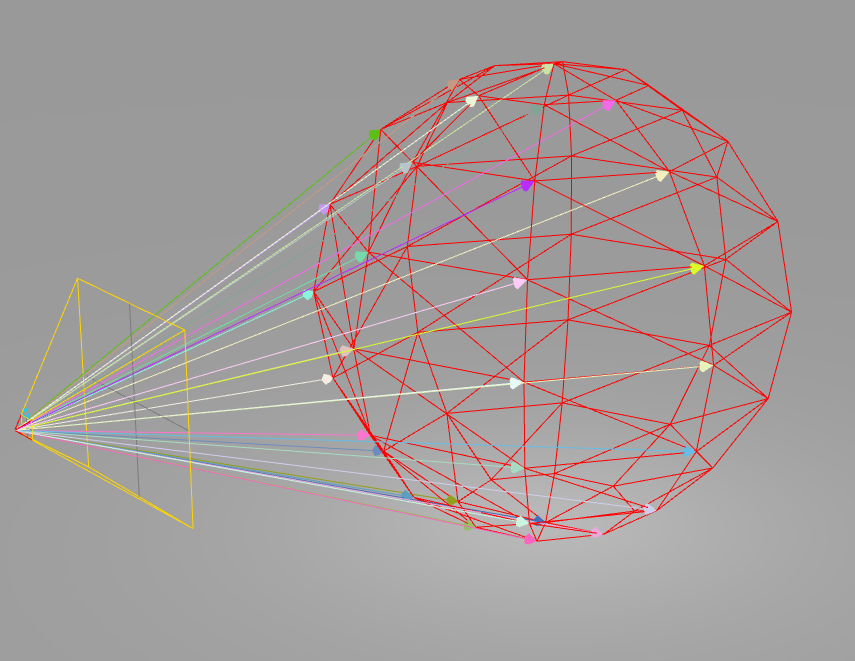
Each arrow you see on the picture is a ray. It is basically what will happen in the vertex shader. Each arrow will be the result of the vertex shader calculation. Then each arrow will be interpolated before feeding the fragment shader.
The formulas for the ray is very simple:
The ray origin is the camera world position or the vertex local position depending of the raymarching effect you want. Taking the local vertex position will ensure that you have the same effect even if you move the sphere around in the scene. Taking the camera world position will make the effect inside different depending on the position of the object in the world space.
There is no right or wrong, just matter of the effect you want to be performed in the sphere.
The ray direction is given by rayDirection = normalize(vertexWorldPosition - cameraWorldPosition). Just make sure that you have every coordinates in the same space.
We normalize the vector, to have a unit length.
Implementation ⚙️
Setting up the material
   const material = new THREE.ShaderMaterial({
      vertexShader: vertexShader,
      fragmentShader: fragmentShader,
      uniforms: {
        uResolution: {
          value: new THREE.Vector2(window.innerWidth, window.innerHeight),
        },
        uTime: {
          value: 0,
        },
      },
    });

    const sphere = new THREE.Mesh(
      new THREE.SphereGeometry(2, 32, 32),
      material
    );
    sphere.position.setY(2);

    this.scene.add(sphere);
Don't forget to add the update part of the uTime uniforms in the render loop: It should look like this:
material.uniforms.uTime.value = elapsedTime;
Vertex shader
varying vec3 vPosition;
varying vec3 vDirection;
varying vec3 vNormal;
void main() {
  vec3 worldPosition = (modelMatrix * vec4(position, 1.0)).xyz;
  vDirection = normalize(worldPosition - cameraPosition);
  vPosition = position;
  vNormal = normal.xyz;
  gl_Position = projectionMatrix * viewMatrix * modelMatrix * vec4(position, 1.0);
}
First we calculate the world position of the vertex by multiplying the modelMatrix to the vertex coordinates.
Then we prepare the varyings that will be interpolated before the fragment shader. vDirection is the ray direction from the camera to the vertex world position like we talked about in the previous section. vPosition is the ray origin. It is the position of the vertex in local space so we ensure that the effect is local to the sphere, and not depending on the position in world space or the camera in world space.
Basically, it is what we are trying to build.
Raymarching algorithm
We will use TheArtOfCode raymarcher for it. Like I said, if you are not familiar with the code of the raymarching algorithm, check out his videos. Here, a part of the fragment shader.
uniform float uTime;
uniform vec2 uResolution;

varying vec3 vPosition;
varying vec3 vDirection;
varying vec3 vNormal;

#define MAX_STEPS 100
#define MAX_DISTANCE 100.
#define SURFACE_DISTANCE .01


float smin( float a, float b, float k ) {
    float h = clamp( 0.5+0.5*(b-a)/k, 0., 1. );
    return mix( b, a, h ) - k*h*(1.0-h);
}

float getDistance(vec3 currentPosition) {
    vec4 sphere = vec4(0, 3, 3, 0.5);

    float sphereDistance = length(currentPosition - sphere.xyz) - sphere.w; // sphere.w === radius of the sphere

    float planeDistance = dot(vec3(currentPosition.x, currentPosition.y - 2. - sin(currentPosition.x + uTime * 0.002) * 0.6 , currentPosition.z), normalize(vec3(0,1,0)));
    //float planeDistance = currentPosition.y; //Plane is ground position so it is minus 0
    float safeDistance = smin(sphereDistance, planeDistance, 0.7);

    return safeDistance;
}
vec3 getNormal(vec3 currentPosition) {
    float d = getDistance(currentPosition);

    vec2 epsilon = vec2(.01, 0);

    vec3 n = d - vec3(
        getDistance(currentPosition - epsilon.xyy),
        getDistance(currentPosition - epsilon.yxy),
        getDistance(currentPosition - epsilon.yyx)
    );

    return normalize(n);
}


float getLight(vec3 currentPosition) {
    vec3 lightPosition = vec3(0,5,6);
    lightPosition.xz += vec2(sin(uTime * 0.001 ), cos(uTime  * 0.001)) * 2.;

    vec3 lightVector = normalize(lightPosition - currentPosition);
    vec3 normalVector = getNormal(currentPosition);


    float diffuseLighting = clamp(dot(normalVector, lightVector),0.,1.);

    float d = rayMarch(currentPosition + normalVector * SURFACE_DISTANCE * 2., lightVector);
    //If there is an hit point and the hit point distance is shorter than the distance current point to the light, then we are occluded by the object we hit.
    //The light is behind the object.
    //Be careful, we need to kick out the point before the raymarching that is colliding with the plane, because we
    //will go out of the raymarch loop too soon due to the collision with the plane and the min(dPlane, dSphere)
    //So we add a little quantity along the normal to have the point just above and continue the raymarch

    if(d < length(lightPosition - currentPosition)) diffuseLighting *= .1;

    return diffuseLighting;
}

float rayMarch(vec3 rayOrigin, vec3 rayDirection) {
    float distanceOrigin = 0.;

    for(int i=0; i< MAX_STEPS; i++) {
        vec3 currentPosition = rayOrigin + rayDirection * distanceOrigin;
        float distanceScene = getDistance(currentPosition);
        distanceOrigin += distanceScene;
        if (distanceOrigin > MAX_DISTANCE || distanceScene < SURFACE_DISTANCE) break;
    }

    return distanceOrigin;
}
Wire everything in the main of the fragment shader
void main()
{
    vec3 rayOrigin = vPosition;
    vec3 rayDirection = normalize(vDirection);

    float d = rayMarch(rayOrigin, rayDirection);

    vec3 color = vec3(0);

    vec3 currentPosition = rayOrigin + rayDirection * d;

    float diffuseColor = getLight(currentPosition);

    color = vec3(diffuseColor);

    // Output to screen
    gl_FragColor = vec4(color,1.0);

}
Basically we are calculating a distance in a direction from an origin point. We are marching forward until we hit something in our abstract space, or until we are pass the maximum distance. We save this distance d.
We can then calculate the current position that we marched to by doing rayOrigin + rayDirection * d (We marched for a distance d along the ray direction, starting from the rayOrigin).
We then ask for the light at the current position, which will be our color.
We do this for every ray generated by every fragment shader running. From there, we can determine every fragment color, which determine every pixel color for the mesh.
Sandbox
Note: I added some fresnel to have this glass effect on the sphere so it feels like the raymarched scene is contained in a glass sphere
What to take off from this blog post ?
You can go on ShaderToy to experiment on raymarching algorithm. I did the experimentation with a cool sea shader I found here:
All you need to do is seek for the raymarching algorithm. Replace the main function by our main, with the calculation of the ray origin and ray direction relative to the three.js camera. And you can get this type of cool effect on your three.js sphere !
Comments (0)