

We now know how to integrate and use table component in React using the react-table package from the previous tutorial. In this tutorial, we are going to continue to add extra features to the React Table component that we implemented in the previous tutorial. Most precisely, we are going to add the sorting and filtering feature to it.
Sorting enables us to sort the information displayed on the table on the basis of table header.
Filtering allows us to filter the information displayed on the table on the basis of filter text that we are going to apply to our React table.
These sorting and filtering features are provided by react-table package out of the box. It offers two hooks useSortBy and useFilters hook which enables us to integrate sorting and filtering features to the table easily.
So, let's get started!
Sorting
First, we are going to implement the sorting feature. In the Table.js file, we need to import the useSortBy hook from the react-table package as shown in the code snippet below:
import { useTable, useSortBy } from "react-table";
Then, we need to go to the table component in the template section and add column.getSortByToggleProps()to column.getHeaderProps()as shown in the code snippet below:
<tr {...headerGroup.getHeaderGroupProps()}>
              {headerGroup.headers.map((column) => (
                <th {...column.getHeaderProps(column.getSortByToggleProps())}>
Now, we need to add the sorting buttons to the column headers of the table. For that, we need to add the button icons with conditional rendering inside the <th> section as shown in the code snippet below:
<th {...column.getHeaderProps(column.getSortByToggleProps())}>
      {column.render("Header")}
                  <span>
                    {column.isSorted
                      ? column.isSortedDesc
                        ? " 🔽"
                        : " 🔼"
                      : ""}
                  </span>
Hence, we can now apply sorting on the basis of column headers as demonstrated in the demo below:
 View Website
 View Website
 View Website
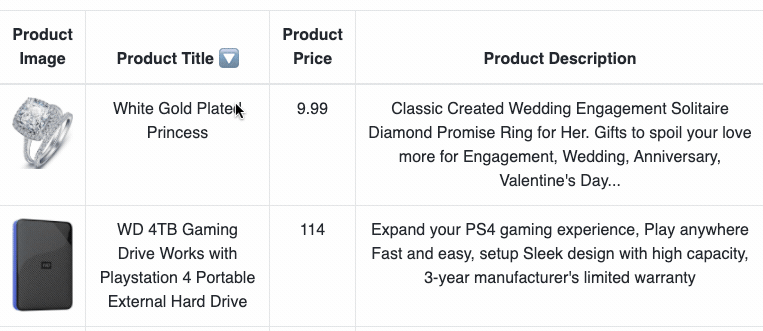
As we can notice, the information displayed in the table is sorted on the basis of header.
Filtering
In this step, we are going to apply the filtering feature to our React table. First, we need to import the useFilters hook from the react-table as shown in the code snippet below:
import { useTable, useFilters, useSortBy } from "react-table";
Then, we need to associate useFilters hook with useTable hook as shown in the code snippet below:
const {
		 /// other
    setFilter
  } = useTable(
    {
      columns,
      data
    },
    useFilters,useSortBy
  );
Also, we need to define a state to store the filtering input text for which we are going to use the useState hook as shown in the code snippet below:
const [filterInput, setFilterInput] = useState("");
Next, we need to add a form input field to fetch the text in order to filter the output on the basis of it. The input text will be used to filter the information shown in the table. The form input field is provided in the code snippet below:
return (
    <>
      <div className="form-group input-group">
        <input
          className="form-control"
          value={filterInput}
          onChange={handleFilterChange}
          placeholder={"Search name"}
        />
      </div>
The value entered in the input field will be stored in the state. And as the user enters the value in the input field, the onChange event will trigger the handleFilterChange function. In handleFilterChange function, we call the setFilter method by passing the title and the entered input data which will automatically filter out the information displayed in the table. The implementation of the function is shown in the code snippet below:
const handleFilterChange = (e) => {
    const value = e.target.value || undefined;
    setFilter("title", value);
    setFilterInput(value);
  };
Hence, we can now filter the table data by entering the text input to input field as shown in the demo below:

Finally, we have successfully applied the sorting and filtering feature to our React table from the previous tutorial.
Conclusion
The main objective of this tutorial was to explore the sorting and filtering feature provided by the react-table package. We were able to implement the sorting as well as filtering feature by means of hooks provided by the react-table package. These features are really basic and essential for any table. It makes the identification and exploration of table information easier and efficient.
The overall code as well as demo for this tutorial is available on Codesandbox.
Comments (0)