
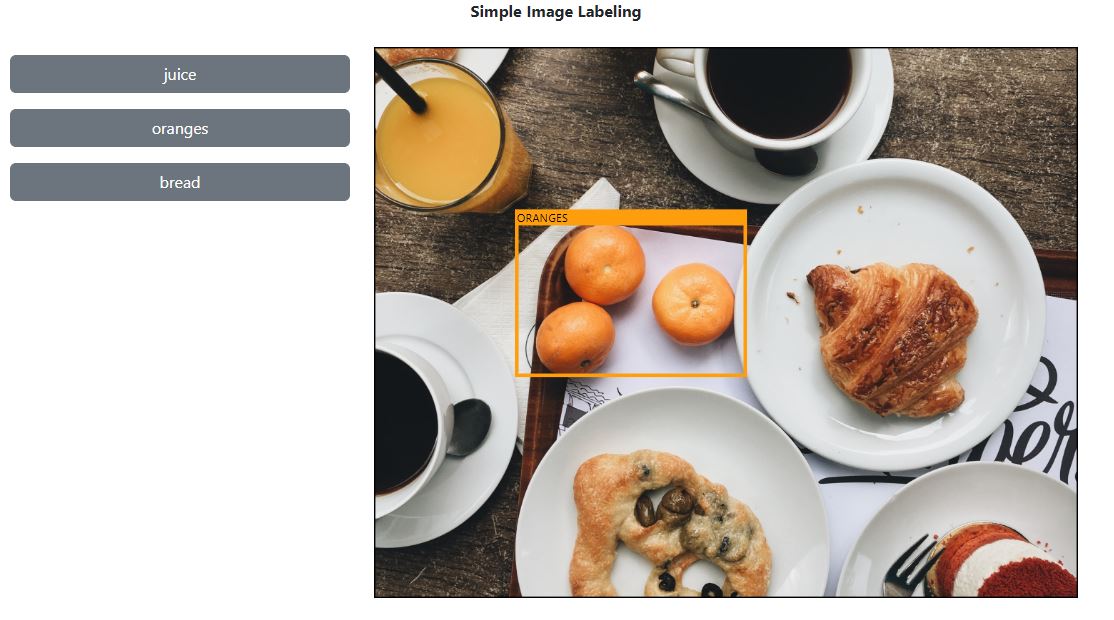
 The function of this simple application is to indicate the object’s location in the image whenever the user clicks any of the labeled buttons.
To begin with, I installed Boostrap 5 then created a simple design layout.
function ImageDetector() {
  return (
    <div className="App">
      <div className="row container">
        <p className="text-center">
          <strong>Simple Image Labeling</strong>
        </p>
        <div className="row mt-2 mb-3">
          <div className="col-4">
            {/* buttons here*/}
          </div>
          <div className="col-8">
            <img
              id="image"
              src="/img/foods.jpg"
              alt="food"
              className="w-100"
            />
          </div>
        </div>
      </div>
    </div>
  );
}

export default ImageDetector;
I made an array of objects as my sample data.
const objects = [
  {
    object: "juice",
    x: 1,
    y: 1,
    w: 230,
    h: 250,
  },
  {
    object: "oranges",
    x: 200,
    y: 230,
    w: 320,
    h: 230,
  },
  {
    object: "bread",
    x: 600,
    y: 280,
    w: 250,
    h: 250,
  },
];
Then I fetched the values from my sample data and put them in the buttons.
<div className="col-4">
  {objects.map((item) => (
    <button
      className="btn btn-secondary col-12 my-2"
      key={item.object}
    >
      {item.object}
    </button>
  ))}
</div>
To display the square or rectangle shape indicator, I set the width and height variables to get the natural width and height of the image.
const [width, setWidth] = useState(0);
const [height, setHeight] = useState(0);

const image = document.querySelector("#image");
useEffect(() => {
  if (image) {
    let linkSrc = image.src;
    const imageCopy = document.createElement("img");
    imageCopy.src = linkSrc;
    setWidth(imageCopy.width);
    setHeight(imageCopy.height);
  }
}, [width, height, image]);
I made a div element to put inside the img and svg elements so that the svg element would appear on the image. And I set the preserveAspectRatio to retain the x and y positions of rect and text elements when the screen size changes.
<div className="col-8">
  <div className="img-container">
    <img
      id="image"
      src="/img/foods.jpg"
      alt="food"
      className="w-100"
    />
    <svg
      preserveAspectRatio="none"
      className="image-map"
      viewBox={`0 0 ${width} ${height}`}
    >
      <rect className="selected-object"></rect>
      <rect className="wrap-text"></rect>
      <text className="object-name" x={xPosition} y={yPosition + 15}>
        {selectedItem}
      </text>
    </svg>
  </div>
</div>
css:
.img-container {
  position: relative;
}

.image-map {
  position: absolute;
  top: 0;
  left: 0;
  width: 100%;
  height: 100%;
  -webkit-user-select: none;
  -moz-user-select: none;
  -ms-user-select: none;
  -o-user-select: none;
  user-select: none;
}

.selected-object {
  position: absolute;
  top: 0;
  left: 0;
  fill: transparent;
  stroke: #ff9e0d;
  stroke-width: 5px;
}

.wrap-text {
  fill: #ff9e0d;
}

.object-name {
  z-index: 999;
}
I started declaring the x,y,w,h variables and call these in svg’s rect and text elements.
const [xPosition, setXPosition] = useState(0);
const [yPosition, setYPosition] = useState(0);
const [objWidth, setObjWidth] = useState(0);
const [objHeight, setObjHeight] = useState(0);
const [selectedItem, setSelectedItem] = useState("");
<svg
  preserveAspectRatio="none"
  className="image-map"
  viewBox={`0 0 ${width} ${height}`}
>
  <rect
    className="selected-object"
    x={xPosition}
    y={yPosition}
    width={objWidth}
    height={objHeight}
  ></rect>
  <rect
    className="wrap-text"
    x={xPosition}
    y={yPosition}
    width={objWidth}
    height="20"
  ></rect>
  <text className="object-name" x={xPosition} y={yPosition + 15}>
    {selectedItem}
  </text>
</svg>
Then, I made a handleClick() to show the svg indicators on the image.
 View Website
 View Website
 View Website
const handleClick = (object) => {
  objects.map((item) => {
    if (item.object === object) {
      setXPosition(item.x);
      setYPosition(item.y);
      setObjWidth(item.w);
      setObjHeight(item.h);
      setSelectedItem(object.toUpperCase());
    }
    return item;
  });
};
Called the function in this button:
<button
  className="btn btn-secondary col-12 my-2"
  key={item.object}
  onClick={() => handleClick(item.object)}
>
  {item.object}
</button>
And it’s done. You can run your simple app.
Comments (0)