
This post is a little how-to guide on being able to access a site under development from a host machine as it is being built and served from inside a guest virtual machine.
In my case, I run a Windows 10 host machine, that runs a Ubuntu 20.04 guest virtual machine via Oracle Virtualbox.
I opted to do this because I wanted to develop on Ubuntu. I find Linux-based operating systems most friendly to software development. I test the site on Windows so I don't have to run another browser from inside the virtual machine, which definitely runs slower and takes up more of the limited RAM allocation.
Virtualbox
Go to the VM's Settings panel. Under Network, change the attached to: value to Bridged Adapter (it's set to NAT) by default.

In Ubuntu, run the following command to list down the IP address Virtualbox assigned to the VM.
ip addr show
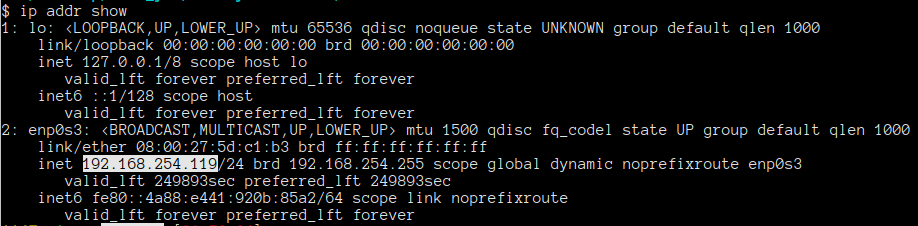
In my case, it's the IPv4 address 192.168.254.119 highlighted in white. Take note of this address as you will be using it all throughout the setup.
Django
By default, running ./manage.py runserver has the Django server listen on IP address 127.0.0.1 on port 8000, but connecting to http://127.0.0.1:8000 from the host machine would just loopback on itself.
 View Website
 View Website
 View Website
Instead, we use make the Django server listen on the VM's IP address or the special address 0.0.0.0 .
./manage.py runserver 192.168.254.119:8000
or
./manage.py runserver 0.0.0.0:8000
Now, visiting the Django admin site via a browser on the host machine via http://192.168.254.119:8000/admin/ would work.
I've written a script to automate the fetching of the local IPv4 address, because good developers are lazy ;)
Add the following script to your .bashrc.
local ip_v4() {
    ip addr show | grep -oP '[\d\.]+/24' | rev | colrm 1 3 | rev
}
export -f local_ipv4
local_ip_v4() is evaluated every time you run manage.py runserver.
./manage.py runserver $(local_ipv4):8000
As a side comment, if you wish to run runserver using an IPv6 address, it's as follows:
python3 manage.py runserver -6 [2405:8d40:b21:2884:81d2:a7f:6264:9b06]:8000
React
On the frontend, I assume you have an environment variable to determine the IP address of the backend depending on the environment (dev, staging, production). The frontend is easily accessible on the host machine on http://192.168.254.119:3000/,but we have repoint the environment variables before serving the frontend through npm run <env>
#API_ROOT_URL='http://localhost:8000'
API_ROOT_URL='http://192.168.254.119:8000'
You can then connect to the frontend from a browser running on the guest machine on http://192.168.254.119:3000/, and api calls will now be directed to http://192.168.254.119:8000.
I've also created some helper functions in my .bashrc that will make this string substitution go faster. It's important that the following are declared after local_ipv4() is declared in the file, as it will be reused in the code. This only works for IPv4 addresses.
stale_env_ip() {
    grep -oP '(\d{1,3}\.){3}\d{1,3}' /path/to/your/.env | uniq
}
sync_fe_ips() {
    sed -i "s/$(stale_env_ip)/$(local_ipv4)/g" /path/to/your/.env
}
export -f sync_fe_ips
Then, just run sync_fe_ips before running your front end server as follows:
sync_fe_ips; npm start
Why need to automate?
Since the guest OS running in the VM is used Bridged mode, the IP address it uses is entirely at the mercy of the DHCP server of whichever network the host OS is connected to. When you're on the go, it's easier to just let the DHCP server dictate the guest OS's IP address instead of configuring it statically and having to reconfigure it to use a different gateway each time.
Conclusion
Now you're ready to develop on the guest machine, while testing more rapidly on the host machine. You'll also have the added benefit of having your servers be accessible throughout the Wireless Local Area Network. For me, this means I can test the development server from a laptop, smartphone, or a desktop simultaneously.
Comments (0)