In this tutorial, we will be creating a basic Tic Tac Toe game with HTML, CSS and JavaScript.
Python version: https://devdojo.com/jothin-kumar/tic-tac-toe-with-python-tkinter-part-1
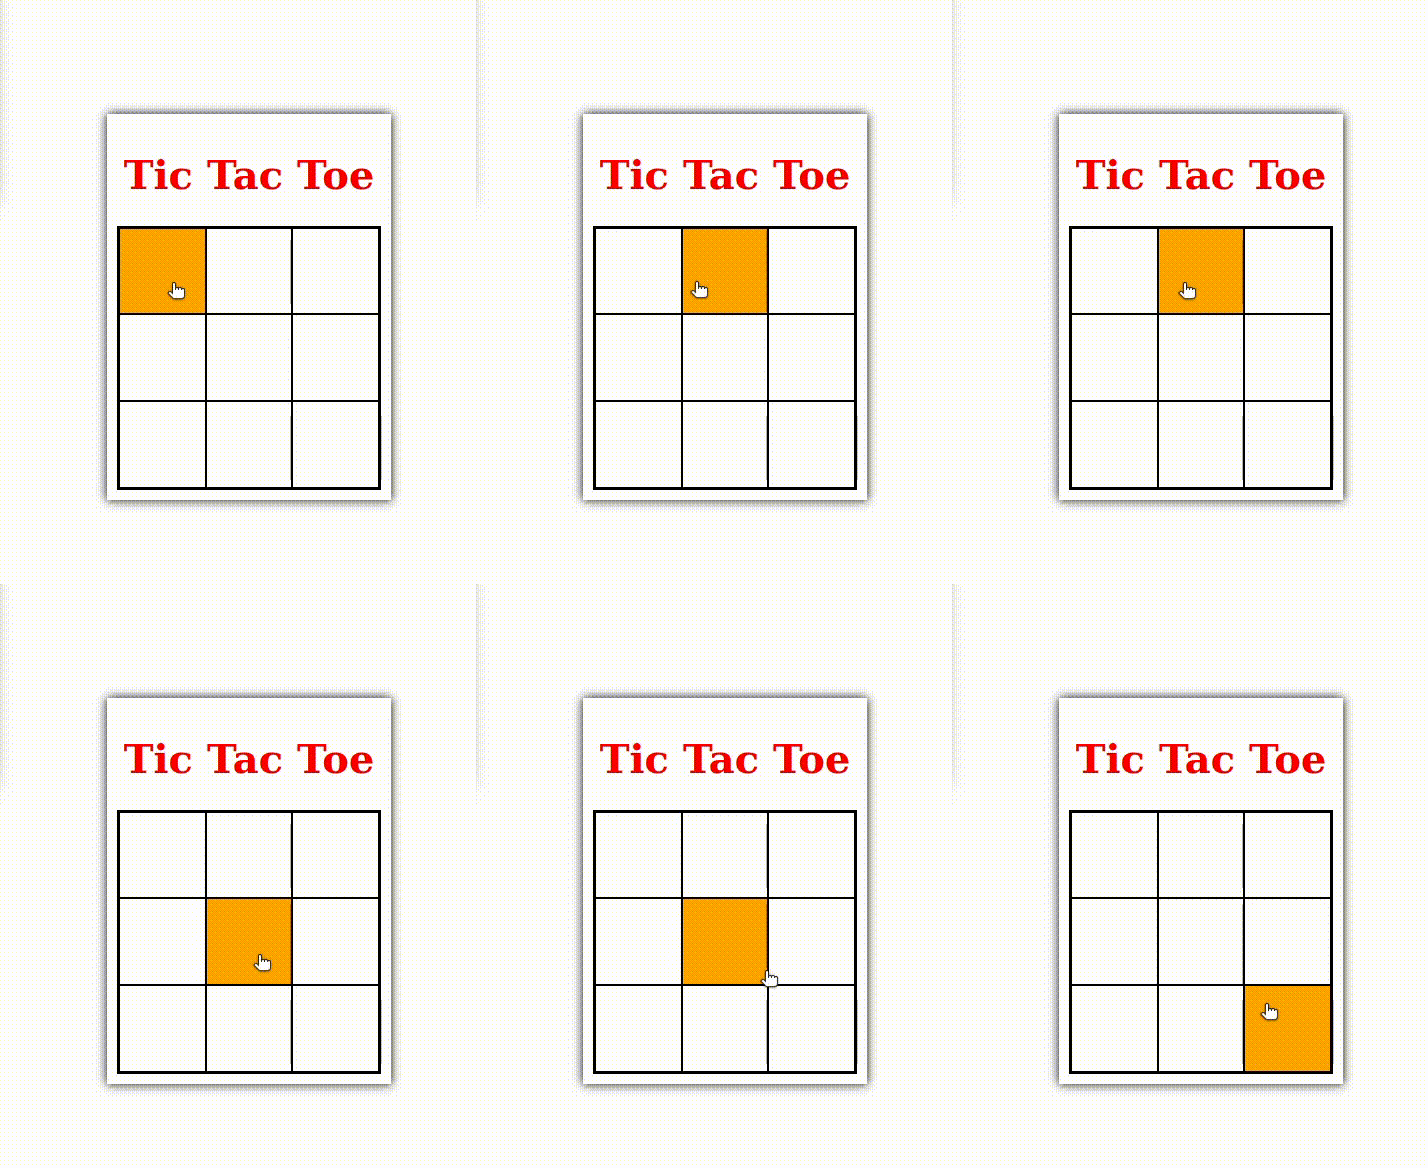
The webpage 👀
Let's go ahead and create a GUI for the game.
Step 1: Create webpage and add some CSS.
- index.html
<!DOCTYPE html>
<html lang="en">
<head>
    <meta charset="UTF-8">
    <title>Tic Tac Toe</title>
    <link rel="stylesheet" href="style.css">
</head>
<body>
    <h1>Tic Tac Toe</h1>
    <div id="play-area">
        <button class="square" id="square1"></button>
        <button class="square" id="square2"></button>
        <button class="square" id="square3"></button>
        <br>
        <button class="square" id="square4"></button>
        <button class="square" id="square5"></button>
        <button class="square" id="square6"></button>
        <br>
        <button class="square" id="square7"></button>
        <button class="square" id="square8"></button>
        <button class="square" id="square9"></button>
    </div>
</body>
</html>
- style.css
body {
    position: absolute;
    text-align: center;
    top: 50%;
    left: 50%;
    transform: translate(-50%, -50%);
    padding: 10px;
    box-shadow: black 0 0 10px;
}
h1 {
    color: red;
}
#play-area {
    border: black solid 2px;
    overflow: hidden;
}
.square {
    width: 5em;
    height: 5em;
    float: left;
    border: black solid 1px;
    background-color: white;
    cursor: pointer;
}
.square:hover {
    background-color: orange;
    color: white;
}
 Step 2: Make the webpage functional with JavaScript.
- script.js
let currentChr = "X";
let XPoint = [];
let OPoint = [];

class XOSquare {
    constructor(x, y, buttonId) {
        this.x = x;
        this.y = y;
        this.button = document.getElementById(buttonId);
        this.button.onclick = () => {
            this.set(buttonId)
        }
    }
    set(buttonId) {
        this.button = document.getElementById(buttonId);
        if (this.button.innerText === "") {
            this.button.innerText = currentChr;
            switchChr();
        }
    }
    reset() {
        this.button.innerText = "";
    }
}
function switchChr() {
    if (currentChr === "X") {
        currentChr = "O";
    } else {
        currentChr = "X";
    }
}
function setup() {
    let squares = [];
    let squareElements = document.getElementsByClassName("square");
    for (let i = 0; i < squareElements.length; i++) {
        let square = new XOSquare(i % 3, Math.floor(i / 3), squareElements[i].id);
        squares.push(square);
    }
}
window.onload = setup;
Add this to index.html under head tag.
<script src="script.js"></script>
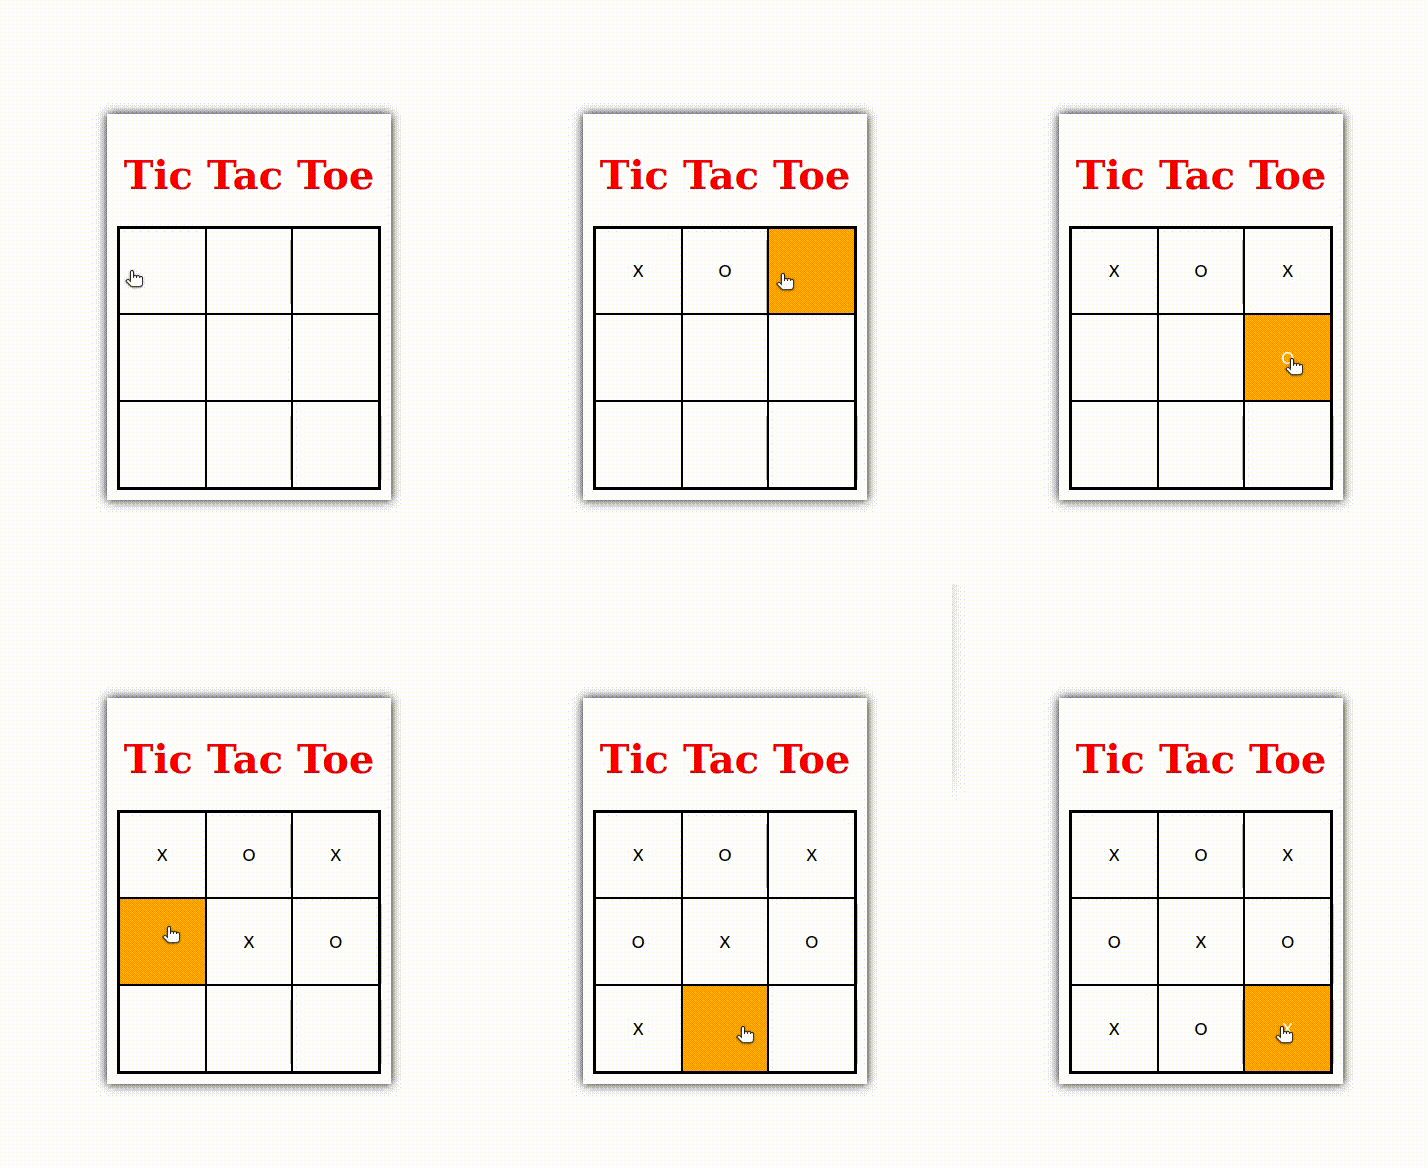
Detect win and draw 🤔
Let's now implement a logic to detect win/draw.
Step 3: Implement logic to detect win.
We need to check after each move if X or O won the game. There are 8 possible ways in which one can win Tic Tac Toe:
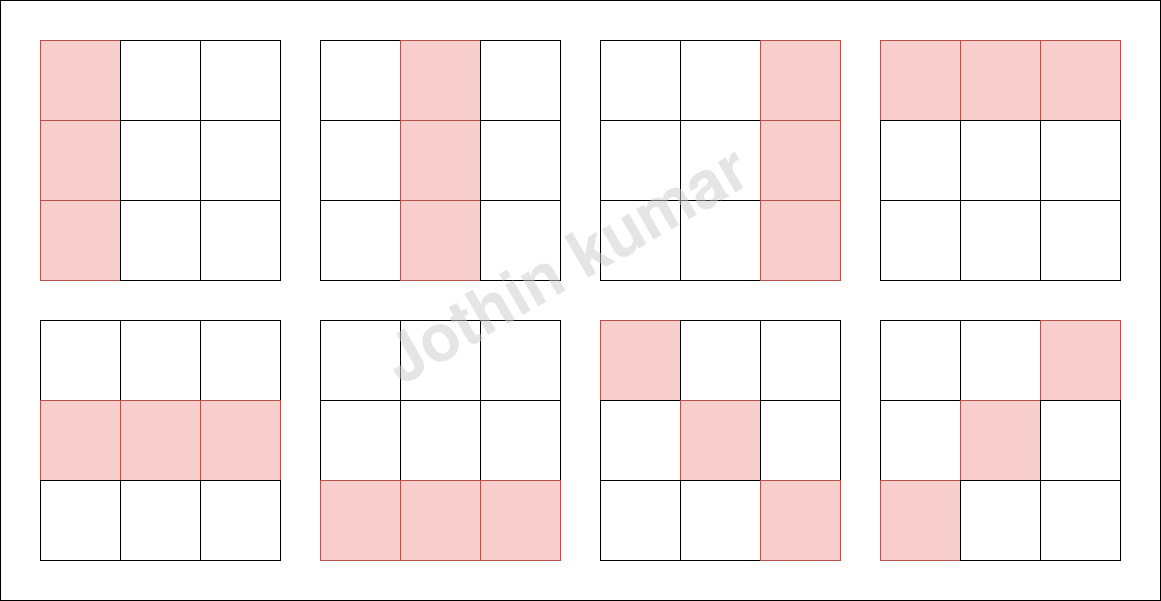 Let's add some the JavaScript in script.js to detect game win.
let currentChr = "X";
let XPoint = [];
let OPoint = [];

class XOSquare {
    constructor(x, y, buttonId) {
        this.x = x;
        this.y = y;
        this.button = document.getElementById(buttonId);
        this.button.onclick = () => {
            this.set(buttonId)
        }
    }
    set(buttonId) {
        this.button = document.getElementById(buttonId);
        if (this.button.innerText === "") {
            this.button.innerText = currentChr;
            if (currentChr === "X") {
                XPoint.push(this);
            } else {
                OPoint.push(this);
            }
            switchChr();
            checkWin();
        }
    }
    reset() {
        this.button.innerText = "";
    }
}
class winningPossibility {
    constructor(x1, y1, x2, y2, x3, y3) {
        this.x1 = x1;
        this.y1 = y1;
        this.x2 = x2;
        this.y2 = y2;
        this.x3 = x3;
        this.y3 = y3;
    }
}
function checkWinningPossibility(winningPossibility, forChr) {
    let p1Satisfied = false;
    let p2Satisfied = false;
    let p3Satisfied = false;
    if (forChr === 'X') {
        for (let i = 0; i < XPoint.length; i++) {
            if (XPoint[i].x === winningPossibility.x1 && XPoint[i].y === winningPossibility.y1) {
                p1Satisfied = true;
            }
            else if (XPoint[i].x === winningPossibility.x2 && XPoint[i].y === winningPossibility.y2) {
                p2Satisfied = true;
            }
            else if (XPoint[i].x === winningPossibility.x3 && XPoint[i].y === winningPossibility.y3) {
                p3Satisfied = true;
            }
        }
    } else {
        for (let i = 0; i < OPoint.length; i++) {
            if (OPoint[i].x === winningPossibility.x1 && OPoint[i].y === winningPossibility.y1) {
                p1Satisfied = true;
            }
            else if (OPoint[i].x === winningPossibility.x2 && OPoint[i].y === winningPossibility.y2) {
                p2Satisfied = true;
            }
            else if (OPoint[i].x === winningPossibility.x3 && OPoint[i].y === winningPossibility.y3) {
                p3Satisfied = true;
            }
        }
    }
    return p1Satisfied && p2Satisfied && p3Satisfied;
}
const winningPossibilities = [
    new winningPossibility(1, 1, 1, 2, 1, 3),
    new winningPossibility(2, 1, 2, 2, 2, 3),
    new winningPossibility(3, 1, 3, 2, 3, 3),
    new winningPossibility(1, 1, 2, 1, 3, 1),
    new winningPossibility(1, 2, 2, 2, 3, 2),
    new winningPossibility(1, 3, 2, 3, 3, 3),
    new winningPossibility(1, 1, 2, 2, 3, 3),
    new winningPossibility(3, 1, 2, 2, 1, 3)
]
function checkWin() {
    for (let i = 0; i < winningPossibilities.length; i++) {
        if (checkWinningPossibility(winningPossibilities[i], 'X')) {
            console.log("X wins");
            return;
        }
        if (checkWinningPossibility(winningPossibilities[i], 'O')) {
            console.log("O wins");
            return;
        }
    }
}
function setup() {
    let squares = [];
    let squareElements = document.getElementsByClassName("square");
    for (let i = 0; i < squareElements.length; i++) {
        let square = new XOSquare(i % 3 + 1, Math.floor(i / 3) + 1, squareElements[i].id);
        squares.push(square);
    }
}
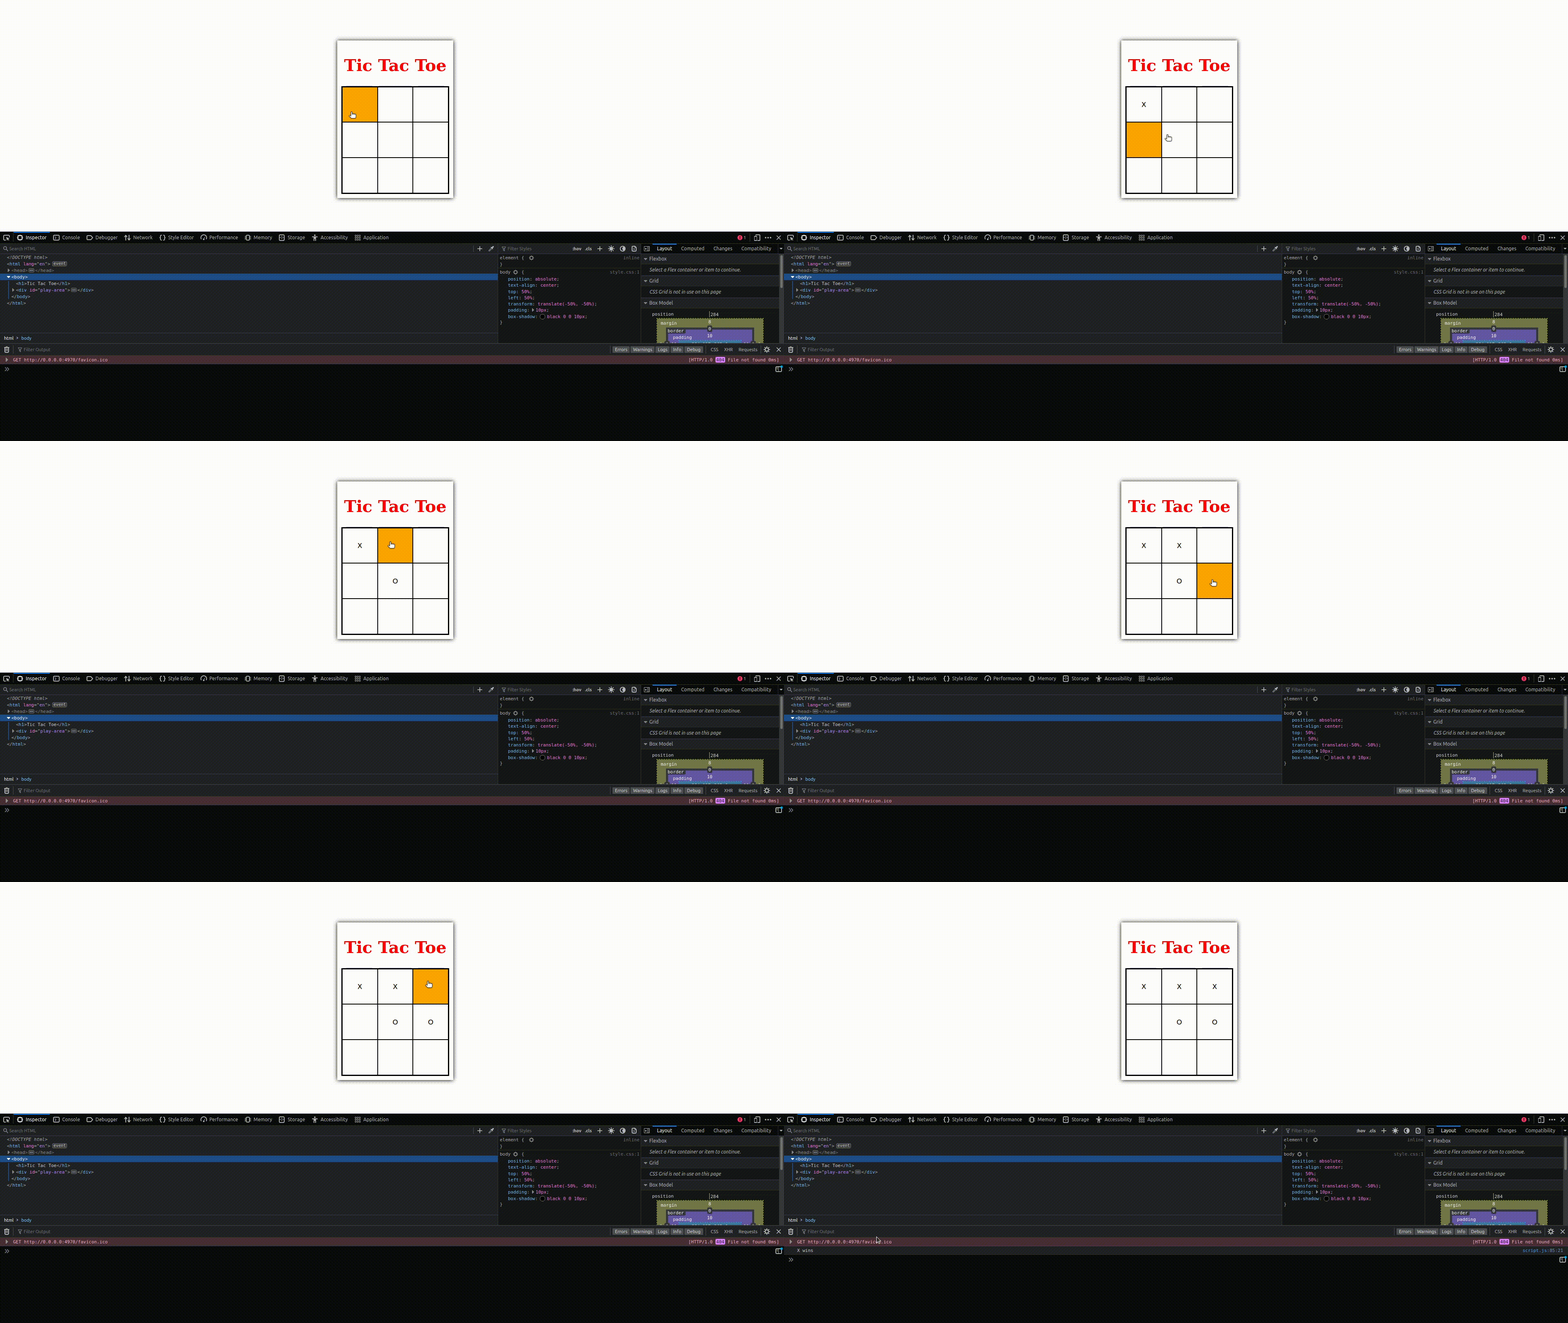 When X or O wins the game, console.log is triggered.
Step 4: Detect draw.
Append the following code to function "checkWin" in script.js
if (XPoint.length + OPoint.length === 9) {
    console.log("Draw");
}
Enhancements
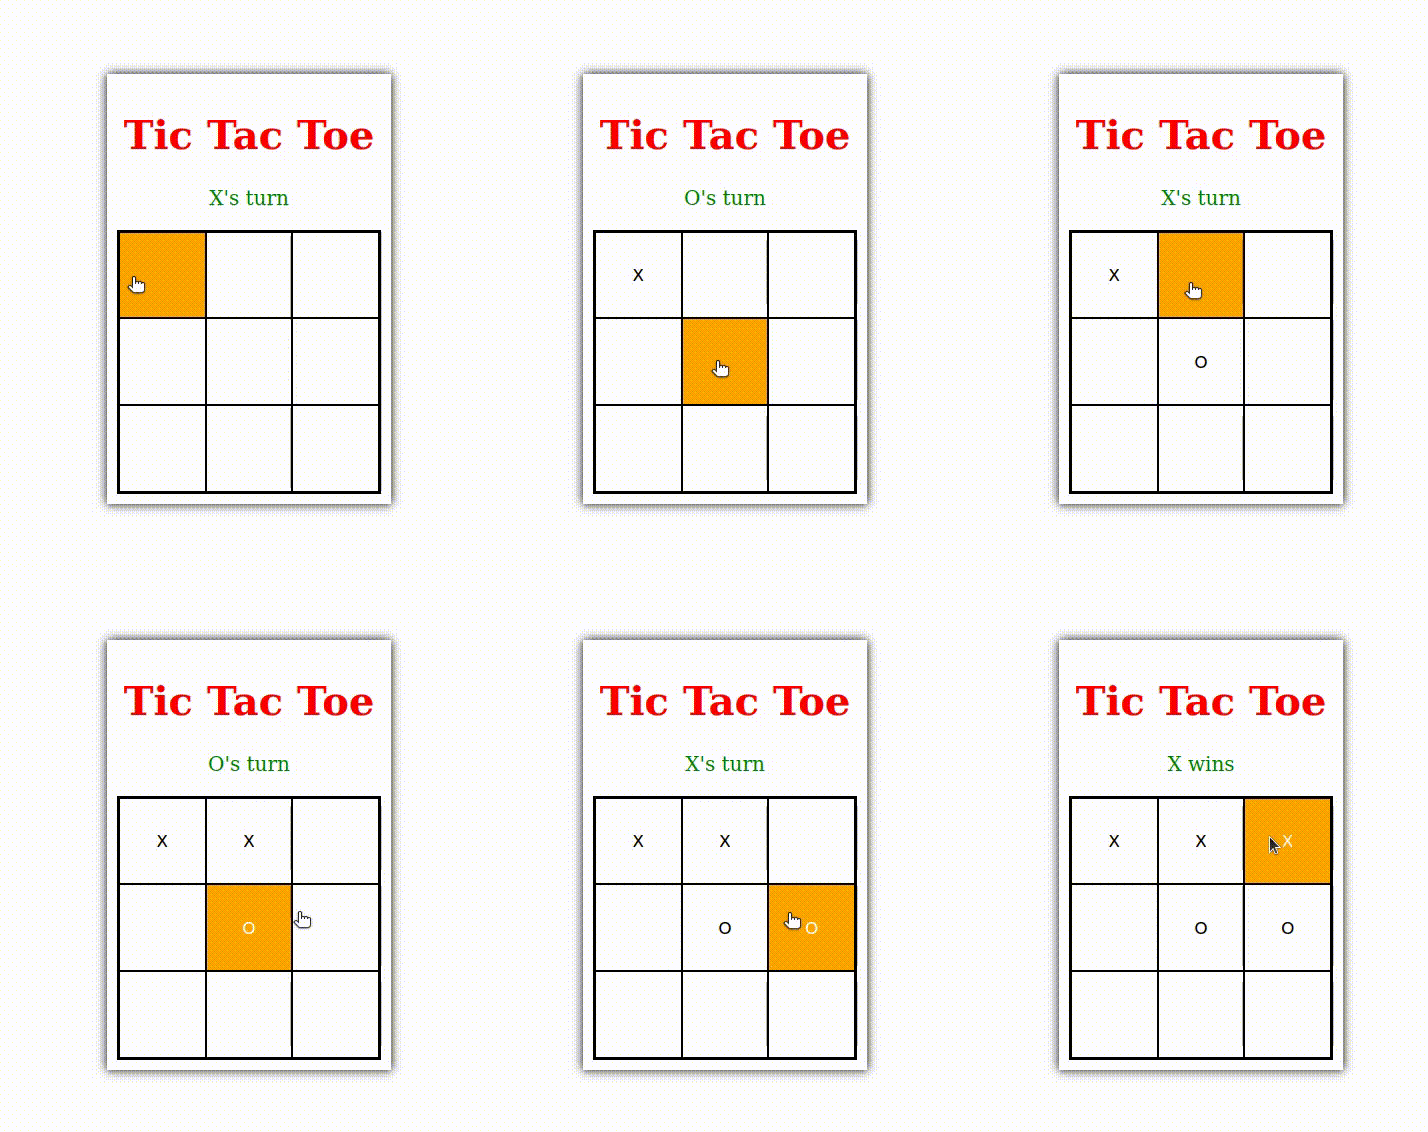
Step 5: Add a status label and use it instead of console.log
Let's make a few changes to script.js:
- function "switchChr":
function switchChr() {
    const statusLabel = document.getElementById("status");
    if (currentChr === "X") {
        currentChr = "O";
        statusLabel.innerText = "O's turn";
    } else {
        currentChr = "X";
        statusLabel.innerText = "X's turn";
    }
}
- function "checkWin":
function checkWin() {
    const statusLabel = document.getElementById("status");
    for (let i = 0; i < winningPossibilities.length; i++) {
        if (checkWinningPossibility(winningPossibilities[i], 'X')) {
            statusLabel.innerText = "X wins";
            disableGame();
            return;
        }
        if (checkWinningPossibility(winningPossibilities[i], 'O')) {
            statusLabel.innerText = "O wins";
            disableGame();
            return;
        }
    }
    if (XPoint.length + OPoint.length === 9) {
        statusLabel.innerText = "Draw";
        disableGame();
    }
}
Add this new element in index.html under body tag
 View Website
 View Website
 View Website
<p id="status">X's turn</p>
Add the following to style.css
#status {
    color: green;
}
 Step 6: Play again
Let's add a play again button so that we don't need to refresh the webpage if we want to replay. We need to create new functions in script.js
- function "playAgain"
function playAgain() {
    const buttons = document.getElementsByClassName("square");
    for (let i = 0; i < buttons.length; i++) {
        buttons[i].disabled = false;
        buttons[i].innerText = "";
    }
    XPoint = [];
    OPoint = [];
    currentChr = "X";
    const statusLabel = document.getElementById("status");
    statusLabel.innerText = "X's turn";
    const playAgainButton = document.getElementById("play-again");
    playAgainButton.style.display = "none";
}
- function "disableGame":
function disableGame() {
    const buttons = document.getElementsByClassName("square");
    for (let i = 0; i < buttons.length; i++) {
        buttons[i].disabled = true;
    }
    const playAgainButton = document.getElementById("play-again");
    playAgainButton.style.display = "block";
}
Add this element to index.html under body tag:
<button id="play-again" onclick="playAgain()">Play Again</button>
Add this property to #play-area in style.css:
margin-bottom: 10px;
Add some css for #play-again (play again button) in style.css:
#play-again {
    box-shadow: black 0 0 5px;
    margin: auto;
    display: none;
}
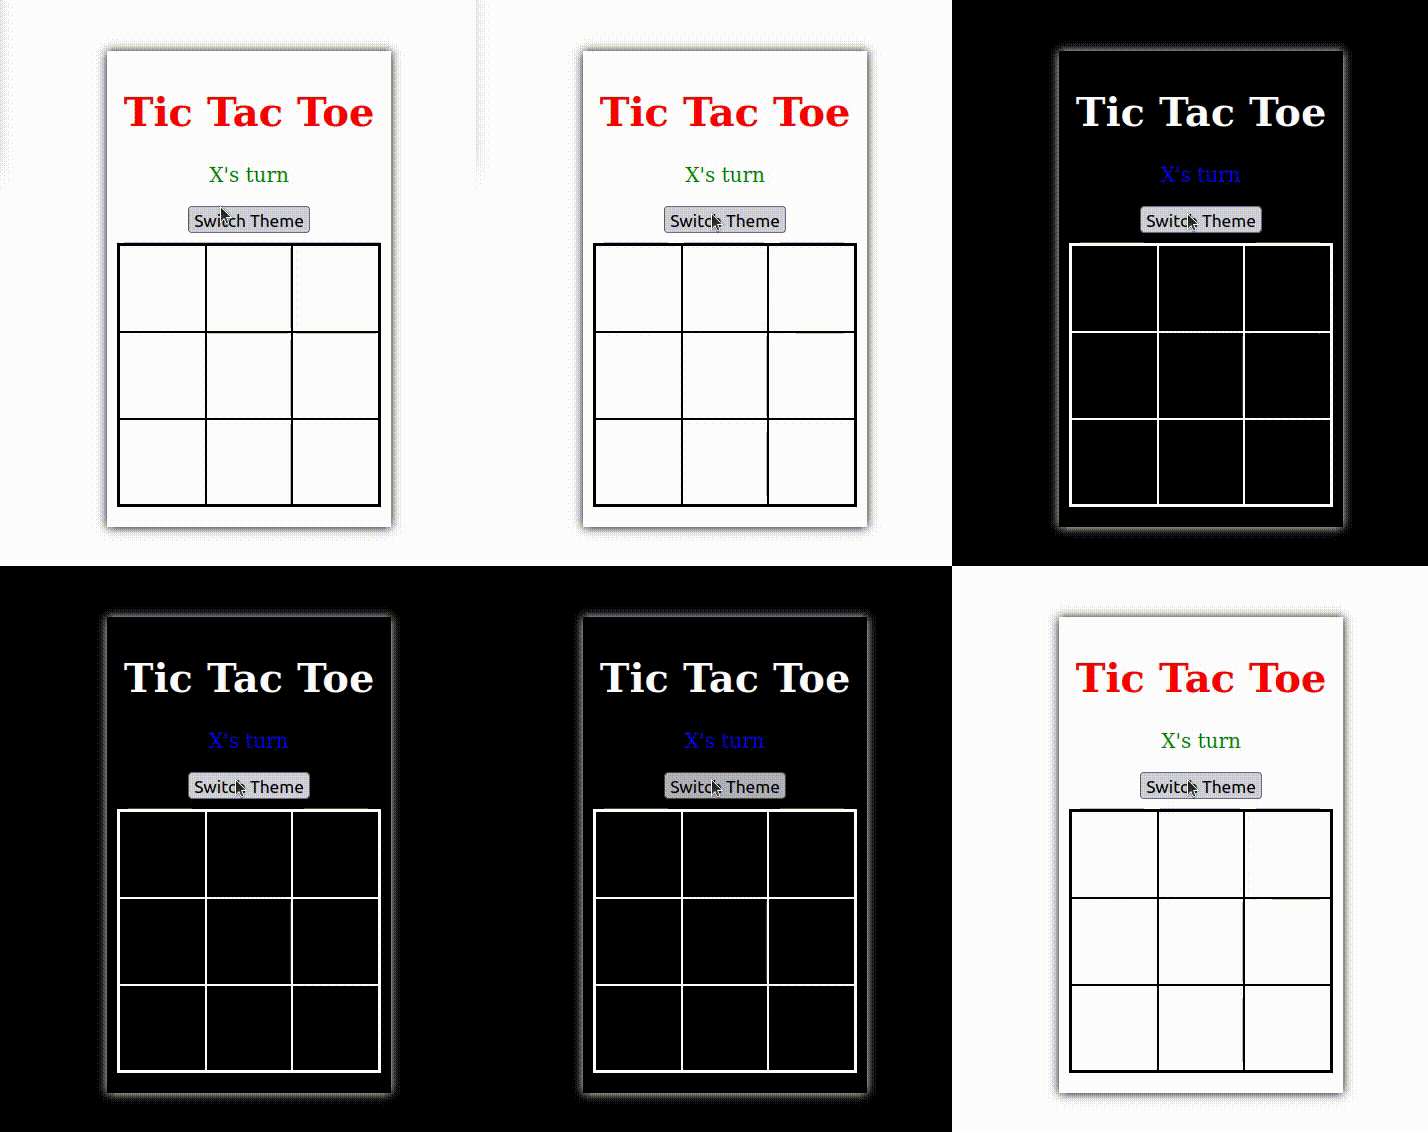
Step 7: Theme switch.
A webpage won't be complete without a cool theme switch. So, let's add one!
Add the following JS code to script.js:
let currentTheme = 'light';
function switchTheme() {
    if (currentTheme === 'dark') {
        document.querySelectorAll('.dark-mode').forEach(function (element) {
            element.classList.remove('dark-mode');
            element.classList.add('light-mode');
        });
        currentTheme = 'light';
    }
    else {
        document.querySelectorAll('.light-mode').forEach(function (element) {
            element.classList.remove('light-mode');
            element.classList.add('dark-mode');
        });
        currentTheme = 'dark';
    }
}
Let's rewrite the CSS:
body.light-mode {
    position: absolute;
    text-align: center;
    top: 50%;
    left: 50%;
    transform: translate(-50%, -50%);
    padding: 10px;
    box-shadow: black 0 0 10px;
}
h1.light-mode {
    color: red;
}
#status.light-mode {
    color: green;
}
#play-area.light-mode {
    border: black solid 2px;
    overflow: hidden;
    margin-top: 10px;
    margin-bottom: 10px;
}
.square.light-mode {
    width: 5em;
    height: 5em;
    float: left;
    border: black solid 1px;
    background-color: white;
    cursor: pointer;
}
.square.light-mode:hover {
    background-color: orange;
    color: white;
}
.square.clicked.light-mode {
    background-color: red;
    color: white;
}
#play-again.light-mode {
    box-shadow: black 0 0 5px;
    margin: auto;
    display: none;
}

body.dark-mode {
    position: absolute;
    text-align: center;
    top: 50%;
    left: 50%;
    transform: translate(-50%, -50%);
    padding: 10px;
    box-shadow: white 0 0 10px;
    background: black;
}
h1.dark-mode {
    color: white;
}
#status.dark-mode {
    color: blue;
}
#play-area.dark-mode {
    border: white solid 2px;
    overflow: hidden;
    margin-top: 10px;
    margin-bottom: 10px;
}
.square.dark-mode {
    width: 5em;
    height: 5em;
    float: left;
    border: white solid 1px;
    background-color: black;
    color: white;
    cursor: pointer;
}
.square.dark-mode:hover {
    background-color: gray;
    color: white;
}
#play-again.dark-mode {
    box-shadow: black 0 0 5px;
    margin: auto;
    display: none;
}
Let's change the body tag in index.html:
<body class="light-mode">
    <h1 class="light-mode">Tic Tac Toe</h1>
    <p id="status" class="light-mode">X's turn</p>
    <button id="theme-switch" onclick="switchTheme()" class="light-mode">Switch Theme</button>
    <div id="play-area" class="light-mode">
        <button class="square light-mode" id="square1"></button>
        <button class="square light-mode" id="square2"></button>
        <button class="square light-mode" id="square3"></button>
        <br>
        <button class="square light-mode" id="square4"></button>
        <button class="square light-mode" id="square5"></button>
        <button class="square light-mode" id="square6"></button>
        <br>
        <button class="square light-mode" id="square7"></button>
        <button class="square light-mode" id="square8"></button>
        <button class="square light-mode" id="square9"></button>
    </div>
    <button id="play-again" onclick="playAgain()" class="light-mode">Play Again</button>
</body>
Full code available at GitHub repository: https://github.com/Jothin-kumar/tic-tac-toe
If you find this article useful, drop a like ⭐ and follow me to get all my latest content.
Part 2 of this tutorial: https://devdojo.com/jothin-kumar/tic-tac-toe-with-python-tkinter-part-2

Comments (1)