Quite possibly one of the best things to happen to HTML since peanut butter met jelly!
jQuery is one of the most popular javascript libraries in the world. There are so many cool and fun interactive features that jQuery brings to the web interface. I'm going to teach you the very basics about using jQuery. This will be a jQuery 101 article. Before we get started, how about a little inspiration? Check out the following sites for some awesome jQuery action:
- Create a sweet looking Image Gallery
- Pretty Checkboxes with jQuery
- Sweet Rollover effects
- Simple jQuery Tabs
- Awesome Lightbox Popups
- Other Sweet jQuery User Interface Features
These are just a few of the things that jQuery can accomplish. The possibilities are endless when you use jQuery in your pages. In this article, I will show you how to create a simple page which uses jQuery slideUp and slideDown functionality. Here is a link to the demo page:
Okay, first off I want to make this article targeted towards absolute newbies, so I will start off by showing the anatomy of a blank HTML page as follows:
<html>
<head>
<title>Page Title</title>
</head>
<body>

</body>
</html>
I'm not going to explain the above code as it should be pretty self explanitory, if you need help learning HTML you can head over to w3schools and learn all about it. Now, to show you a skeleton page of an HTML page with a jQuery declaration:
<html>
<head>
<title>Page Title</title>
<script src="https://ajax.googleapis.com/ajax/libs/jquery/1.4.2/jquery.min.js"></script>
<script type="text/javascript">

$(document).ready(function() {
    // put all your jQuery goodness in here.
});

</script>
</head>
<body>

</body>
</html>
Okay, I'll explain the above additions. First, in the head of the page, we have added:
<script src="https://ajax.googleapis.com/ajax/libs/jquery/1.4.2/jquery.min.js"></script>
This script declares the jQuery Library.
 View Website
 View Website
 View Website
This link https://ajax.googleapis.com/ajax/libs/jquery/1.4.2/jquery.min.js is a link to the Google Ajax API; alternatively if you wish to have the actual jQuery javascript library file on your server you can download the latest copy from http://www.jquery.com and link the .js file to your page.
The next part that we added to the page is the main function loop where you will be performing all your jQuery magic:
<script type="text/javascript">

$(document).ready(function() {
    // put all your jQuery goodness in here.
});

</script>
With the code above, we have officially added jQuery to the page. You may notice that nothing different happens on this page, and that's because we need to add some jQuery action to the page.
What I'm going to show you is how to show and hide a div. In order to show this to you I'll have to add two buttons and a div to the HTML of the page. So far the page will now look as follows:
<html>
<head>
<title>Page Title</title>
<script src="https://ajax.googleapis.com/ajax/libs/jquery/1.4.2/jquery.min.js"></script>
<script type="text/javascript">

$(document).ready(function() {
   // put all your jQuery goodness in here.
 });

</script>
</head>
<body>

<input type="button" value="Hide" id="hide-button" />
<input type="button" value="Show" id="show-button" />

<div style="width:250px; height:150px; background:#cccccc; margin-top:10px" id="box"></div>

</body>
</html>
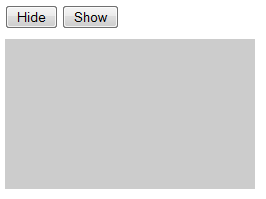
The html above will give you a page with two buttons and a grey box that looks as follows:

This page would still not do anything yet, until we add the following jQuery functionality
$(document).ready(function() {
   // put all your jQuery goodness in here.

   $('#hide-button').click(function(){
		$('#box').slideUp();
   });

   $('#show-button').click(function(){
		$('#box').slideDown();
   });

});
So, all together the final page would look as follows:
<html>
<head>
<title>Page Title</title>
<script src="https://ajax.googleapis.com/ajax/libs/jquery/1.4.2/jquery.min.js"></script>
<script type="text/javascript">

$(document).ready(function() {
   // put all your jQuery goodness in here.

   $('#hide-button').click(function(){
		$('#box').slideUp();
   });

   $('#show-button').click(function(){
		$('#box').slideDown();
   });

});

</script>
</head>
<body>

<input type="button" value="Hide" id="hide-button" />
<input type="button" value="Show" id="show-button" />

<div style="width:250px; height:150px; background:#cccccc; margin-top:10px" id="box"></div>

</body>
</html>
You can take a look at the page by clicking here: jQuery 101 Simple Example.
Now, to explain how this works, when the page is open, the jQuery ready function is always running:
$(document).ready(function() {
   // put all your jQuery goodness in here.
});
The page is constantly running through this loop and checking if there are any functions that have been fired or run. And in our jQuery loop we have the following function:
$('#hide-button').click(function(){
    $('#box').slideUp();
});
In the above function we are checking to see if an element with the id equal to hide-button is clicked. If it is clicked then run the code inside of this function which is $('#box').slideUp();. This code tells the element with the id equal to box to slideUp. slideUp() is just one of the many functions available in the jQuery library. To check out the jQuery library and all of its functions you can head over to jQuery.com.
Finally, the only other function that we have added to the jQuery loop, is the following function:
$('#show-button').click(function(){
    $('#box').slideDown();
});
The function above does the same as the previous function, except it says that if the show-button is clicked then we will set box to slideDown().
So that is it! You have just learned the very basics of using jQuery. Wasn't that simple. Remember all that is required to add jQuery to your page is to link to the library, include the jQuery ready loop, and then insert some awesome jQuery sauce into the loop.


Comments (0)