Howdy Geeks! 👋
I will build a web app alongside this article and this will act as a guide as I would share my struggles and we will debug as well.
Let's git this shii! 🚀
What is Flask?
Flask is a python framework that is used to create microservice web applications. It aims to keep projects simple but extensible and it won't decide for you, i.e. It allows you to create functionalities and has fewer packages or tell you what type of database to be used in a project.
Virtual Environment
In python, before doing anything. It is advisable to create a virtual environment and use it to install frameworks so your project folder looks neat.
To do so,
Python3 -m venv name_of_virtual_enviroment
name_of_virtual_enviroment should be replaced by the name you choose for your virtual environment (env or myenv or venv). In this article, I will call mine venv.
To activate the created virtual environment:
For windows OS
 View Website
 View Website
 View Website
venv\Scripts\activate
For Mac OS
venv/bin/activate
This activates the virtual environment, and you can now install packages for your projects.
**NB: Do this in your project folder. **
Flask Installation
To do this:
pip install Flask
Flask is now installed! You are a flask developer!

Now, onto your code
Create a python file and name, app.py.
This file will be like an entry file which will lead to other codebases in the projects.
Write this in your app.py file:
from flask import Flask

app = Flask(__name__)

if __name__ == '__main__':
    app.run()
Then run it by doing on your terminal:
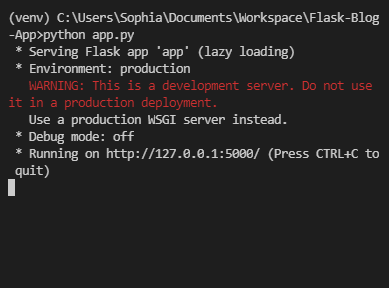
python app.py
You should see this:

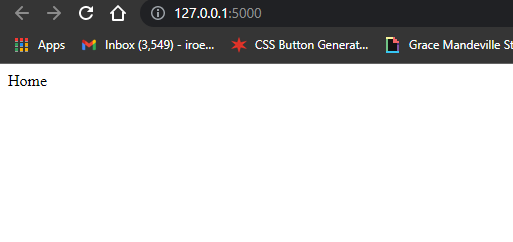
Click on the URL on your terminal and you should see this

We see this because we have created no routes for home or index, so let's do that right away.
Creating Routes
@app.route('/')
def index():
        return "Hello World!"
This will create a route and will return ** Hello World ** when we run the URL again.
Kill your terminal and run python app.py again, then you will see it.
It's a pain in the ass to always restart the terminal to see your recent changes on your localhost right? An easy way to do this is by adding a debug mode.
if __name__ == '__main__':
    app.run(debug=True)
OR
app = Flask(__name__)
app.debug =True
Anyone would suffice. Restart your terminal and whatever change you make will automatically update on the web.
Templating your index file
Normally we do not return strings, we return templates. Flask uses ** Jinja templating**.
Jinja Templating
In your application, you will use templates to render HTML, which will display in the browser. In Flask, we configured Jinja to auto escape any data that is rendered in HTML templates. This means that it’s safe to render user input; any characters entered that could mess with the HTML, such as < and > will be escaped with safe values that look the same in the browser but don’t cause unwanted effects.
from flask import Flask, render_template
We have imported render_template, which is a flask package.
Now, let's return it so it shows on our localhost.
@app.route('/')
def index():
        return render_template('home.html')
What did we just do?
We just rendered an HTML template in your python file. Cool, right?
Creating template folder
Create a template folder and an HTML file will name it home.html as stated in the previous code and create another file named layout.html
Write the following code in your layout file:
<!DOCTYPE html>
<html lang="en">
<head>
    <meta charset="UTF-8">
    <title>My Flask Blog</title>
</head>
<body>
    {% block body%}{% endblock%}
</body>
</html>
And add this code to your home.html:
{% extends 'layout.html' %}

{% block body %}
    Home
{% endblock %}
This will be your result:

Bootstrap installation
We would use the bootstrap CDN instead of flask-bootstrap because flask-bootstrap limits us and it is complex to use. Use this link to understand bootstrap in flask better: https://youtu.be/IRNMEML3RoA
Copy this code and paste it after the title tag in your layout.html like this:
 <title>My Flask Blog</title>
    <link rel="stylesheet" href="https://maxcdn.bootstrapcdn.com/bootstrap/3.3.7/css/bootstrap.min.css">
Next, copy the JavaScript code and paste it above the ending body tag like this:
    <script src="https://maxcdn.bootstrapcdn.com/bootstrap/3.3.7/js/bootstrap.min.js"></script>
</body>
Bootstrap should be enabled. Reload and you will notice changes such as a change in fonts and no padding.
NavBar
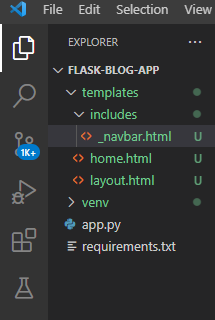
The NavBar should show on every route page so it will be added to the HTML layout file. Create a folder under templates folder named includes then create a file named _navbar.html and it should look like this:

Add this code to _navbar file:
<nav class="navbar navbar-default">
    <div class="container">
      <div class="navbar-header">
        <button type="button" class="navbar-toggle collapsed" data-toggle="collapse" data-target="#navbar" aria-expanded="false" aria-controls="navbar">
          <span class="sr-only">Toggle navigation</span>
          <span class="icon-bar"></span>
          <span class="icon-bar"></span>
          <span class="icon-bar"></span>
        </button>
        <a class="navbar-brand" href="#">My Flask BlogApp</a>
      </div>
      <div id="navbar" class="collapse navbar-collapse">
        <ul class="nav navbar-nav">
          <li><a href="/">Home</a></li>
          <li><a href="/about">About</a></li>
          <li><a href="/articles">Articles</a></li>
        </ul>
      </div>
    </div>
  </nav>
Then include the navbar file in your layout file and wrap the body in a container class.
{% include 'includes/_navbar.html' %}
    <div class="container">
        {% block body%}{% endblock%}
    </div>
Refresh and you notice that the content now has padding.
The about and articles links won't work because we have not created the routes.
Home routes
Let's finish our home route
{% extends 'layout.html' %}

{% block body %}
    <div class="jumbtron text-center">
        <h1>Welcome To BlogIt!</h1>
        <p class="lead"> This is a blog application built on the Python Flask Framework and users can upload articles.</p>
    </div>
{% endblock %
This should be your result so far:

Yeah, I decided to give it a name.
About routes
Let's create a route for our about page
@app.route('/about')
def about():
    return render_template('about.html')
And create our HTML file
{% extends 'layout.html' %}

{% block body %}
    <h1>About Us</h1>
    <p>Lorem ipsum dolor sit amet consectetur adipisicing elit. Est aperiam aspernatur facilis distinctio commodi maxime repellendus recusandae, beatae nihil molestias voluptatum, itaque possimus porro, eum praesentium saepe maiores repudiandae ea.</p>
{% endblock %}
Refresh and check about page.
Article routes
We would be using dummy data to display our articles page. First, let's create our routes.
@app.route('/articles')
def articles():
    return render_template('articles.html')
Then, create our dummy article data. Create a file called article_data.py
Add some dummy data in it like this:
def Articles():
    articles = [
        {
            'id': 1,
            'title': 'First article',
            'body': 'lorem ipsum adhdyj gdh gsshh hu gdh gsh asgasd sdivvvvFVUvjusd cgibsdjhbcu',
            'author': 'Sophia Iroegbu',
            'date_created': '26-01-2022'
        },
        {
            'id': 2,
            'title': 'Second article',
            'body': 'lorem ipsum adhdyj gdh gsshh hu gdh gsh asgasd sdivvvvFVUvjusd cgibsdjhbcu',
            'author': 'John Doe',
            'date_created': '25-01-2022'
        },
        {
            'id': 3,
            'title': 'Third article',
            'body': 'lorem ipsum adhdyj gdh gsshh hu gdh gsh asgasd sdivvvvFVUvjusd cgibsdjhbcu',
            'author': 'Mary James',
            'date_created': '26-01-2022'
        },
    ]


    return articles
Afterward, import it and add it to your article route in your entry file, app.py. It should look like this:
from flask import Flask, render_template
from article_data import Articles

app = Flask(__name__)

Articles = Articles()

@app.route('/')
def index():
    return render_template('home.html')

@app.route('/about')
def about():
    return render_template('about.html')

@app.route('/articles')
def articles():
    return render_template('articles.html', articles = Articles)

if __name__ == '__main__':
    app.run(debug=True)
Next, we will create a function that will loop through our data in article_data and display the article titles on the articles page.
{% extends 'layout.html' %}

{% block body %}
  <h1>Articles</h1>
  <ul class="list-group">
    {% for article in articles %}
      {{article.title}}
    {% endfor %}
  </ul>
{% endblock %}
Then wrap the articles in an unordered list of items and each title in an ordered list.
  <h1>Articles</h1>
  <ul class="list-group">
    {% for article in articles %}
      <li class="list-group-item">{{articles.title}}</li>
    {% endfor %}
  </ul>
You should have something like this:

Next wrap each article title to a link
{% for article in articles %}
      <li class="list-group-item"><a href="article/{{article.id}}">{{article.title}}</a></li>
    {% endfor %}
Refresh and you'd notice the change in title color and if you click any one, you'd see an error that is because we haven't created routes to display an article by id.
Display article route
@app.route('/articles/<string:id>/')
def display_article(id):
    return render_template('article.html', articles = Articles)
What we did was to specify the type of data we want to receive then use received data to query to the database and fetch the article by id. Since we are not using any database yet. Let's pass the id in the display articles routes like this:
@app.route('/article/<string:id>/')
def display_article(id):
    return render_template('article.html', id=id)
Refresh and click an article link, you should see an Id on the page.
When we implement a MySQL database, we will display the full article.
Congratulations, you just took a huge step in creating your first flask blog web app! You are officially a developer 🚀
Onto the next feature!

Source code
Like I said earlier, I am coding alongside this article so the source code is available on my GitHub: https://github.com/Sophyia7/flask-blog-app
You can fork and make some changes if you wish, it's 100% open source.
Thank you for reading!
Follow us on Twitter for more tech blogs.
Until next time,
Sophia Iroegbu.


Comments (0)