Your Functionality
If this is your first time using Wave, you may find yourself asking, "Where do I add my own logic and functionality?" The Answer to that is pretty simple. Let's cover it below.
Common Practice
Wave is built using the popular Laravel Framework, which means you can add functionality in all the familiar places like controllers, models, services, and more.
You will most-likely want to structure your code in a way that keeps everything organized and maintainable. With that said, we do have a small recommendation that might help.
Recommended Approach
Because Wave utilizes single-file volt pages, we recommend using single-file Livewire Volt pages when adding new functionality. It will help keep your code organized and make future Wave upgrades more manageable.
If you follow this recommended approach, it may still be beneficial to abstract any complex logic into a service class or controller to keep the code within your single-file volt page clean and maintainable.
While this approach simplifies development, you’re completely free to choose how to structure your application. The bottom line is that there’s no wrong way to add logic to your application.
Recommended Example
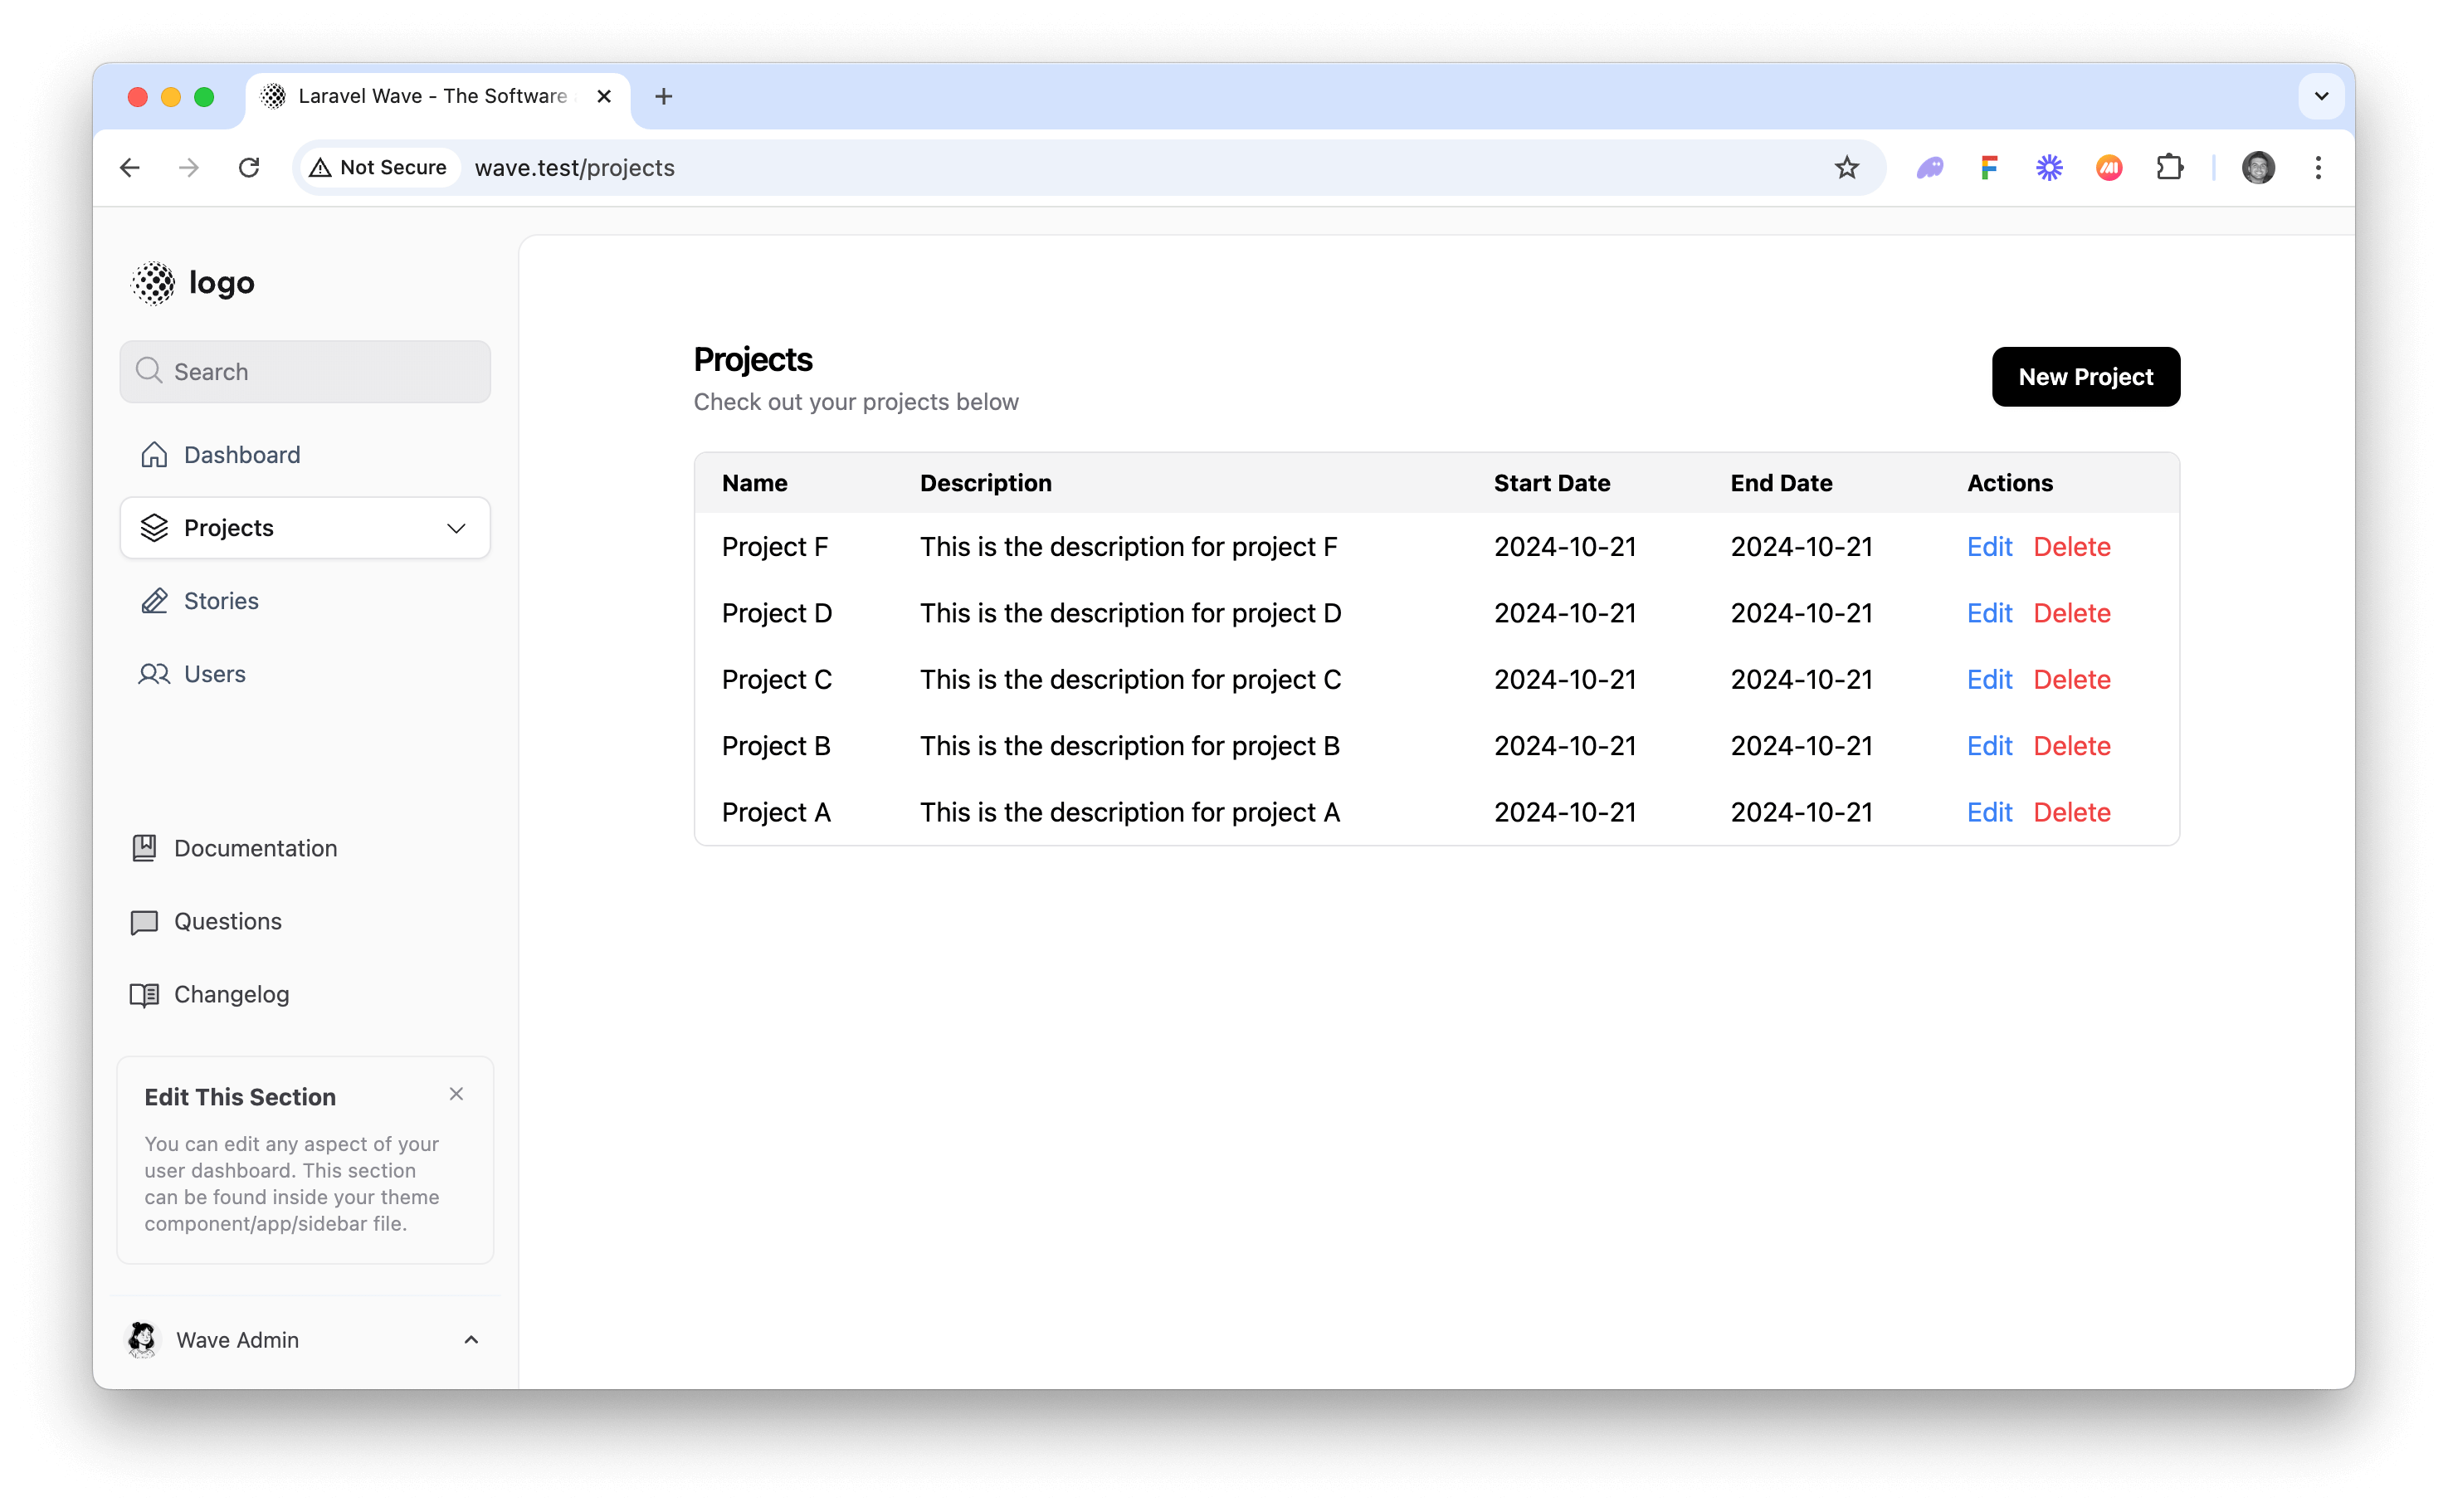
It may be helpful to see an example. In this example we will create a projects page where users can view, add, or delete projects. Here's a screenshot of the functional projects page that we will create.

First we'll create the migration and the model. Add the following files to your Wave project:
use Illuminate\Database\Migrations\Migration;
use Illuminate\Database\Schema\Blueprint;
use Illuminate\Support\Facades\Schema;

class CreateProjectsTable extends Migration
{
    public function up()
    {
        Schema::create('projects', function (Blueprint $table) {
            $table->id();
            $table->string('name');
            $table->text('description')->nullable();
            $table->date('start_date')->nullable();
            $table->date('end_date')->nullable();
            $table->foreignId('user_id')->constrained()->onDelete('cascade');
            $table->timestamps();
        });
    }

    public function down()
    {
        Schema::dropIfExists('projects');
    }
}
namespace App\Models;

use Illuminate\Database\Eloquent\Model;

class Project extends Model
{
    protected $fillable = [
        'name',
        'description',
        'start_date',
        'end_date',
        'user_id',
    ];

    protected $casts = [
        'start_date' => 'date',
        'end_date' => 'date',
    ];

    public function user()
    {
        return $this->belongsTo(User::class);
    }
}
Make sure to run php artisan migrate to add the project table.
Next, let's create the volt page to list our projects. Add the following file contents:
<?php
    use function Laravel\Folio\{middleware, name};
    use App\Models\Project;
    use Livewire\Volt\Component;
    middleware('auth');
    name('projects');

    new class extends Component{
        public $projects;

        public function mount()
        {
            $this->projects = auth()->user()->projects()->latest()->get();
        }

        public function deleteProject(Project $project)
        {
            $project->delete();
            $this->projects = auth()->user()->projects()->latest()->get();
        }
    }
?>

<x-layouts.app>
    @volt('projects')
        <x-app.container>

            <div class="flex items-center justify-between mb-5">
                <x-app.heading
                        title="Projects"
                        description="Check out your projects below"
                        :border="false"
                    />
                <x-button tag="a" href="/projects/create">New Project</x-button>
            </div>

            @if($projects->isEmpty())
                <div class="w-full p-20 text-center bg-gray-100 rounded-xl">
                    <p class="text-gray-500">You don't have any projects yet.</p>
                </div>
            @else
                <div class="overflow-x-auto border rounded-lg">
                    <table class="min-w-full bg-white">
                        <thead class="text-sm bg-gray-100">
                            <tr>
                                <th class="px-4 py-2 text-left">Name</th>
                                <th class="px-4 py-2 text-left">Description</th>
                                <th class="px-4 py-2 text-left">Start Date</th>
                                <th class="px-4 py-2 text-left">End Date</th>
                                <th class="px-4 py-2 text-left">Actions</th>
                            </tr>
                        </thead>
                        <tbody>
                            @foreach($projects as $project)
                                <tr>
                                    <td class="px-4 py-2">{{ $project->name }}</td>
                                    <td class="px-4 py-2">{{ Str::limit($project->description, 50) }}</td>
                                    <td class="px-4 py-2">{{ $project->start_date ? $project->start_date->format('Y-m-d') : 'N/A' }}</td>
                                    <td class="px-4 py-2">{{ $project->end_date ? $project->end_date->format('Y-m-d') : 'N/A' }}</td>
                                    <td class="px-4 py-2">
                                        <a href="/project/edit/{{ $project->id }}" class="mr-2 text-blue-500 hover:underline">Edit</a>
                                        <button wire:click="deleteProject({{ $project->id }})" class="text-red-500 hover:underline">Delete</button>
                                    </td>
                                </tr>
                            @endforeach
                        </tbody>
                    </table>
                </div>
            @endif
        </x-app.container>
    @endvolt
</x-layouts.app>
In order for the code above to work, you will need to add the projects() method to your User model.
public function projects()
{
    return $this->hasMany(Project::class);
}
Visit your application URL at app_url.test/projects and you will see a screen like the following:

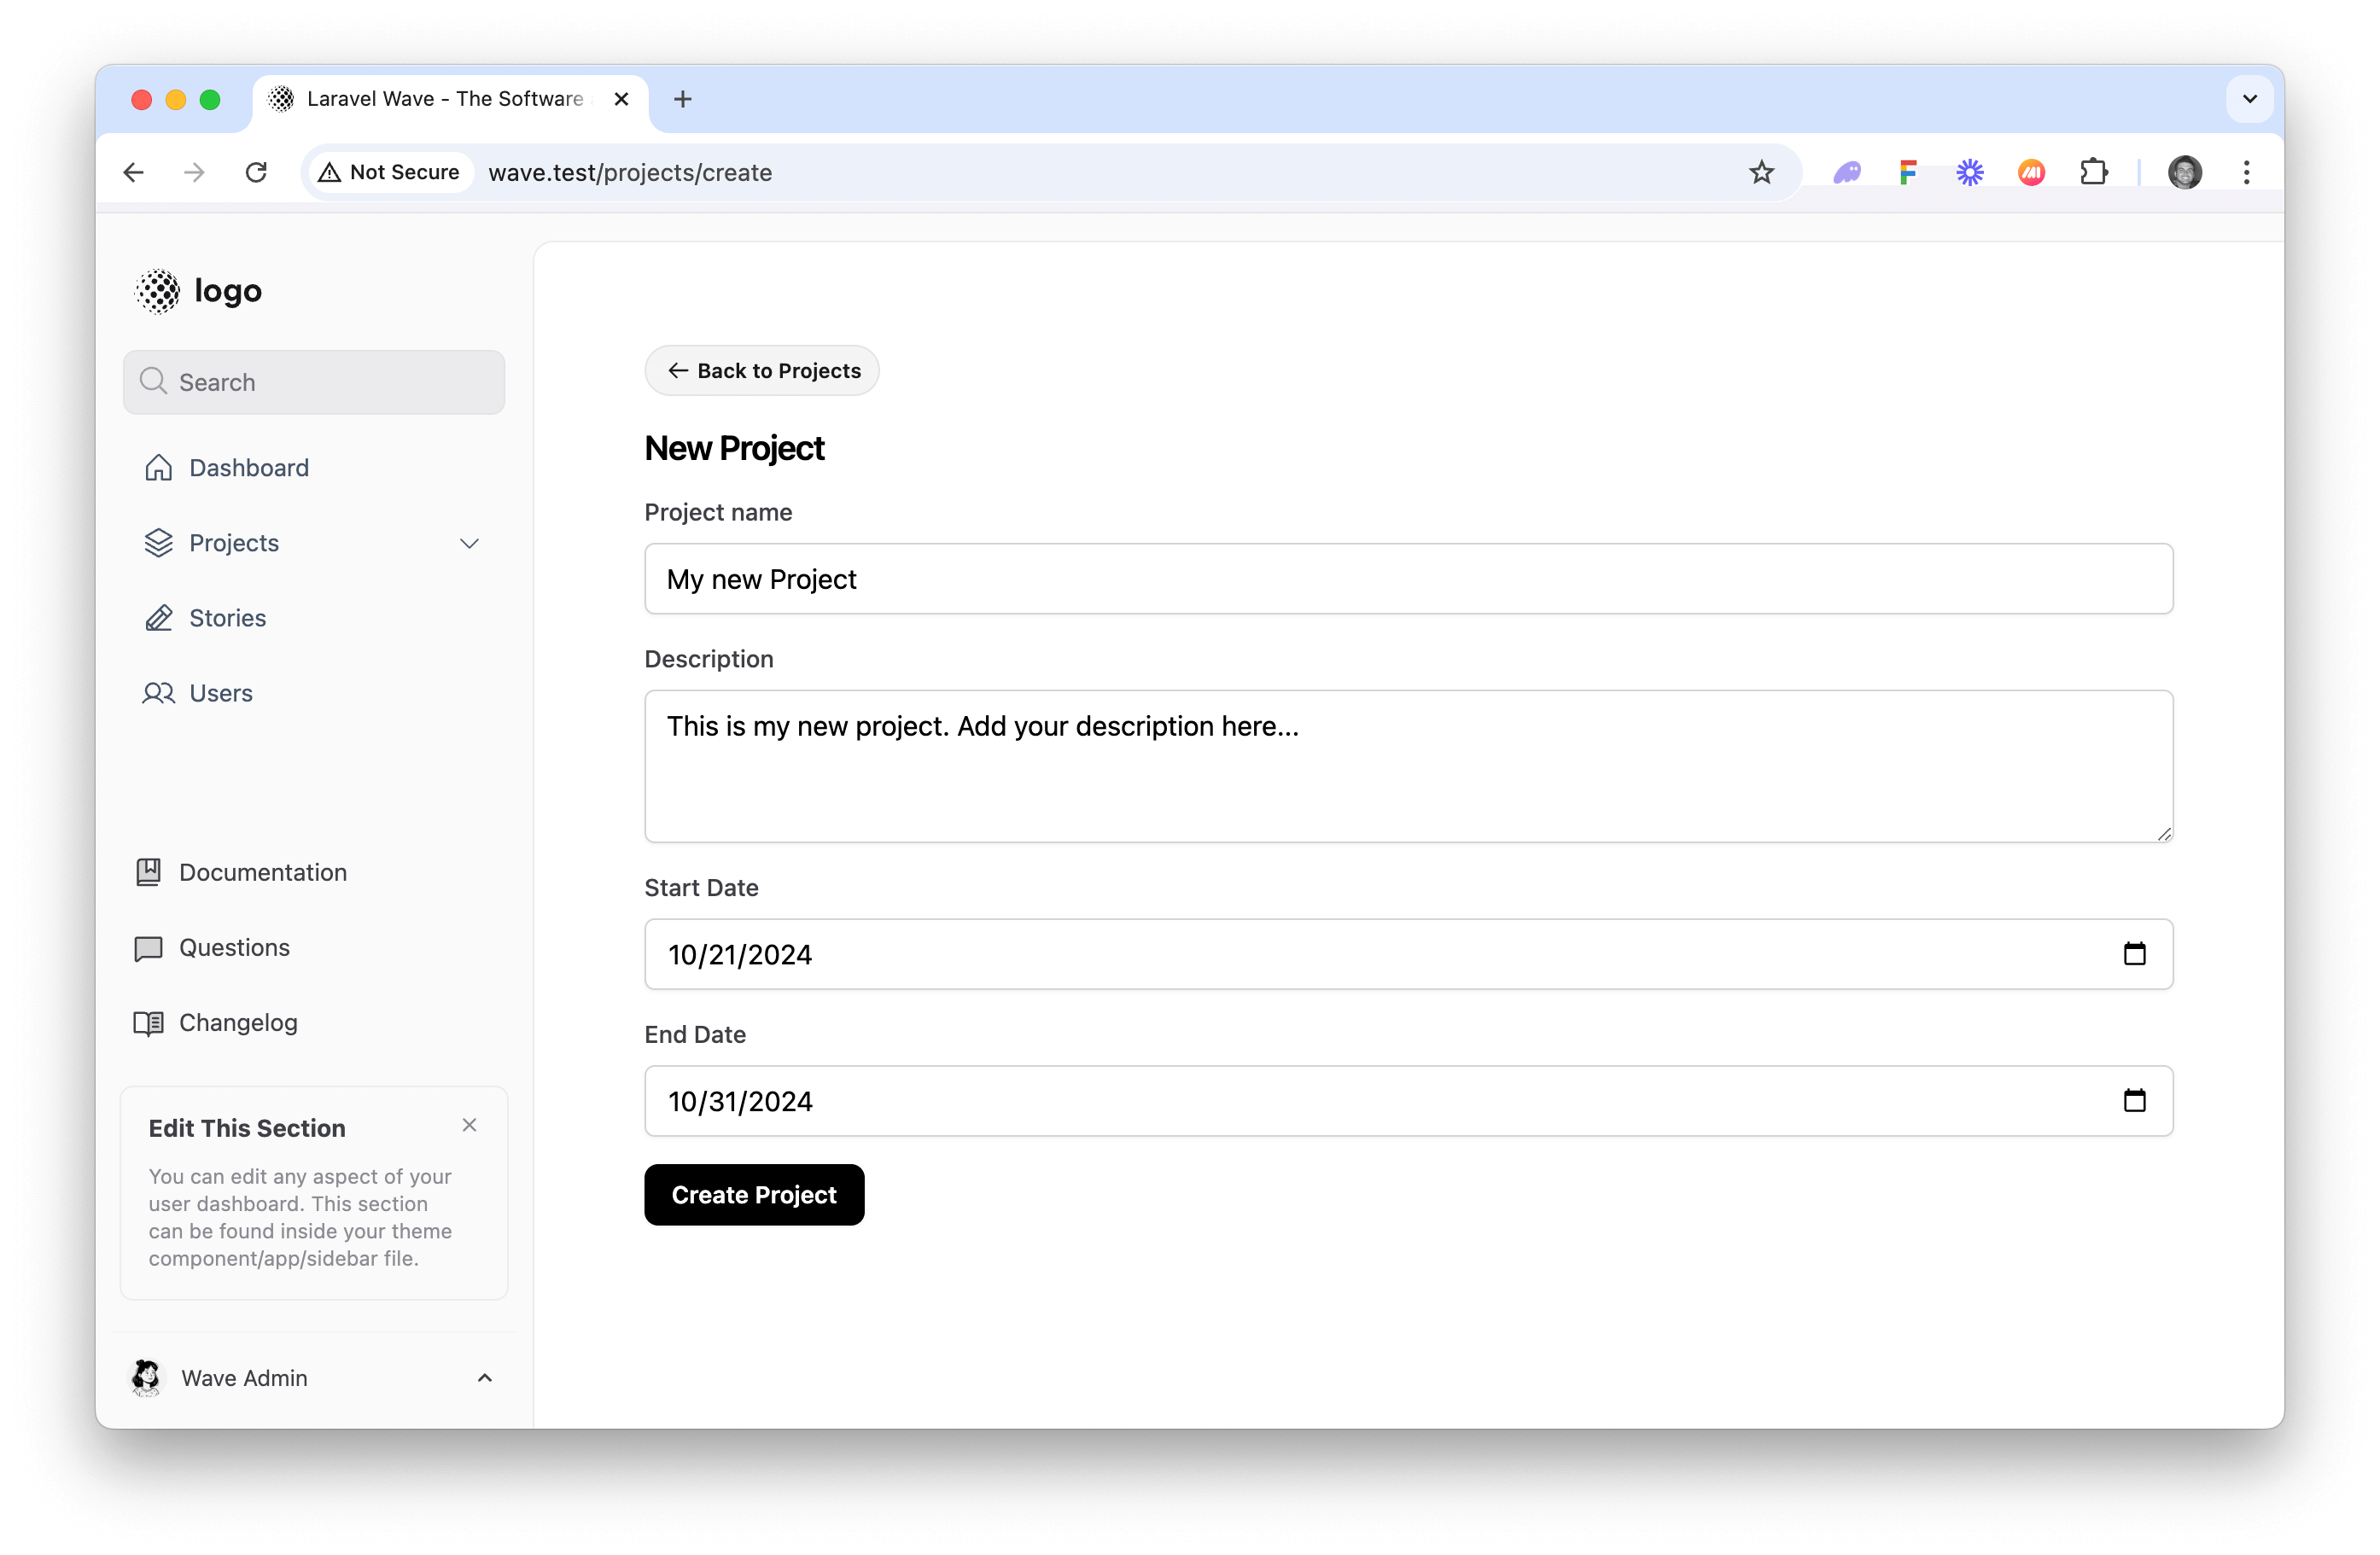
This page will output all the projects that belong to this specific user, but right now there are no projects. But, we can easily add a create project volt page to allow us to create projects. Create another file inside the projects folder called create.blade.php, with the following contents:
<?php
    use function Laravel\Folio\{middleware, name};
    use Livewire\Attributes\Validate;
    use Livewire\Volt\Component;
    middleware('auth');
    name('projects.create');

    new class extends Component
    {
        #[Validate('required|min:3|max:255')]
        public $name = '';

        #[Validate('nullable|max:1000')]
        public $description = '';

        #[Validate('nullable|date')]
        public $start_date = '';

        #[Validate('nullable|date|after_or_equal:start_date')]
        public $end_date = '';

        public function save()
        {
            $validated = $this->validate();

            $project = auth()->user()->projects()->create($validated);

            session()->flash('message', 'Project created successfully.');

            $this->redirect(route('projects'));
        }
    }
?>

<x-layouts.app>
    @volt('projects.create')
        <x-app.container>

            <x-elements.back-button
                class="max-w-full mx-auto mb-3"
                text="Back to Projects"
                :href="route('projects')"
            />

            <div class="flex items-center justify-between mb-3">
                <x-app.heading
                        title="New Project"
                        description=""
                        :border="false"
                    />
            </div>

            <form wire:submit="save" class="space-y-4">
                <div>
                    <label for="description" class="block mb-2 text-sm font-medium text-gray-700">Project name</label>
                    <input type="text" id="name" wire:model.live="name" class="block w-full mt-1 border-gray-300 rounded-md shadow-xs focus:border-indigo-300 focus:ring-3 focus:ring-indigo-200 focus:ring-opacity-50">
                    @error('name') <span class="text-xs text-red-500">{{ $message }}</span> @enderror
                </div>
                <div>
                    <label for="description" class="block mb-2 text-sm font-medium text-gray-700">Description</label>
                    <textarea id="description" wire:model.live="description" rows="3" class="block w-full mt-1 border-gray-300 rounded-md shadow-xs focus:border-indigo-300 focus:ring-3 focus:ring-indigo-200 focus:ring-opacity-50"></textarea>
                    @error('description') <span class="text-xs text-red-500">{{ $message }}</span> @enderror
                </div>

                <div>
                    <label for="start_date" class="block mb-2 text-sm font-medium text-gray-700">Start Date</label>
                    <input type="date" id="start_date" wire:model.live="start_date" class="block w-full mt-1 border-gray-300 rounded-md shadow-xs focus:border-indigo-300 focus:ring-3 focus:ring-indigo-200 focus:ring-opacity-50">
                    @error('start_date') <span class="text-xs text-red-500">{{ $message }}</span> @enderror
                </div>

                <div>
                    <label for="end_date" class="block mb-2 text-sm font-medium text-gray-700">End Date</label>
                    <input type="date" id="end_date" wire:model.live="end_date" class="block w-full mt-1 border-gray-300 rounded-md shadow-xs focus:border-indigo-300 focus:ring-3 focus:ring-indigo-200 focus:ring-opacity-50">
                    @error('end_date') <span class="text-xs text-red-500">{{ $message }}</span> @enderror
                </div>

                <div>
                    <x-button type="submit">
                        Create Project
                    </x-button>
                </div>
            </form>
        </x-app.container>
    @endvolt
</x-layouts.app>
This will allow us to navigate to app_url.test/projects/create, where we can create a new project.

After creating a few new projects, you can navigate back the app_url.test/projects and see a list of these new projects.

This is just an example of how you can add custom logic for your application. But again, there is no right or wrong way to do this. However you're most comfortable adding and maintaining the logic in your app is the way to go.
Using FilamentPHP
FilamentPHP is used for the Admin section of Wave; however, it can also be used for much more. In addition to an Admin Panel builder Filament also provides a collection of very useful components, such as the Table Builder and the Form Builder. Visit the Using Filament With Volt Guide to learn how to utilze them in your app.