Using Filament with Volt
Using Filament within Wave will speed-up your productivity. In this guide we'll use the example from the Your Functionality section to implement the same functionality using the Table Builder and the Form Builder.
- Using Filament with Volt
- Using the Table Builder
- Using the Form Builder
- Combining the Table and Form Builder
We will assume that you've already added the database migration and the model for the projects table in this section. Be sure to finish the Your Functionality section before continuing with this guide.
Using the Table Builder
Inside of our pages/projects/index.blade.php page, we listed out a table view of projects owned by the user. To make things simpler, we can utilize the Table Builder to display our projects like so:
<?php
    use App\Models\Project;
    use Filament\Forms\Concerns\InteractsWithForms;
    use Filament\Forms\Contracts\HasForms;
    use Filament\Tables;
    use Filament\Tables\Columns\TextColumn;
    use Filament\Tables\Table;
    use Livewire\Volt\Component;
    use function Laravel\Folio\{middleware, name};

    middleware('auth');
    name('projects');

    new class extends Component implements HasForms, Tables\Contracts\HasTable
    {
        use InteractsWithForms, Tables\Concerns\InteractsWithTable;

        public ?array $data = [];

        public function table(Table $table): Table
        {
            return $table
                ->query(Project::query()->where('user_id', auth()->id()))
                ->columns([
                    TextColumn::make('name')
                        ->searchable()
                        ->sortable(),
                    TextColumn::make('description')
                        ->limit(50)
                        ->searchable(),
                    TextColumn::make('start_date')
                        ->date()
                        ->sortable(),
                    TextColumn::make('end_date')
                        ->date()
                        ->sortable(),
                    TextColumn::make('created_at')
                        ->dateTime()
                        ->sortable()
                        ->toggleable(isToggledHiddenByDefault: true),
                ])
                ->defaultSort('created_at', 'desc');
        }
    }
?>

<x-layouts.app>
    @volt('projects')
        <x-app.container>
            <div class="flex items-center justify-between mb-5">
                <x-app.heading title="Projects" description="Check out your projects below" :border="false" />
                <x-button tag="a" href="/projects/create">New Project</x-button>
            </div>
            <div class="overflow-x-auto border rounded-lg">
                {{ $this->table }}
            </div>
        </x-app.container>
    @endvolt
</x-layouts.app>
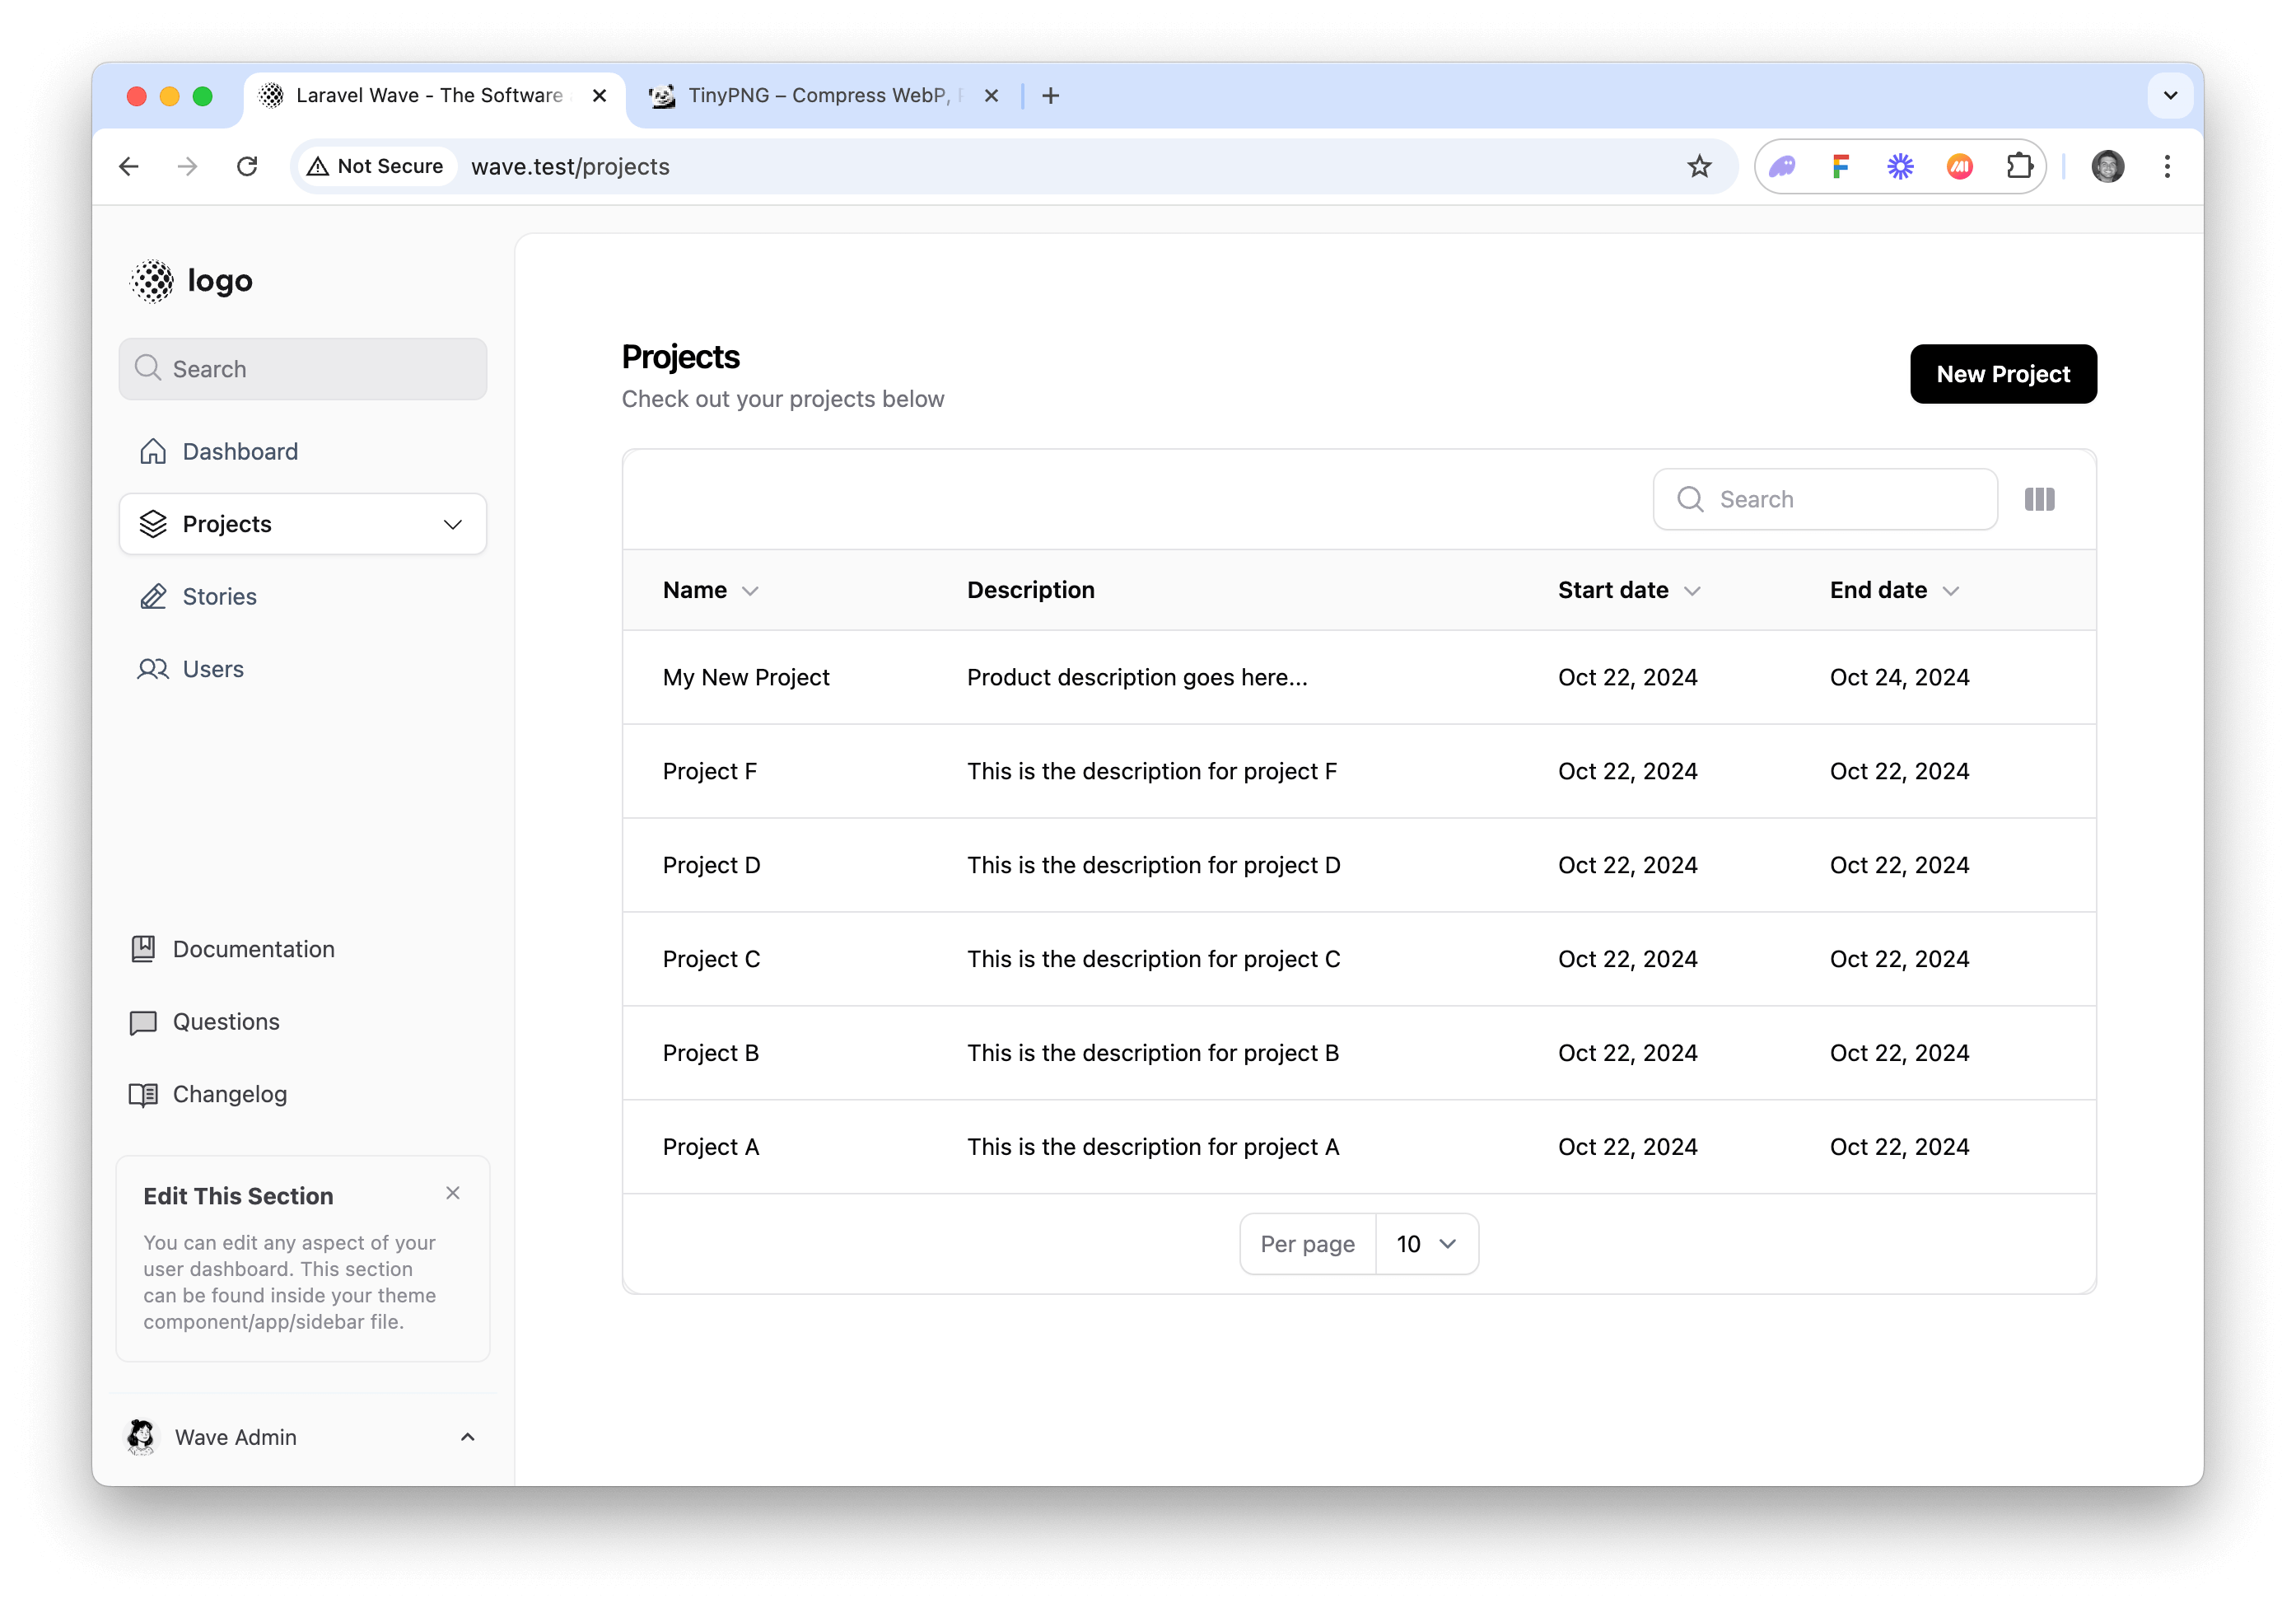
This code will generate a sortable and searchable table of user projects. Screenshot below.
Next, let's use the Form Builder to simplify the process of creating a new project.
Using the Form Builder
We can utilize the Form Builder to make creating new projects easier. Here’s an example of what the code might look like in our projects/create.blade.php file:
<?php
    use Filament\Forms\Components\TextInput;
    use Filament\Forms\Components\Textarea;
    use Filament\Forms\Components\DatePicker;
    use Filament\Forms\Concerns\InteractsWithForms;
    use Filament\Forms\Contracts\HasForms;
    use Filament\Forms\Form;
    use Filament\Notifications\Notification;
    use Livewire\Volt\Component;
    use function Laravel\Folio\{middleware, name};
    use App\Models\Project;

    middleware('auth');
    name('projects.create');

    new class extends Component implements HasForms
    {
        use InteractsWithForms;

        public ?array $data = [];

        public function mount(): void
        {
            $this->form->fill();
        }

        public function form(Form $form): Form
        {
            return $form
                ->schema([
                    TextInput::make('name')
                        ->required()
                        ->maxLength(255),
                    Textarea::make('description')
                        ->maxLength(1000),
                    DatePicker::make('start_date'),
                    DatePicker::make('end_date')
                        ->after('start_date'),
                ])
                ->statePath('data');
        }

        public function create(): void
        {
            $data = $this->form->getState();

            auth()->user()->projects()->create($data);

            $this->form->fill();

            Notification::make()
                ->success()
                ->title('Project created successfully')
                ->send();

            $this->redirect('/projects');
        }
    }
?>

<x-layouts.app>
    @volt('projects.create')
        <x-app.container class="max-w-xl">
            <div class="flex items-center justify-between mb-5">
                <x-app.heading title="Create Project" description="Fill out the form below to create a new project" :border="false" />
            </div>
            <form wire:submit="create" class="space-y-6">
                {{ $this->form }}
                <div class="flex justify-end gap-x-3">
                    <x-button tag="a" href="/projects" color="secondary">Cancel</x-button>
                    <x-button type="submit" class="text-white bg-primary-600 hover:bg-primary-500">
                        Create Project
                    </x-button>
                </div>
            </form>
        </x-app.container>
    @endvolt
</x-layouts.app>
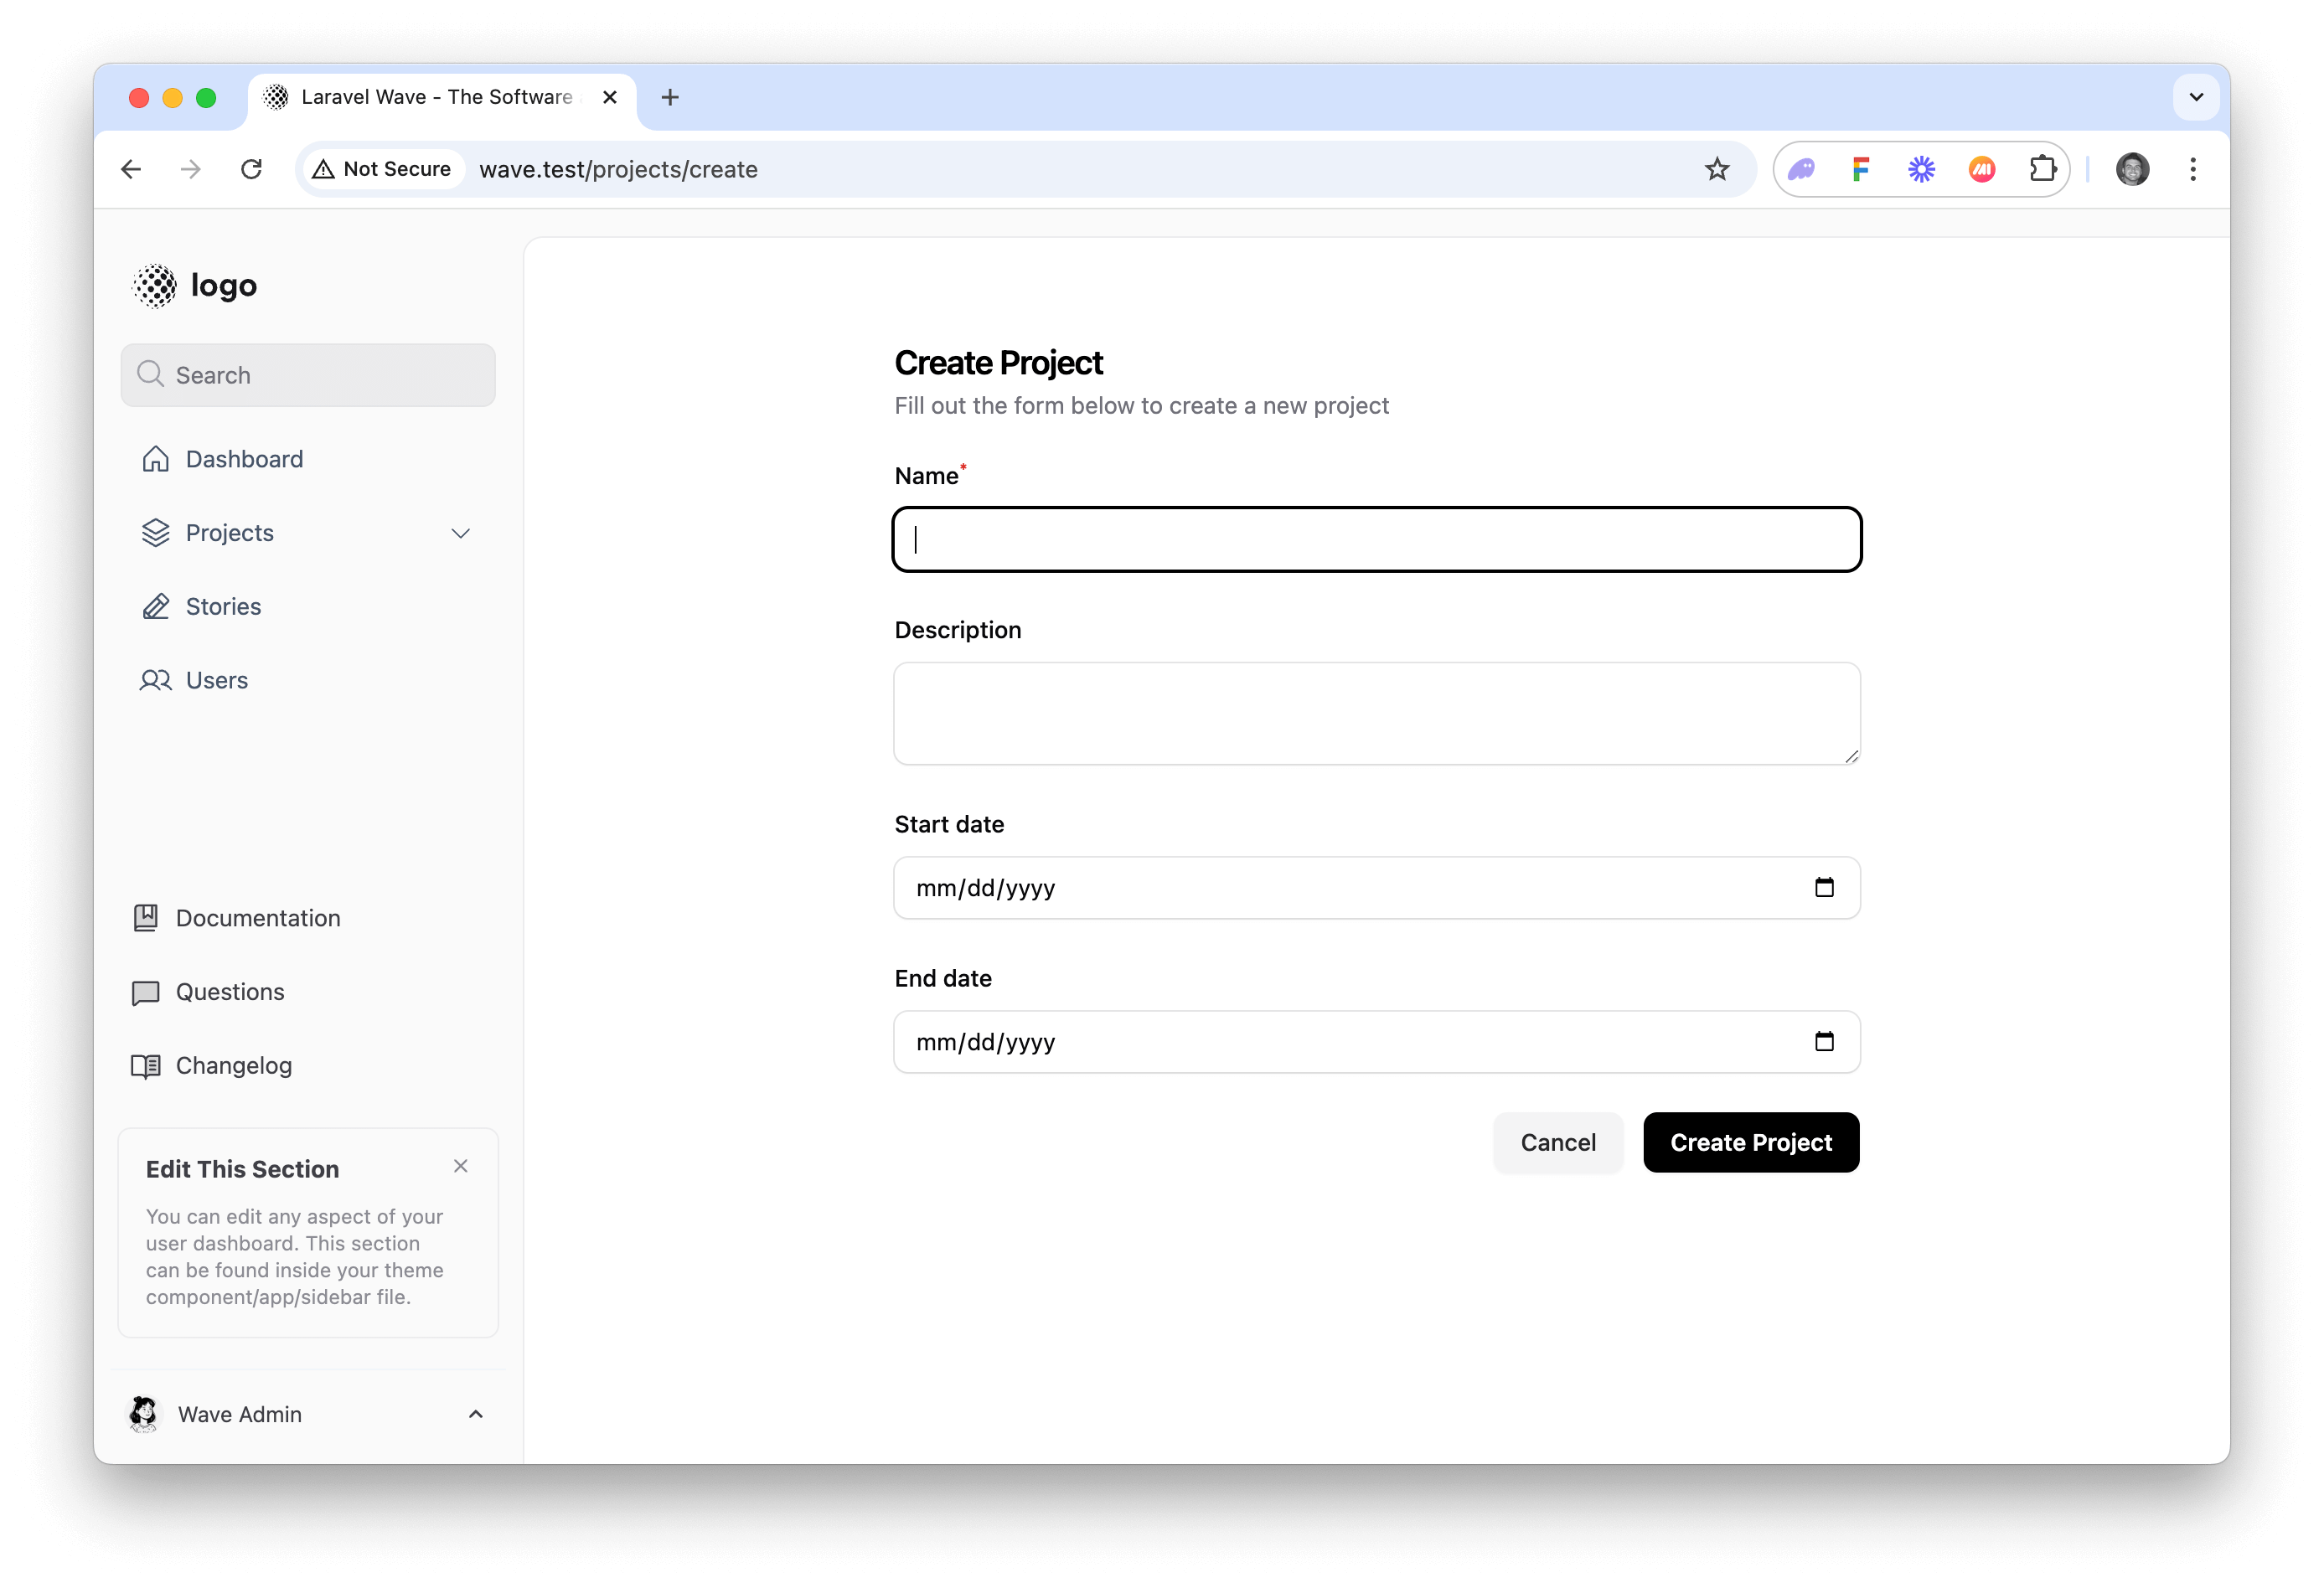
Navigating to app_url.test/projects/create will allow us to create a new project with validation.
Utilizing the FilamentPHP form and table builder we can simplify the process even more by combining the table and form builder into a single Volt Page. Let's take a look at that below.
Combining the Table and Form Builder
We can simplify the process of viewing, creating, editing, and deleting our projects by creating a single Volt Page that will handle all these operations for us. We can do this by utilizing the table and form builder together:
<?php
    use App\Models\Project;
    use Filament\Forms\{Form, Concerns\InteractsWithForms, Contracts\HasForms};
    use Filament\Forms\Components\{TextArea, TextInput, DatePicker};
    use Filament\Notifications\Notification;
    use Filament\Tables;
    use Filament\Tables\{Table, Concerns\InteractsWithTable, Contracts\HasTable, Actions\Action, Actions\CreateAction, Actions\DeleteAction, Actions\EditAction, Actions\ViewAction, Columns\TextColumn};
    use Livewire\Volt\Component;
    use function Laravel\Folio\{middleware, name};

    middleware('auth');
    name('projects');

    new class extends Component implements HasForms, Tables\Contracts\HasTable
    {
        use InteractsWithForms, InteractsWithTable;

        public ?array $data = [];

        public function table(Table $table): Table
        {
            return $table
                ->query(Project::query()->where('user_id', auth()->id()))
                ->columns([
                    TextColumn::make('name')
                        ->searchable()
                        ->sortable(),
                    TextColumn::make('description')
                        ->limit(50)
                        ->searchable(),
                    TextColumn::make('start_date')
                        ->date()
                        ->sortable(),
                    TextColumn::make('end_date')
                        ->date()
                        ->sortable(),
                    TextColumn::make('created_at')
                        ->dateTime()
                        ->sortable()
                        ->toggleable(isToggledHiddenByDefault: true),
                ])
                ->defaultSort('created_at', 'desc')
                ->actions([
                    ViewAction::make()
                        ->slideOver()
                        ->modalWidth('md')
                        ->form([
                            TextInput::make('name')
                                ->disabled(),
                            Textarea::make('description')
                                ->disabled(),
                            DatePicker::make('start_date')
                                ->disabled(),
                            DatePicker::make('end_date')
                                ->disabled(),
                        ]),
                    EditAction::make()
                        ->slideOver()
                        ->modalWidth('md')
                        ->form([
                            TextInput::make('name')
                                ->required()
                                ->maxLength(255),
                            Textarea::make('description')
                                ->maxLength(1000),
                            DatePicker::make('start_date'),
                            DatePicker::make('end_date')
                                ->after('start_date'),
                        ]),
                    DeleteAction::make()
                        ->after(function () {
                            Notification::make()
                                ->success()
                                ->title('Project deleted')
                                ->send();
                        })
                    ->mutateFormDataUsing(function (array $data): array {
                        $data['user_id'] = auth()->id();
                        return $data;
                    })
                    ->after(function () {
                        Notification::make()
                            ->success()
                            ->title('Project created')
                            ->send();
                    }),
                ])
                ->filters([
                    // Add any filters you want here
                ])
                ->bulkActions([
                    Tables\Actions\BulkActionGroup::make([
                        Tables\Actions\DeleteBulkAction::make(),
                    ]),
                ]);
        }

        public function form(Form $form): Form
        {
            return $form
                ->schema([
                    TextInput::make('name')
                        ->required()
                        ->maxLength(255),
                    Textarea::make('description')
                        ->maxLength(1000),
                    DatePicker::make('start_date'),
                    DatePicker::make('end_date')
                        ->after('start_date'),
                ])
                ->statePath('data');
        }

        public function create(): void
        {
            $data = $this->form->getState();
            $project = auth()->user()->projects()->create($data);
            $this->form->fill();
            $this->dispatch('close-modal', id: 'create-project');

            Notification::make()
                ->success()
                ->title('Project created successfully')
                ->send();
        }
    }
?>

<x-layouts.app>
    @volt('projects')
        <x-app.container class="max-w-5xl">
            <div class="flex items-center justify-between mb-5">
                <x-app.heading title="Projects" description="Check out your projects below" :border="false"/>
                <x-filament::modal id="create-project" width="md" :slide-over="true">
                    <x-slot name="trigger">
                        <x-button>New Project</x-button>
                    </x-slot>
                    <x-slot name="header">
                        <h2 class="text-lg font-medium">Create Project</h2>
                    </x-slot>
                    <form wire:submit="create" class="space-y-6">
                        {{ $this->form }}
                        <div class="flex justify-end mt-6">
                            <x-button type="submit" wire:target="create">
                                Create Project
                            </x-button>
                        </div>
                    </form>
                </x-modal>
            </div>
            <div class="overflow-x-auto border rounded-lg">
                {{ $this->table }}
            </div>
        </x-app.container>
    @endvolt
</x-layouts.app>
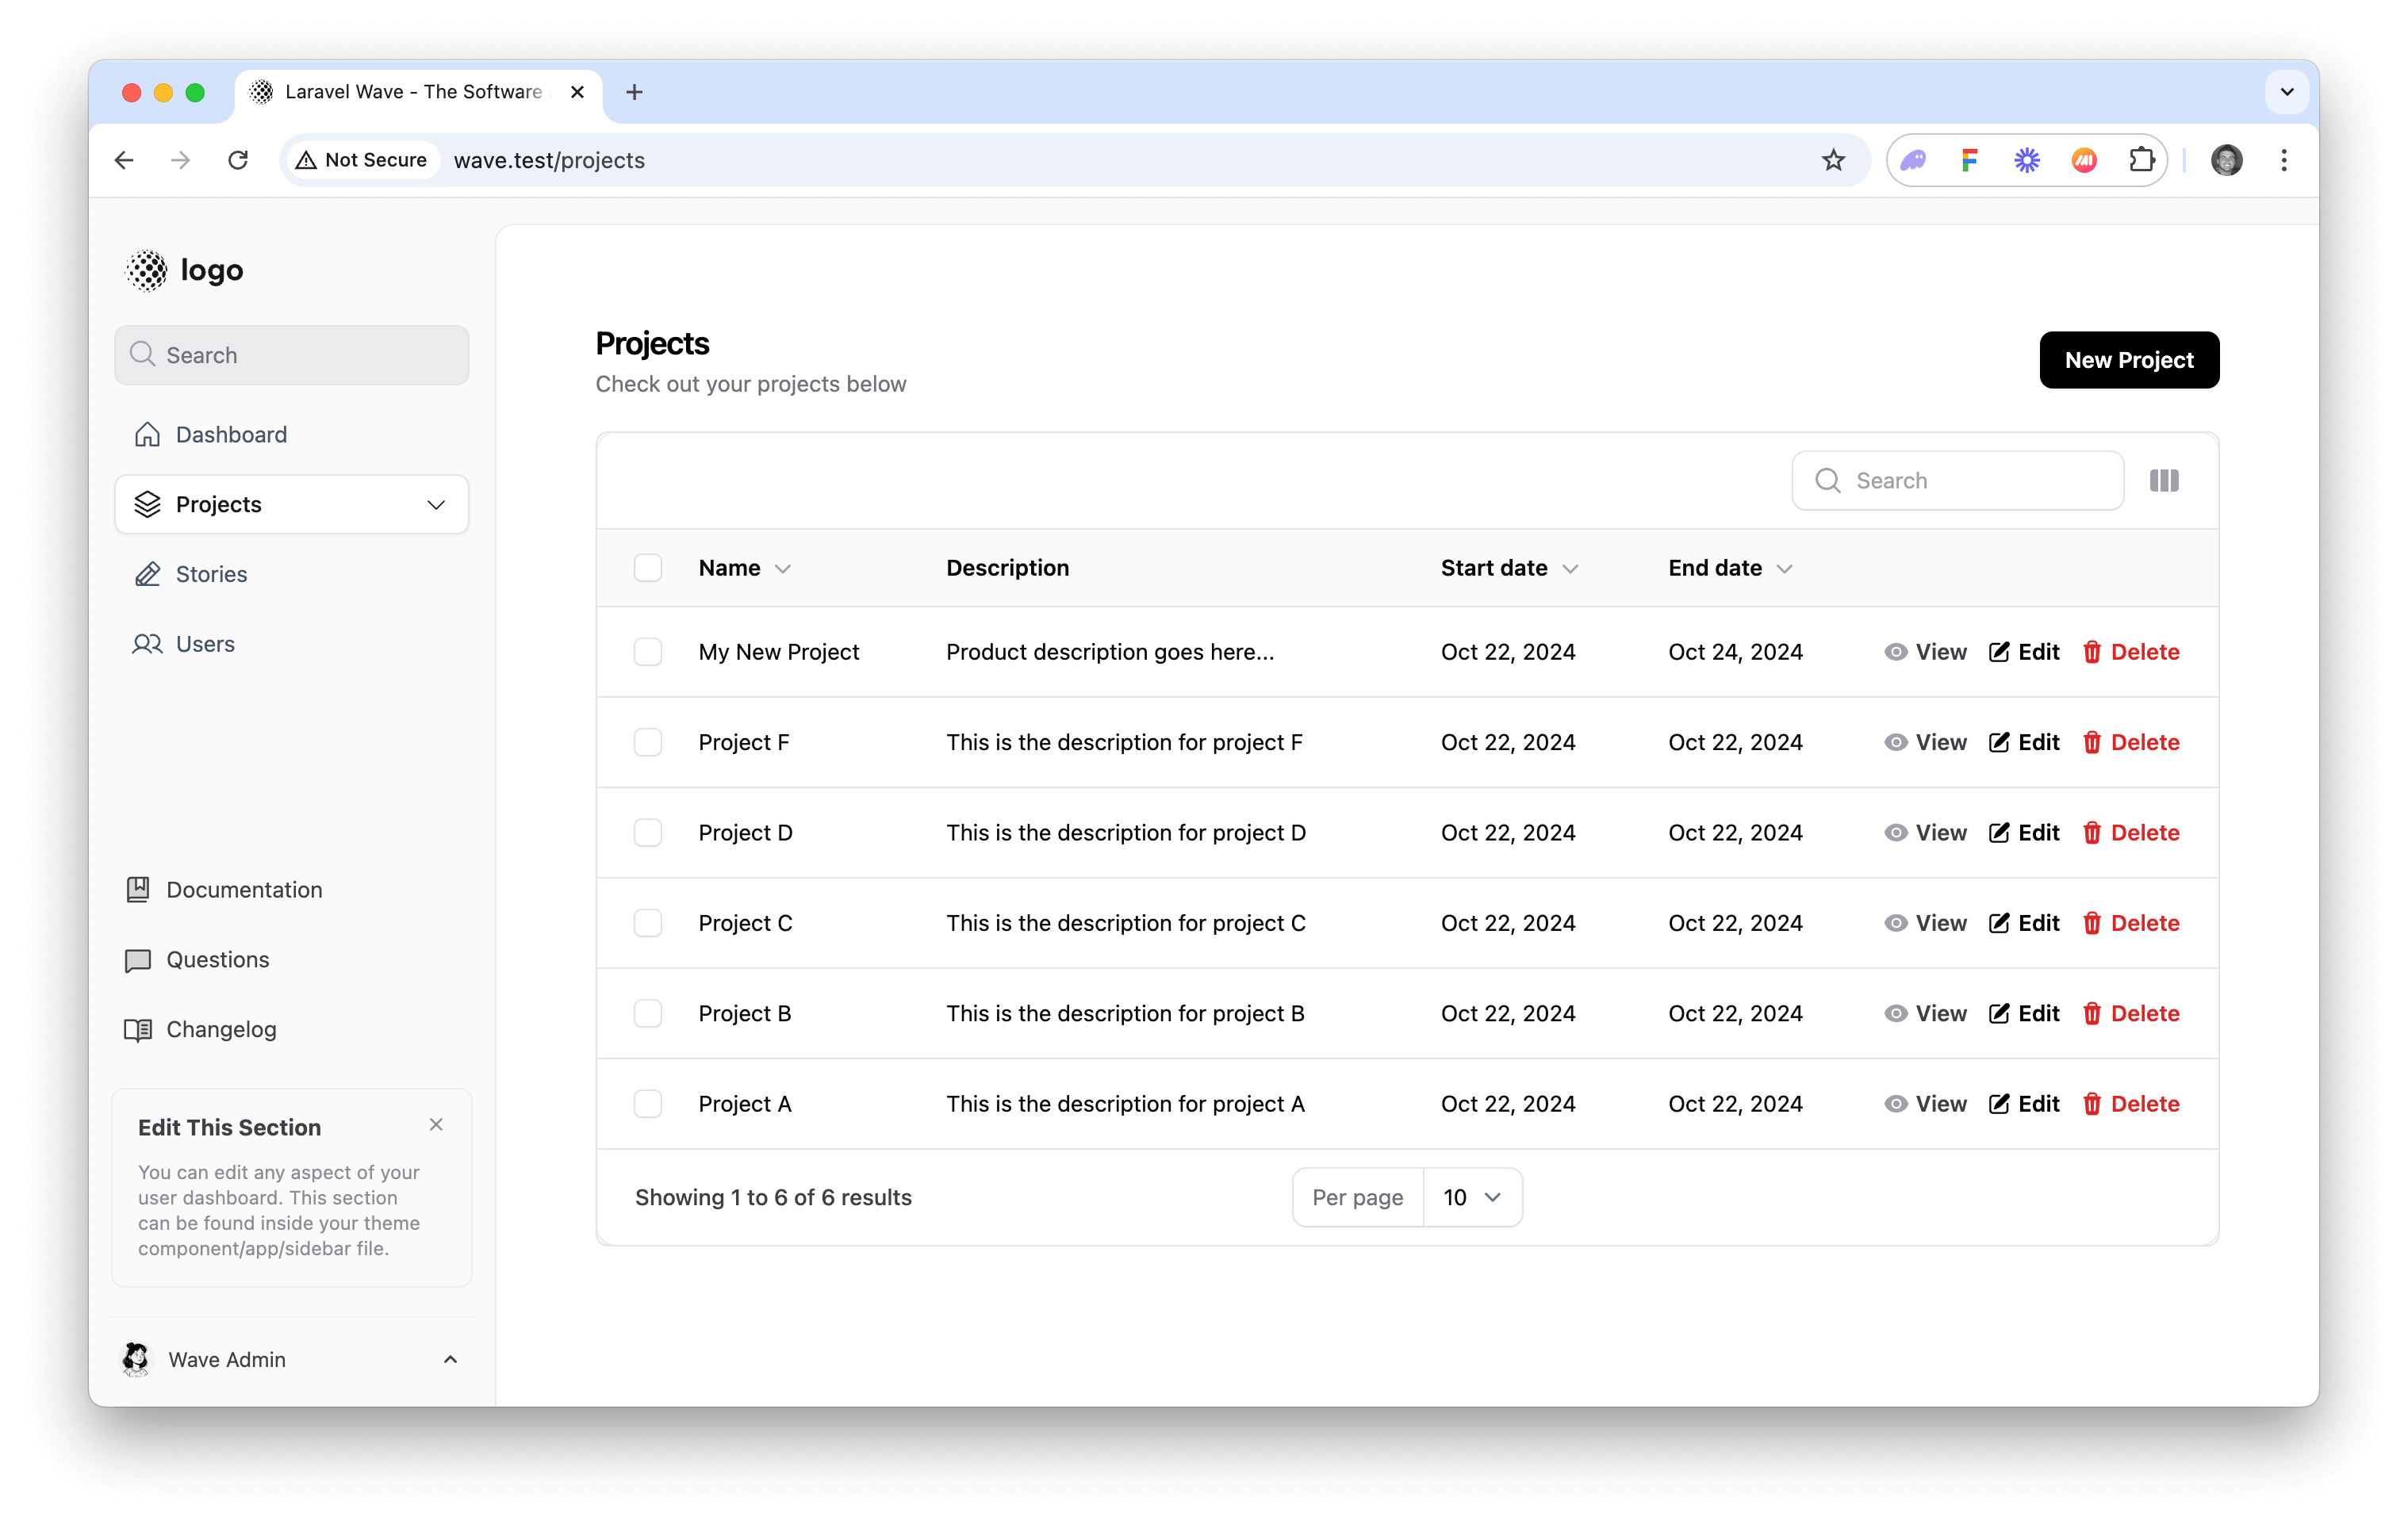
Now, when we visit app_url.test/projects we can view, create, edit, and delete projects from a single page. Here is how our new /projects page will look.
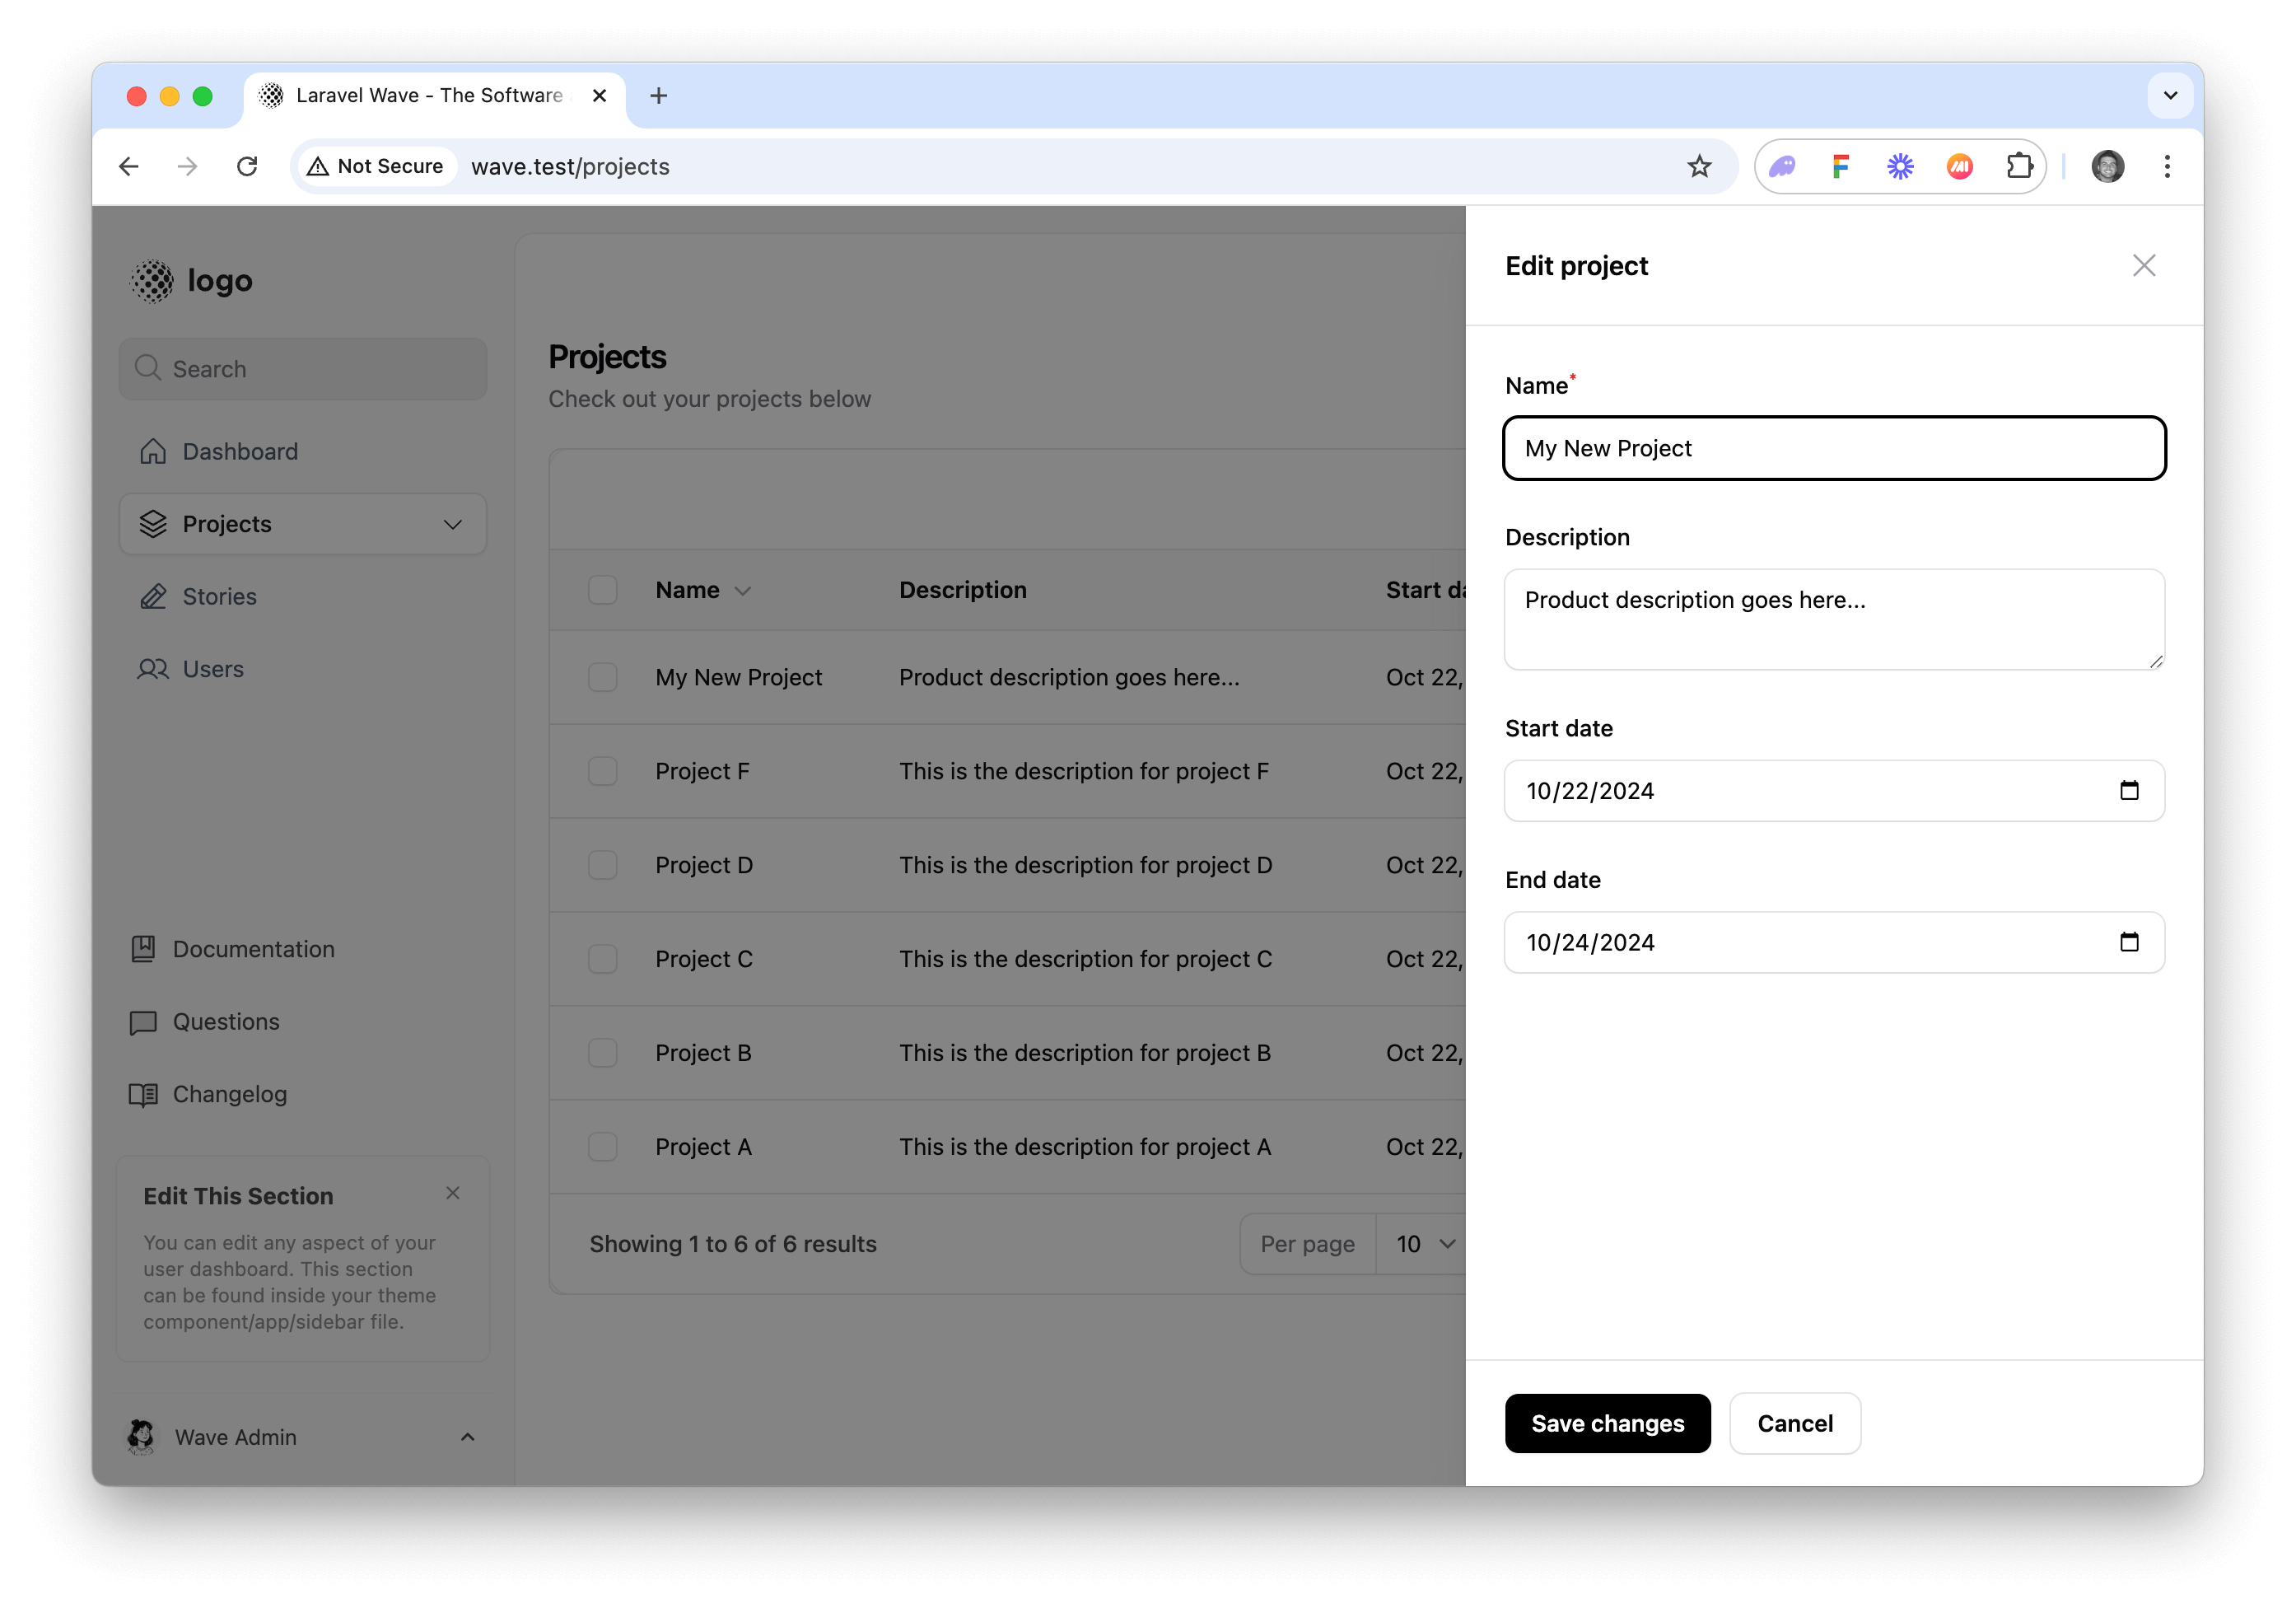
As you can see, when you click on the edit button next to a project a slide-over will open allowing you to edit the details for this project.
You can also click the New Project button and you'll see a slide-over open allowing you to create a new project.
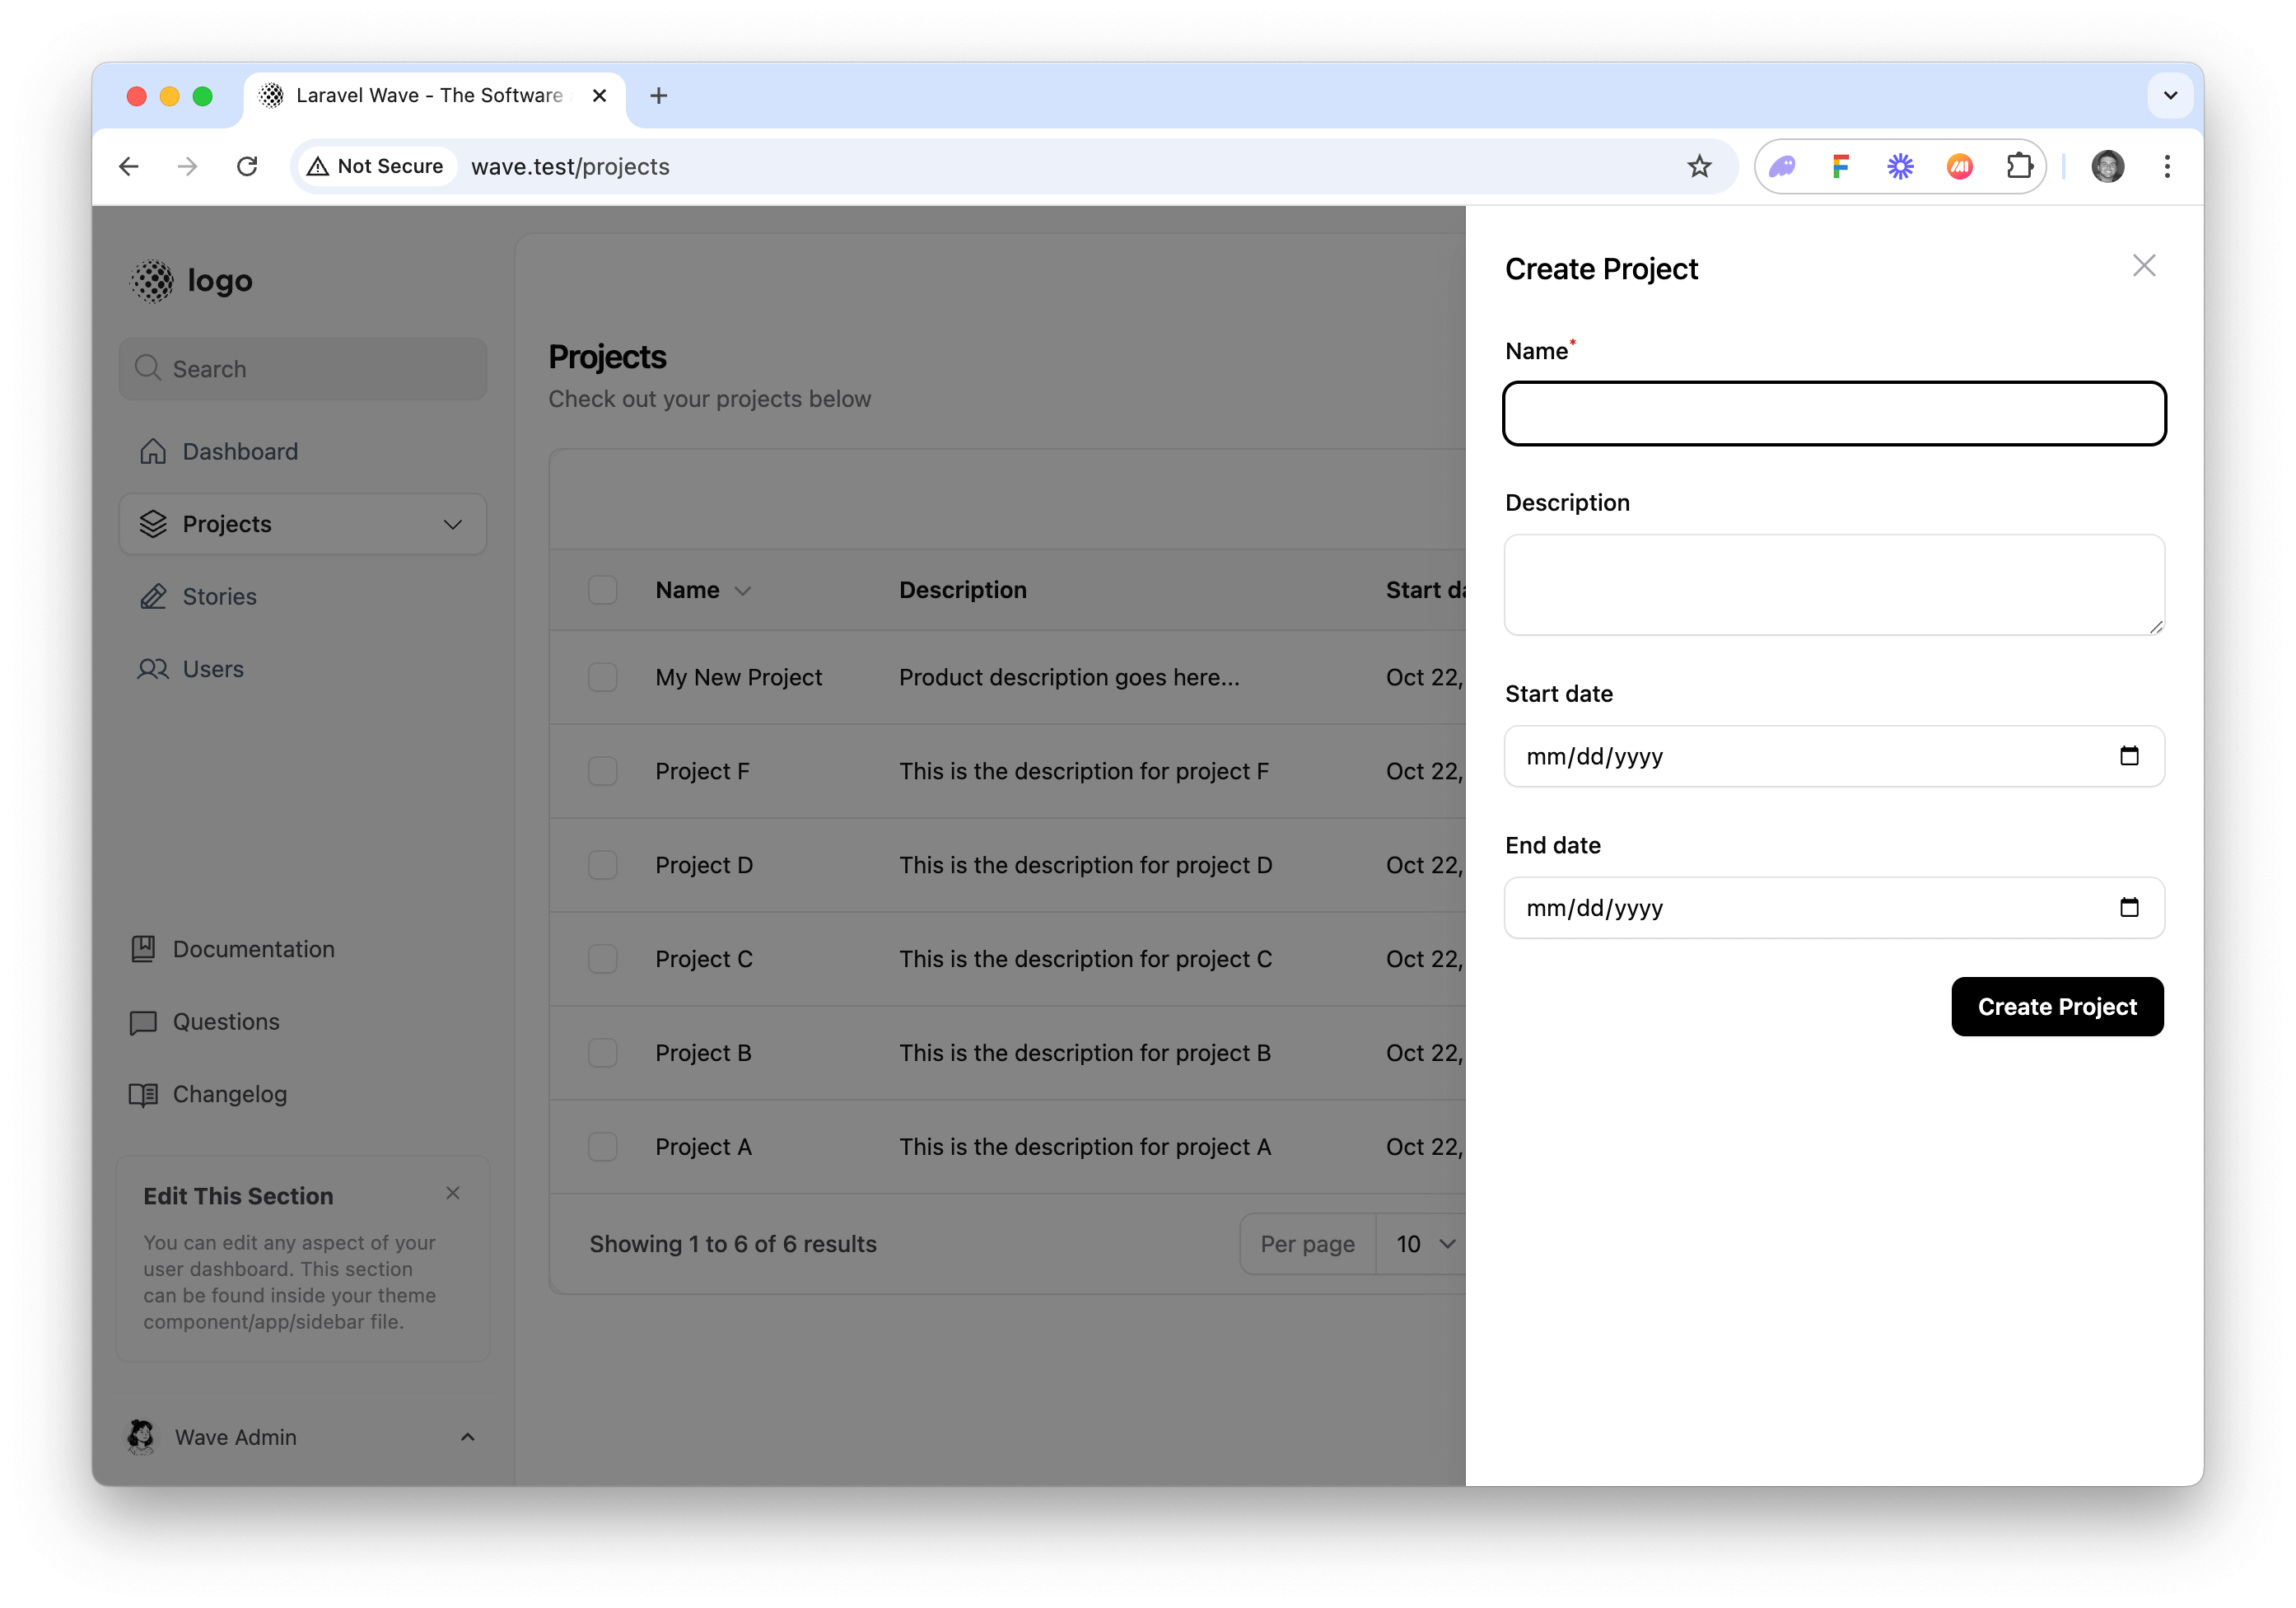
Combining the Table and the Form builder in the same page will make it easer to add functionality to our application.