Billing
Wave integrates seamlessly with Stripe or Paddle in order to accept payments in your app. In this section you will learn how to configure and setup billing in your application.
Selecting Your Payment Provider
You may choose whichever payment provider fits your needs. To change the payment provider you want to use, you can change the BILLING_PROVIDER value inside your application .env file. You can set this to stripe or paddle. This config is stored inside the config/wave.php file.
<?php

return [

    ...
    'billing_provider' => env('BILLING_PROVIDER', 'stripe'),
    ...

];
Ok, now that you've selected the payment provider, lets dig in a little deeper into each one to learn how to get it setup.
Stripe
Wave utilizes Stripe Checkout, which is the simplest implementation of accepting payments. In order to get setup you'll need the following credentials.
- Stripe Publishable Key
- Stripe Secret Key
- Stripe Webhook Secret
Add Stripe API Credentials
To get the Publishable Key and Secret Key, follow these steps:
- Log in to your Stripe account at dashboard.stripe.com.
- Click on the Developers button at the top right corner of the dashboard.
- From the dropdown menu, select Api Keys.
- You will see your Publishable key and Secret key. Copy these values and place them in your application .env file:
STRIPE_PUBLISHABLE_KEY=pk_test_51...
STRIPE_SECRET_KEY=sk_test_51...
Add Stripe Webhook Secret
The Webhook Secret key allows stripe to talk to your application and receive webhook events when a customer fullfills a purchase, changes their plan, or cancels a subscription. Follow these steps, to get this key:
- Log in to your Stripe account at dashboard.stripe.com.
- Click on the Developers button at the top right corner of the dashboard.
- From the dropdown menu, select Webhooks.
- From this page you will see a button to Create new endpoint
- From this screen you will need to select the following 9 events:
All Checkout Events:
checkout.session.async_payment_failed,checkout.session.async_payment_succeeded,checkout.session.completed,checkout.session.expiredAll Billing Portal Events:
billing_portal.configuration.created,billing_portal.configuration.updated,billing_portal.session.createdCustomer Subscription Events:
customer.subscription.deleted,customer.subscription.updatedThese subscription events are required to update the database when customers cancel or change their subscription.
- Enter your application endpoint. This will be your application URL with the
/webhook/stripepath. So, if your URL ishttps://wave.testyour endpoint will behttps://wave.test/webhook/stripe. - Optionally, add a description and click the Create destination button.
- On this page you will see a Signing secret key inside the Destination Details section. Copy this value and add it to your application .env file:
STRIPE_WEBHOOK_SECRET=whsec_75...
Webhook Warning
If your webhook is not setup correctly, it may look like the user purchases and their account never upgrades. Here is a workflow overview of how it works from when the user clicks the Subscribe to Plan button.
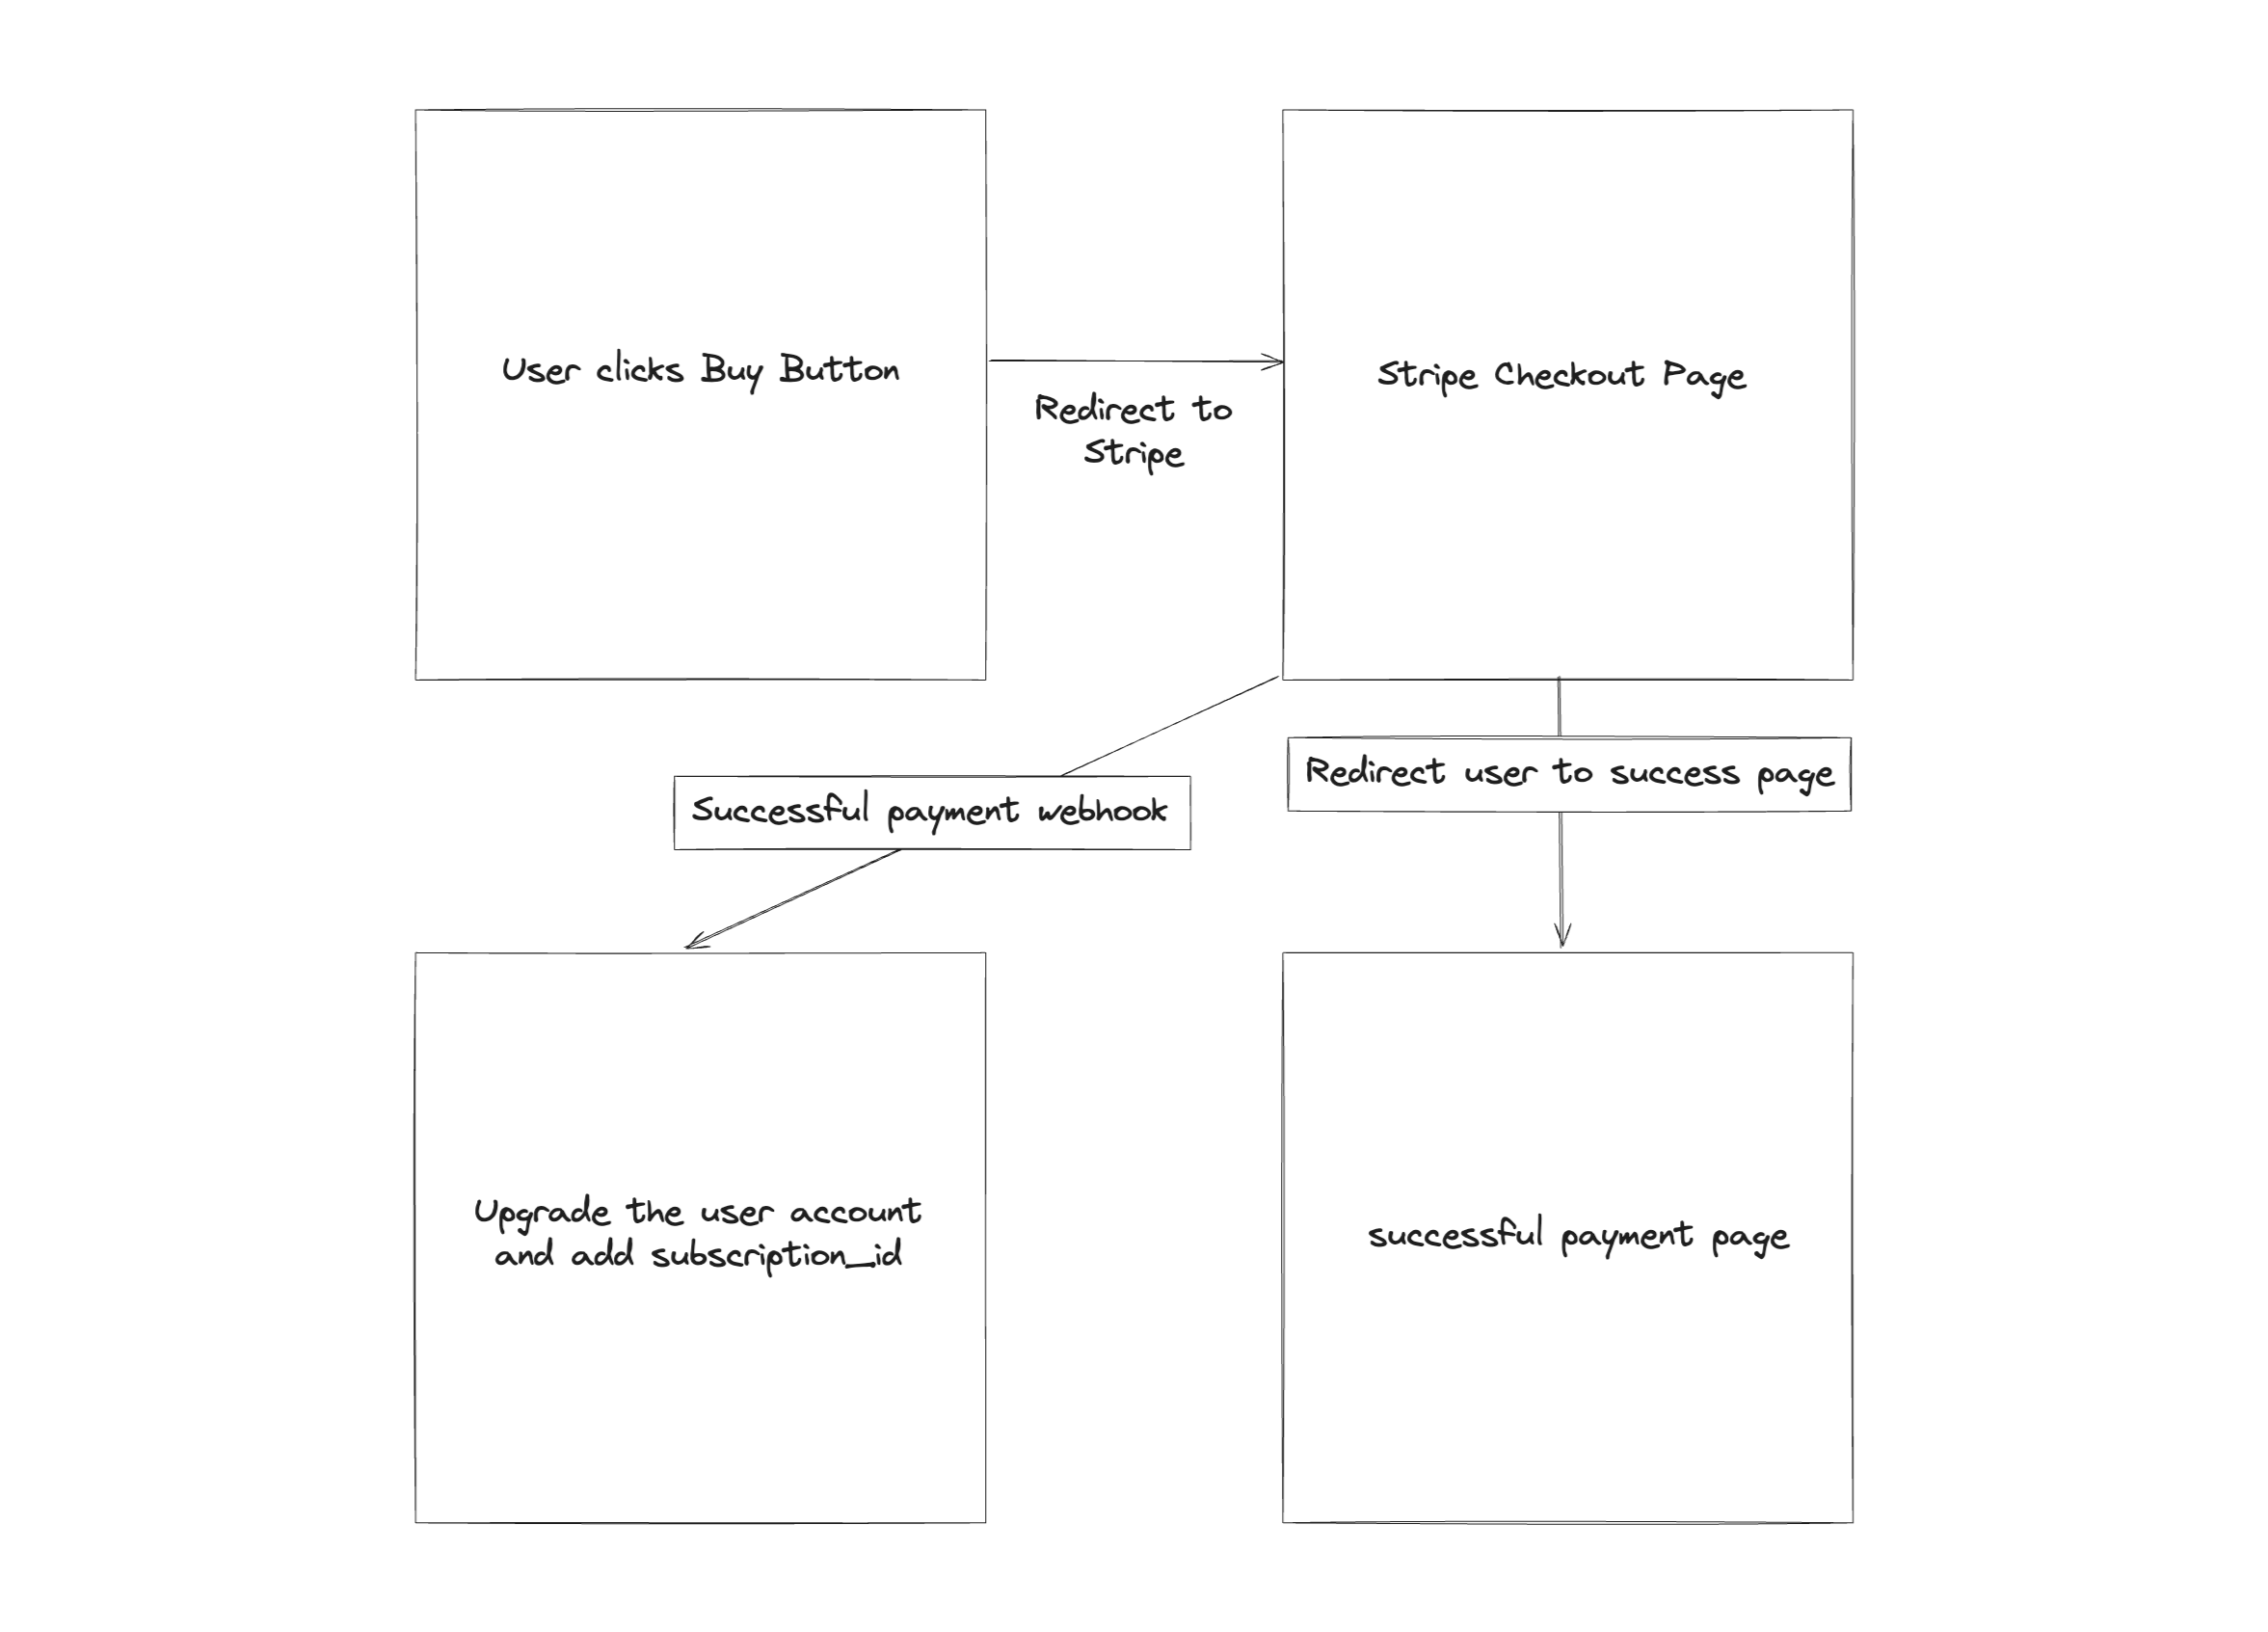
As you can see that the webhook gets sent at the same time as a successful payment. So, if the webhook is not setup correctly the user will be redirected to the success page, but their account will not actually be upgraded.
As long as the webhook is setup correctly, the functionality will happen simultaneously, so everything will function correctly. This is probably a good thing to know in case you are having trouble debugging the situation where an account never gets upgraded after a successful purchase.
We may change the way that this works down the road, but for now it's good to know about how this functions.
Testing Sripe Payments and Events
It's very important to test your application from a dev environment to make sure everything is working correctly. At the top right of your stripe dashboard you can toggle Test Mode on and off. You will receive new API keys for each environment, so make sure to add the correct keys.
When you want to test out payments locally, you can use these Example Credit Card Credentials during checkout.
Next, if you want to easily test out events on your local machine you can utilize the Stripe CLI, and test your webhook events locally.
After setting up the Stripe CLI, you will run the following command:
stripe listen --forward-to https://wave.test/webhook/stripe
In this example, you need to swap out https://wave.test with your local URL. After running this command, you'll get a message that says something like Your webhook signing secret is whsec75…, this is the new STRIPEWEBHOOK_SECRET you will need to add to your .env file.
Now you will be able to go through your application check out process and see how everything will function when a user subscribes, switches plans, or cancels.
Stripe Customer Portal
After a user subscribes to a plan they will then visit the Stripe Customer Portal to update plans, change their payment methods, or cancel their plan.
You can configure the Stripe customer portal by following these steps:
- Log in to your Stripe account at dashboard.stripe.com.
- Click on the Settings button at the top right.
- From the settings page, click Billings.
- From the billing page you will see a tab that says Customer portal
Here you can customize all the aspects of the customer portal.
Paddle
Paddle also offers a very simple Checkout integration. This is the integration that we'll be using. In order to setup this implementation we'll need 4 different keys.
- Paddle Vendor ID
- Paddle API Key
- Paddle Public Secret
- Paddle Webhook Secret
Paddle Environment
When you are implementing your Paddle integration you will want to test the payment process using Sandbox Mode. To do this, you need to specify the PADDLE_ENV value inside your .env file:
PADDLE_ENV=sandbox
When, you're ready to put your application in production you will change the PADDLE_ENV to production. Next, we need to add our API credentials.
Paddle API Credentials
Inside of your Paddle Dashboard you'll see a button under the Developer Tools menu, called Authentication, click on that button to get your API Authentication Credentials.
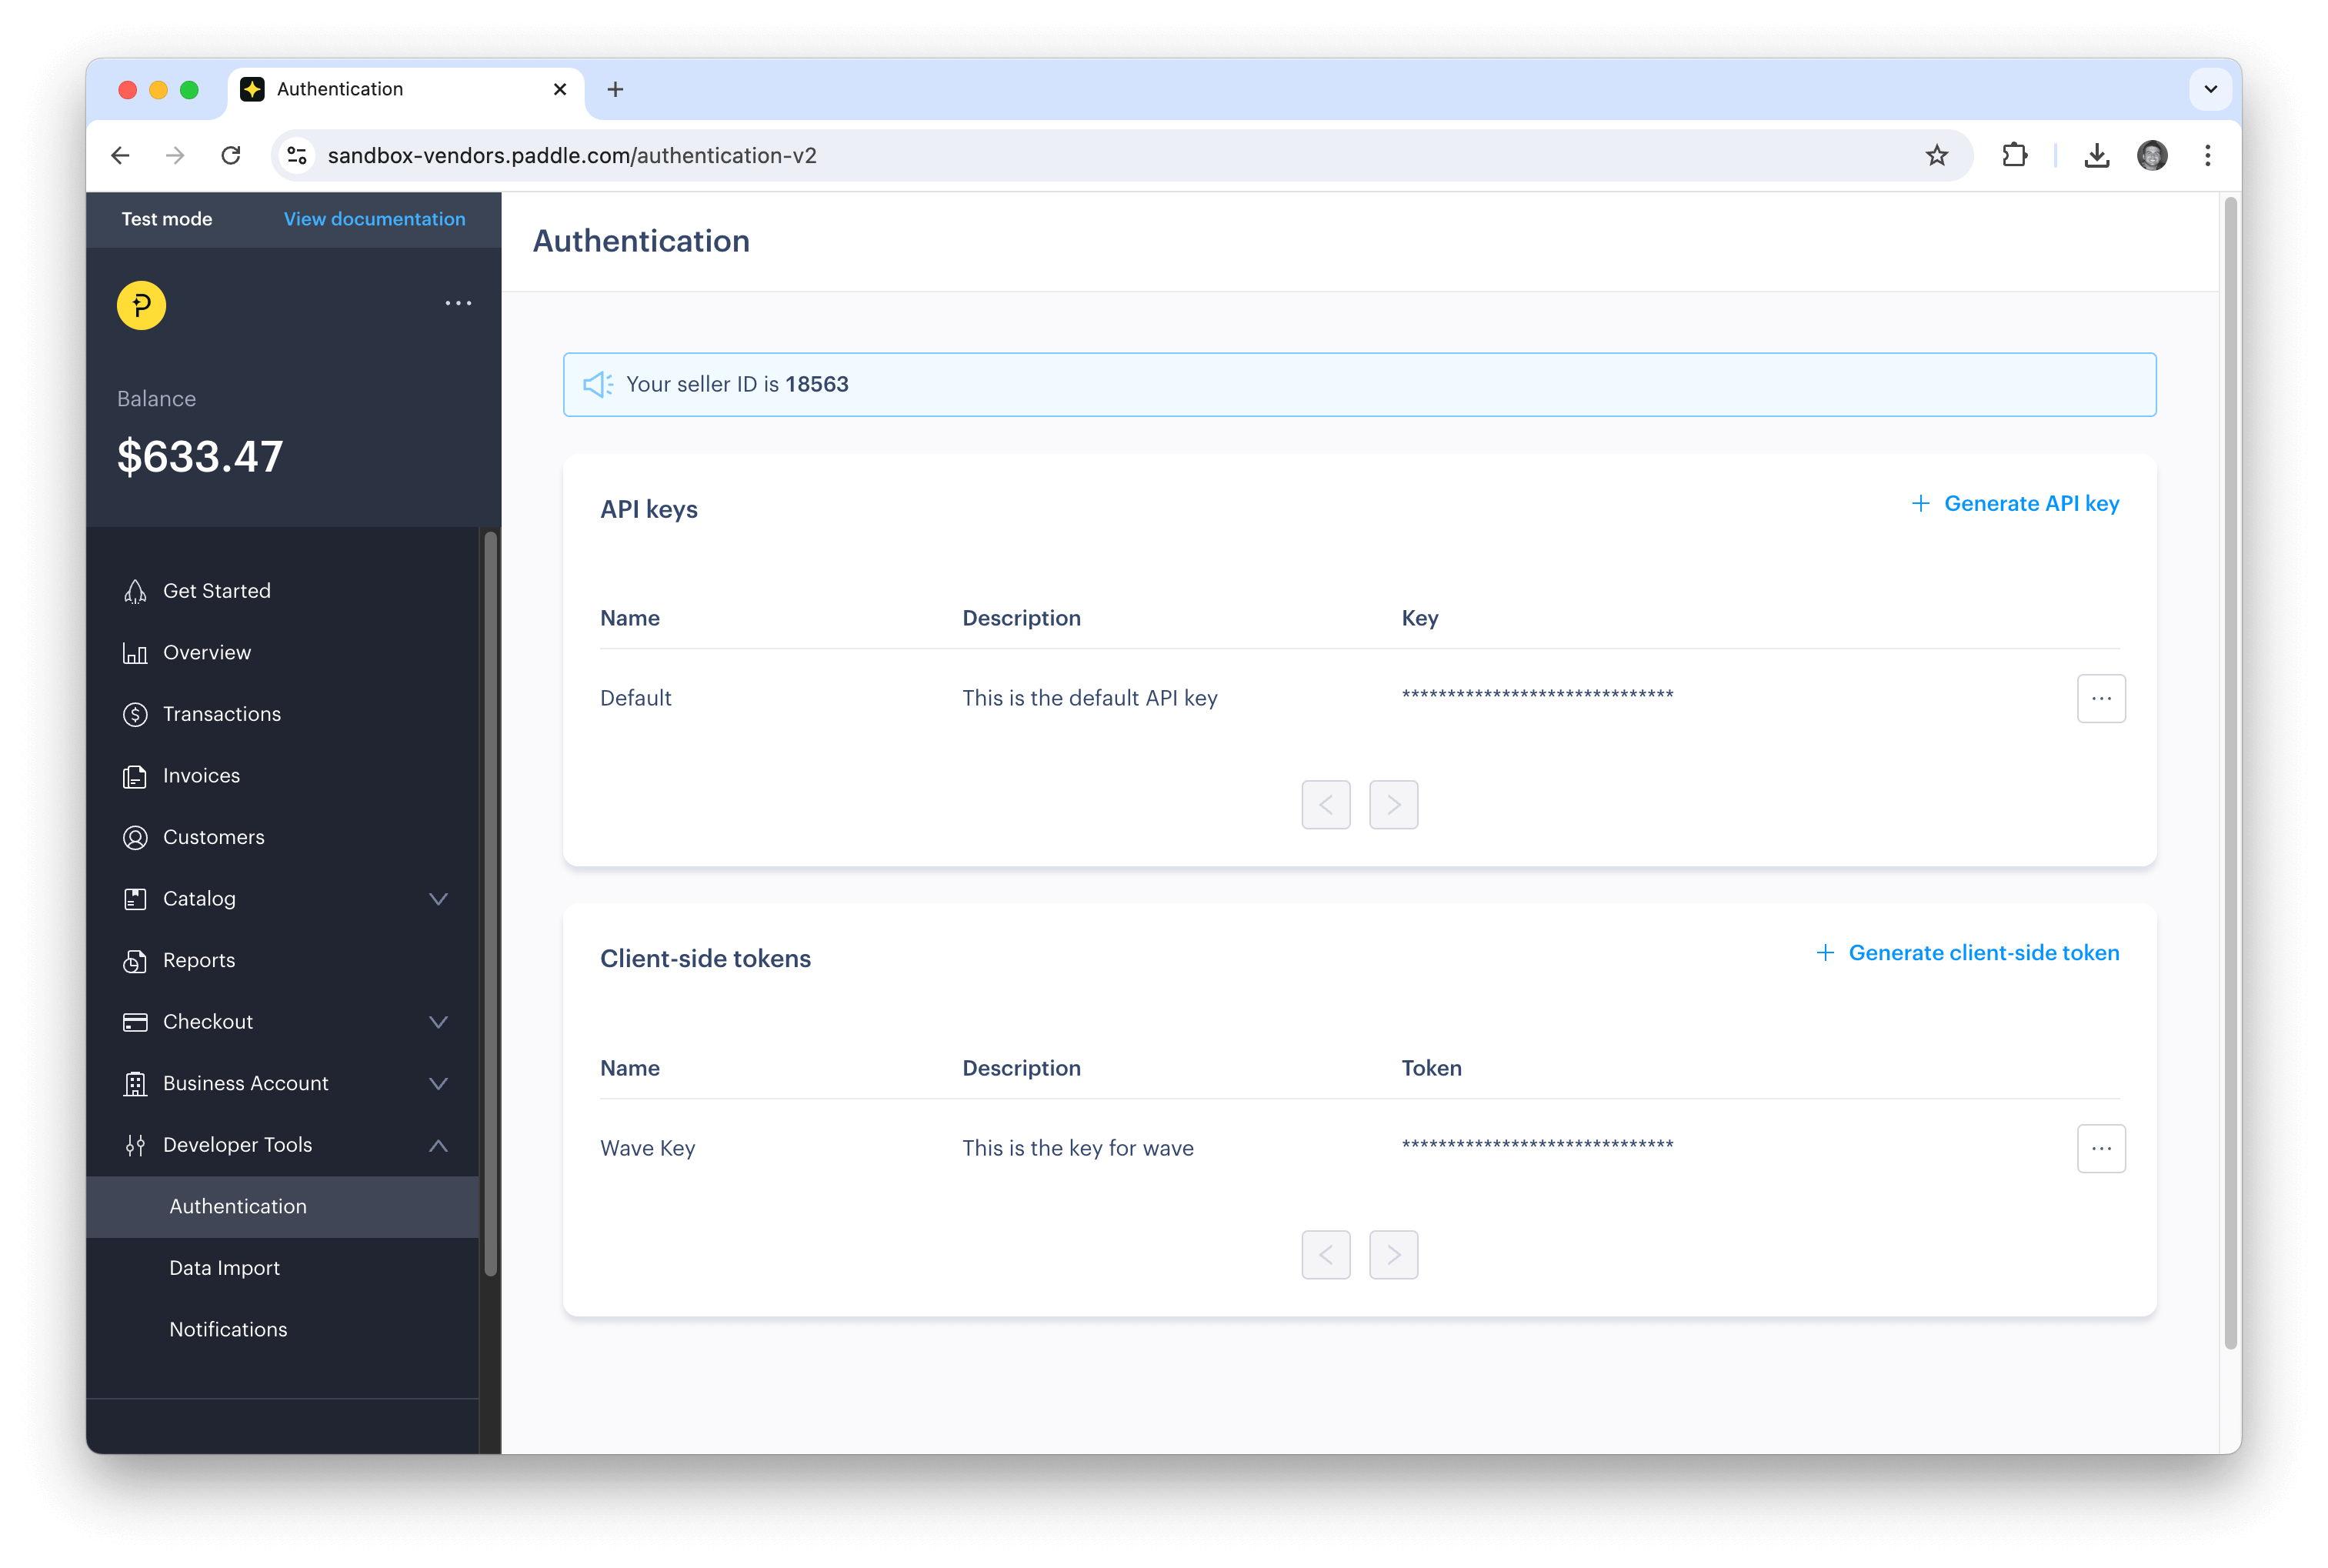
From this page, you can get your Vendor ID (seller ID), API Key, and Client-side Token. To get the API Key and Public key, you'll need to + Generate a new key if you do not have one. Then, click the Show Key button in the menu to the right. Paste the key values into your application .env file:
PADDLE_VENDOR_ID=9999
PADDLE_API_KEY=...
PADDLE_CLIENT_SIDE_TOKEN=...
Next, we need to setup our webhook.
Paddle Webhooks
Paddle webhooks are used to send events to your application. These events include a user subscription being created, cancelled, updated, or a payment has failed. In order for your app to handle these events correctly we have to setup a webhook. To do this, go to your Paddle dashboard and click on Developer Tools -> Notifications.
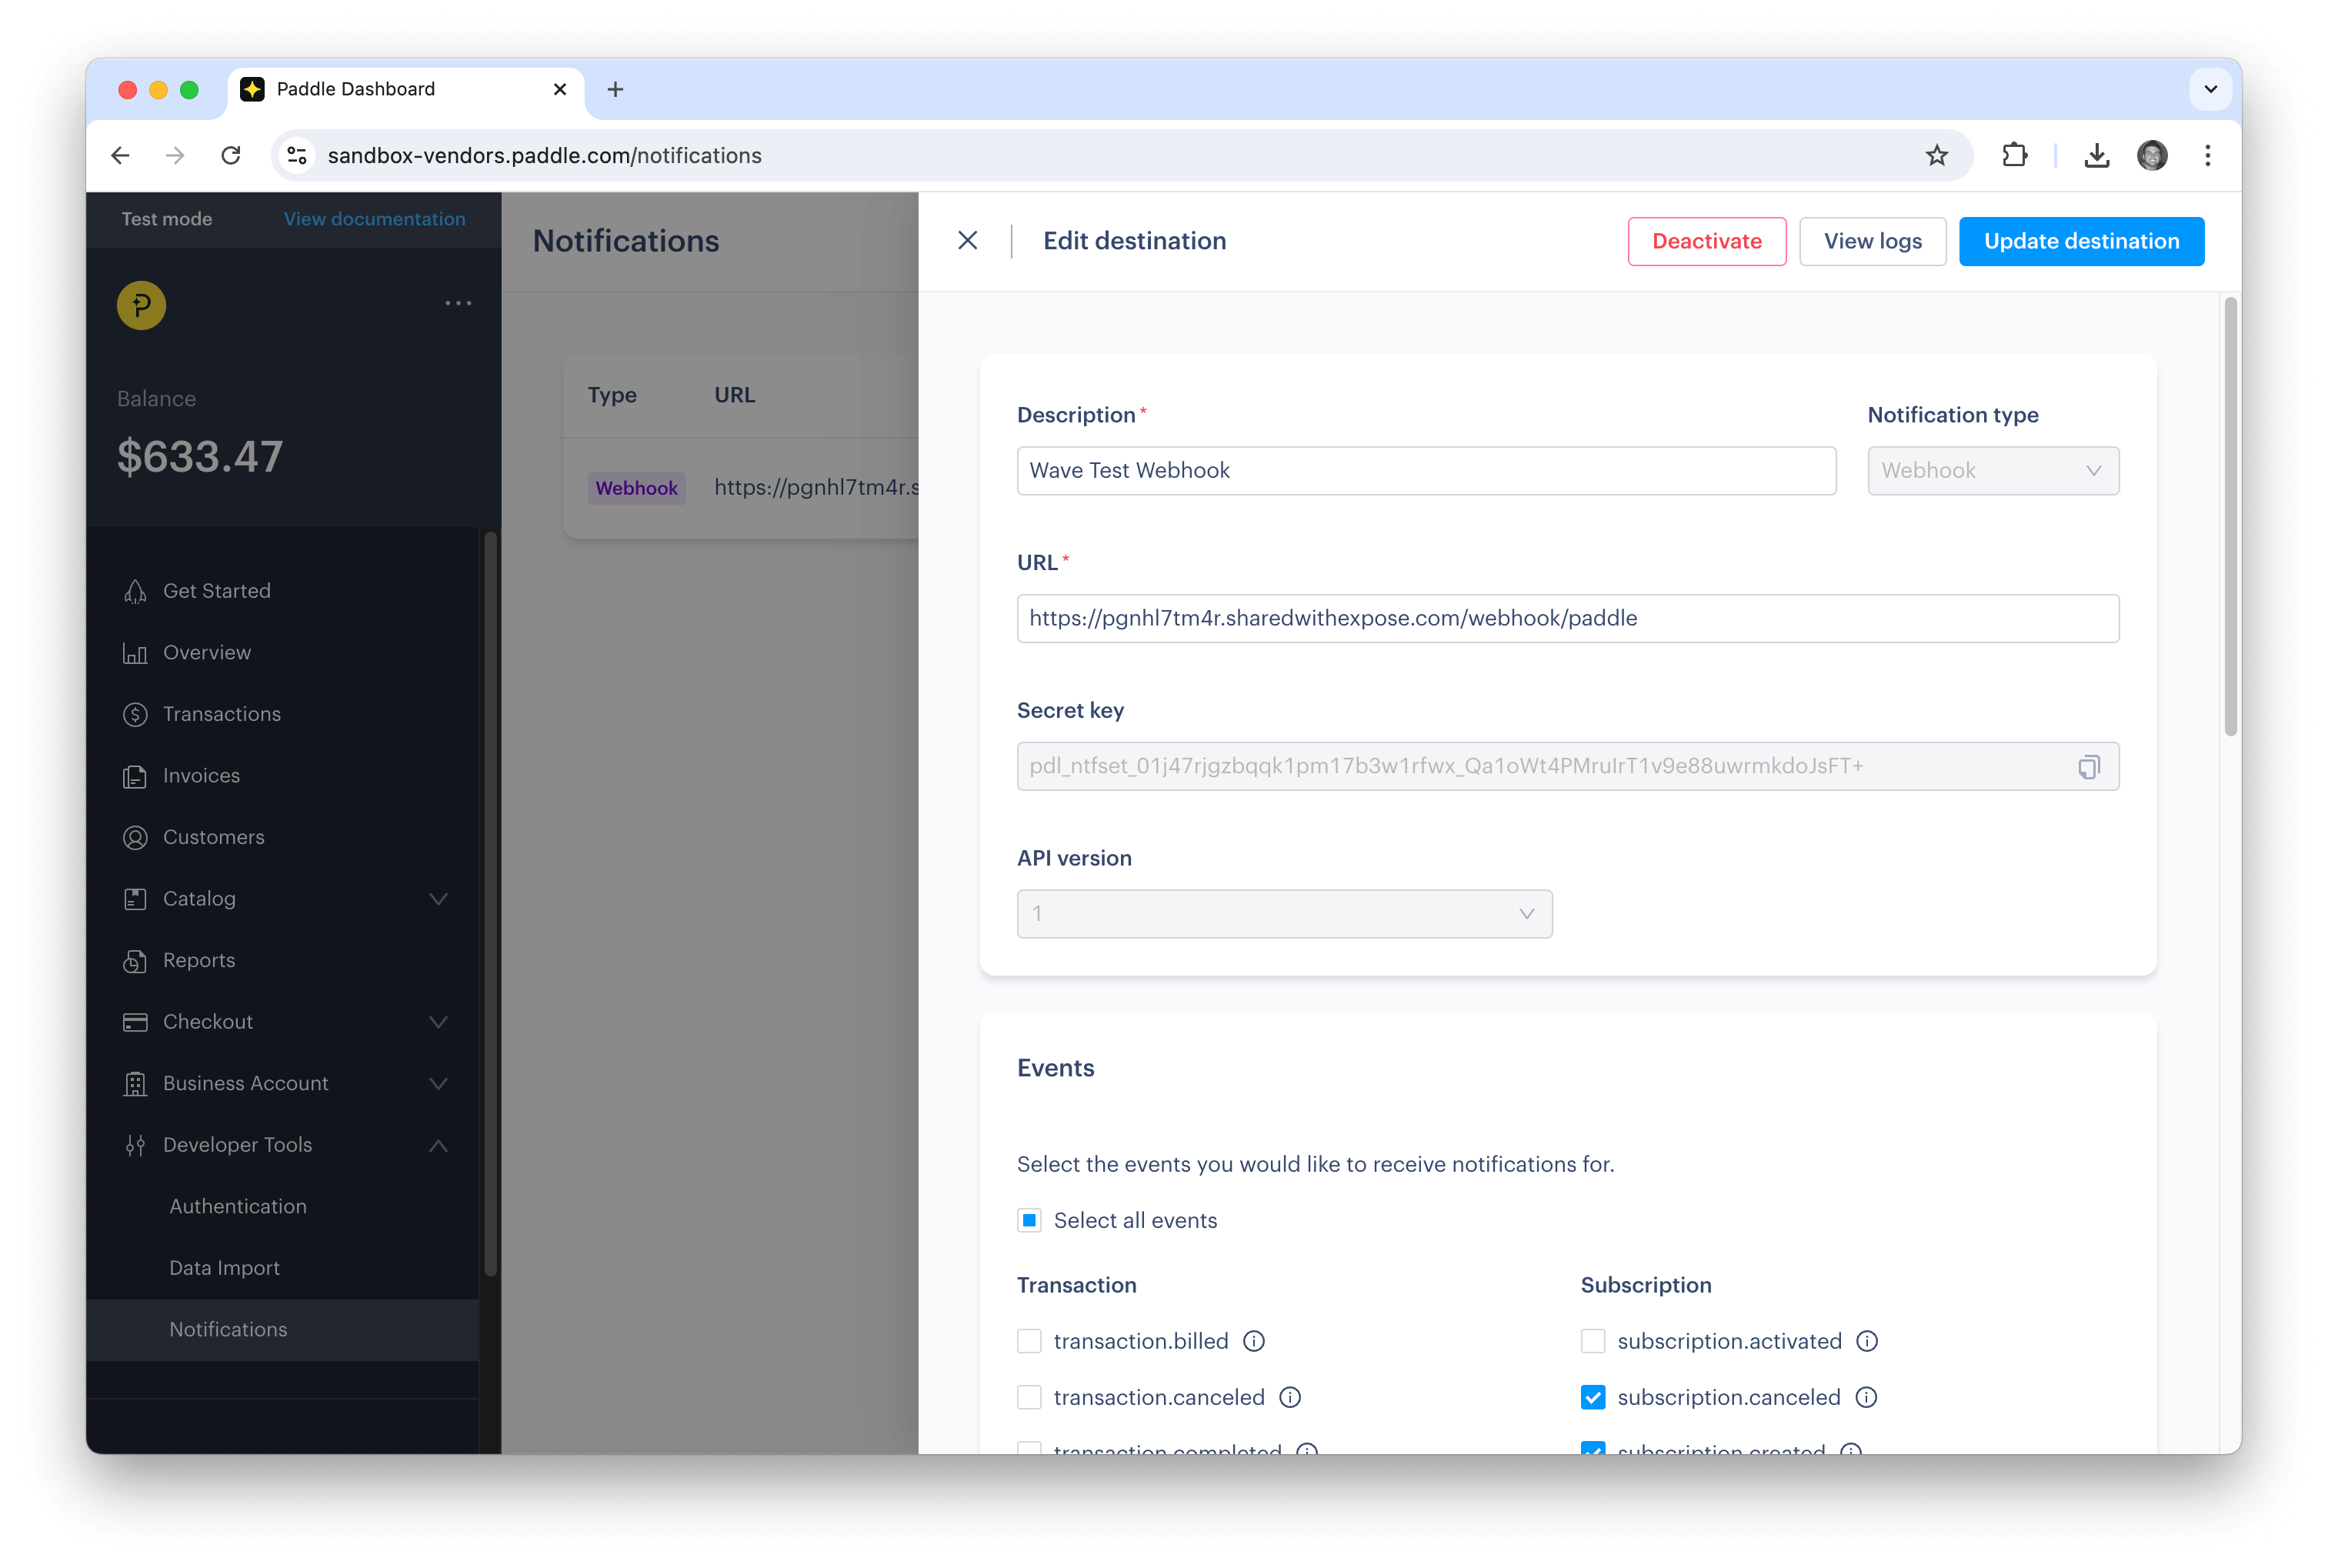
From the slide over menu, you will need to add your application URL and the path webhook/paddle. If you are in Sandbox mode, to test this out you may need to Publicly Share your local site and update that public URL inside the field.
You will also need to check all the events that we want to send to our application.
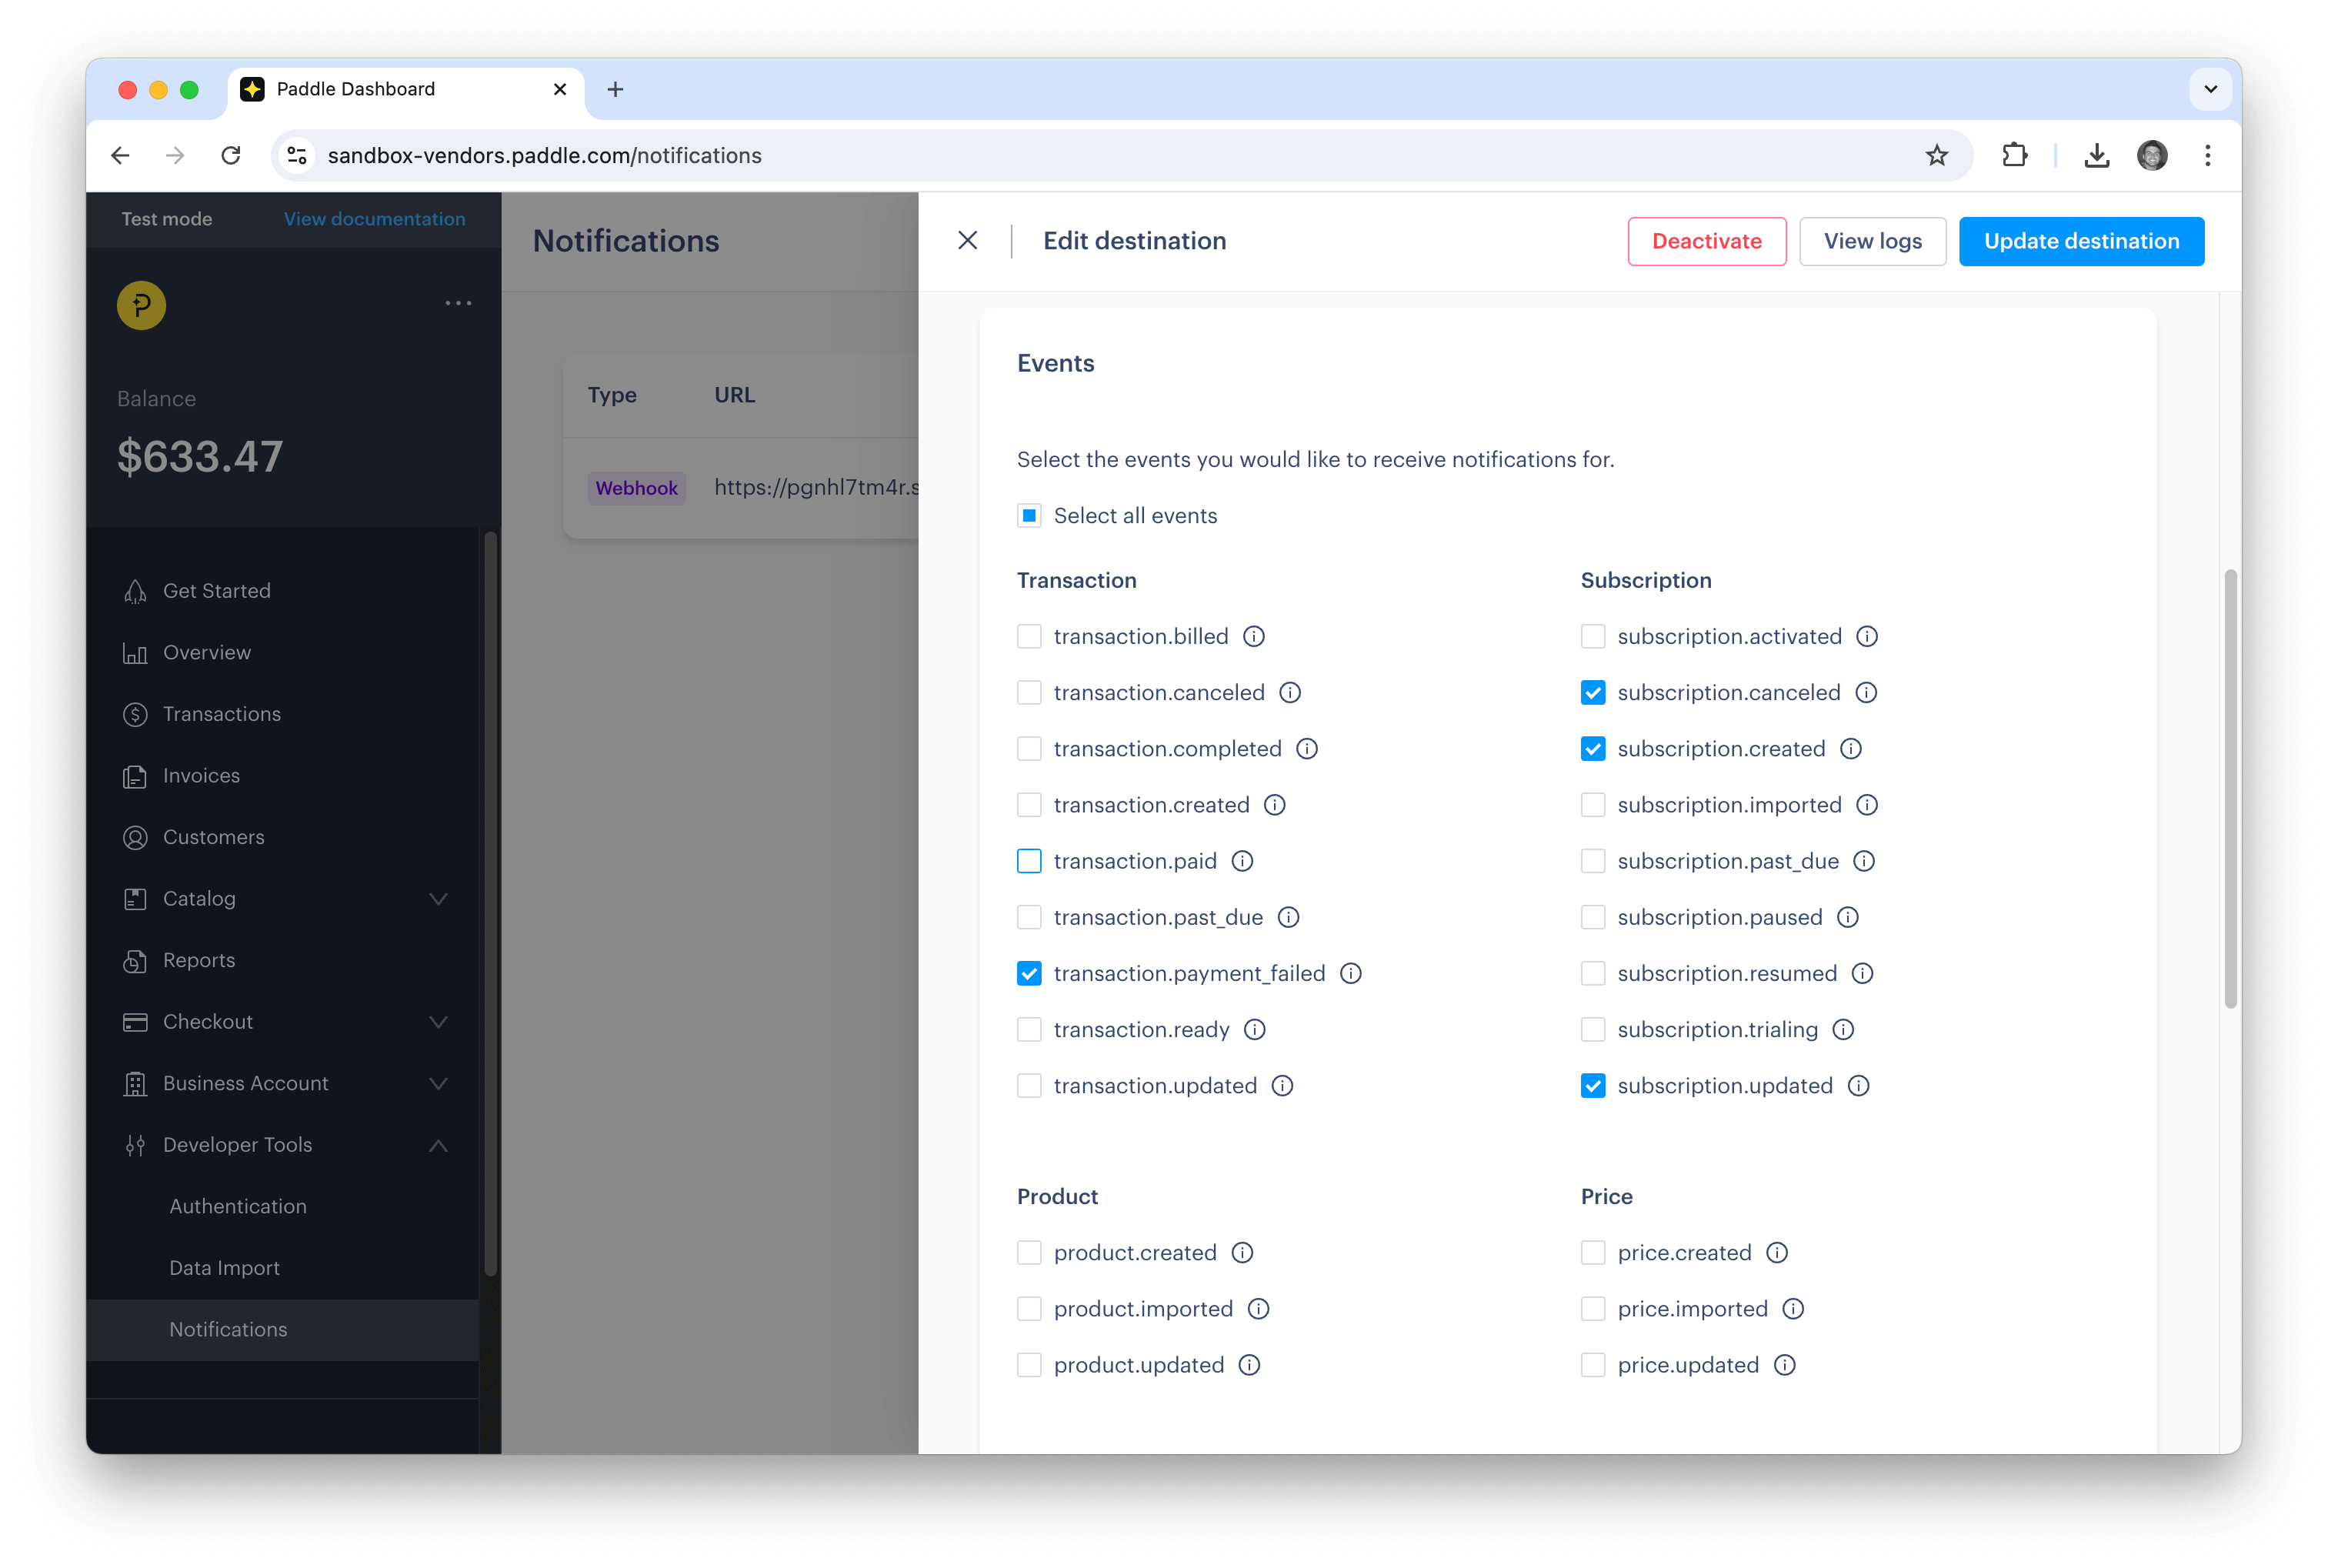
Make sure to select the subscription.cancelled, subscription.created, subscription.updated, and transaction.payment_failed. Those are the events that we handle on Waves end.
Finally, we need to set our payment link.
Paddle Payment link
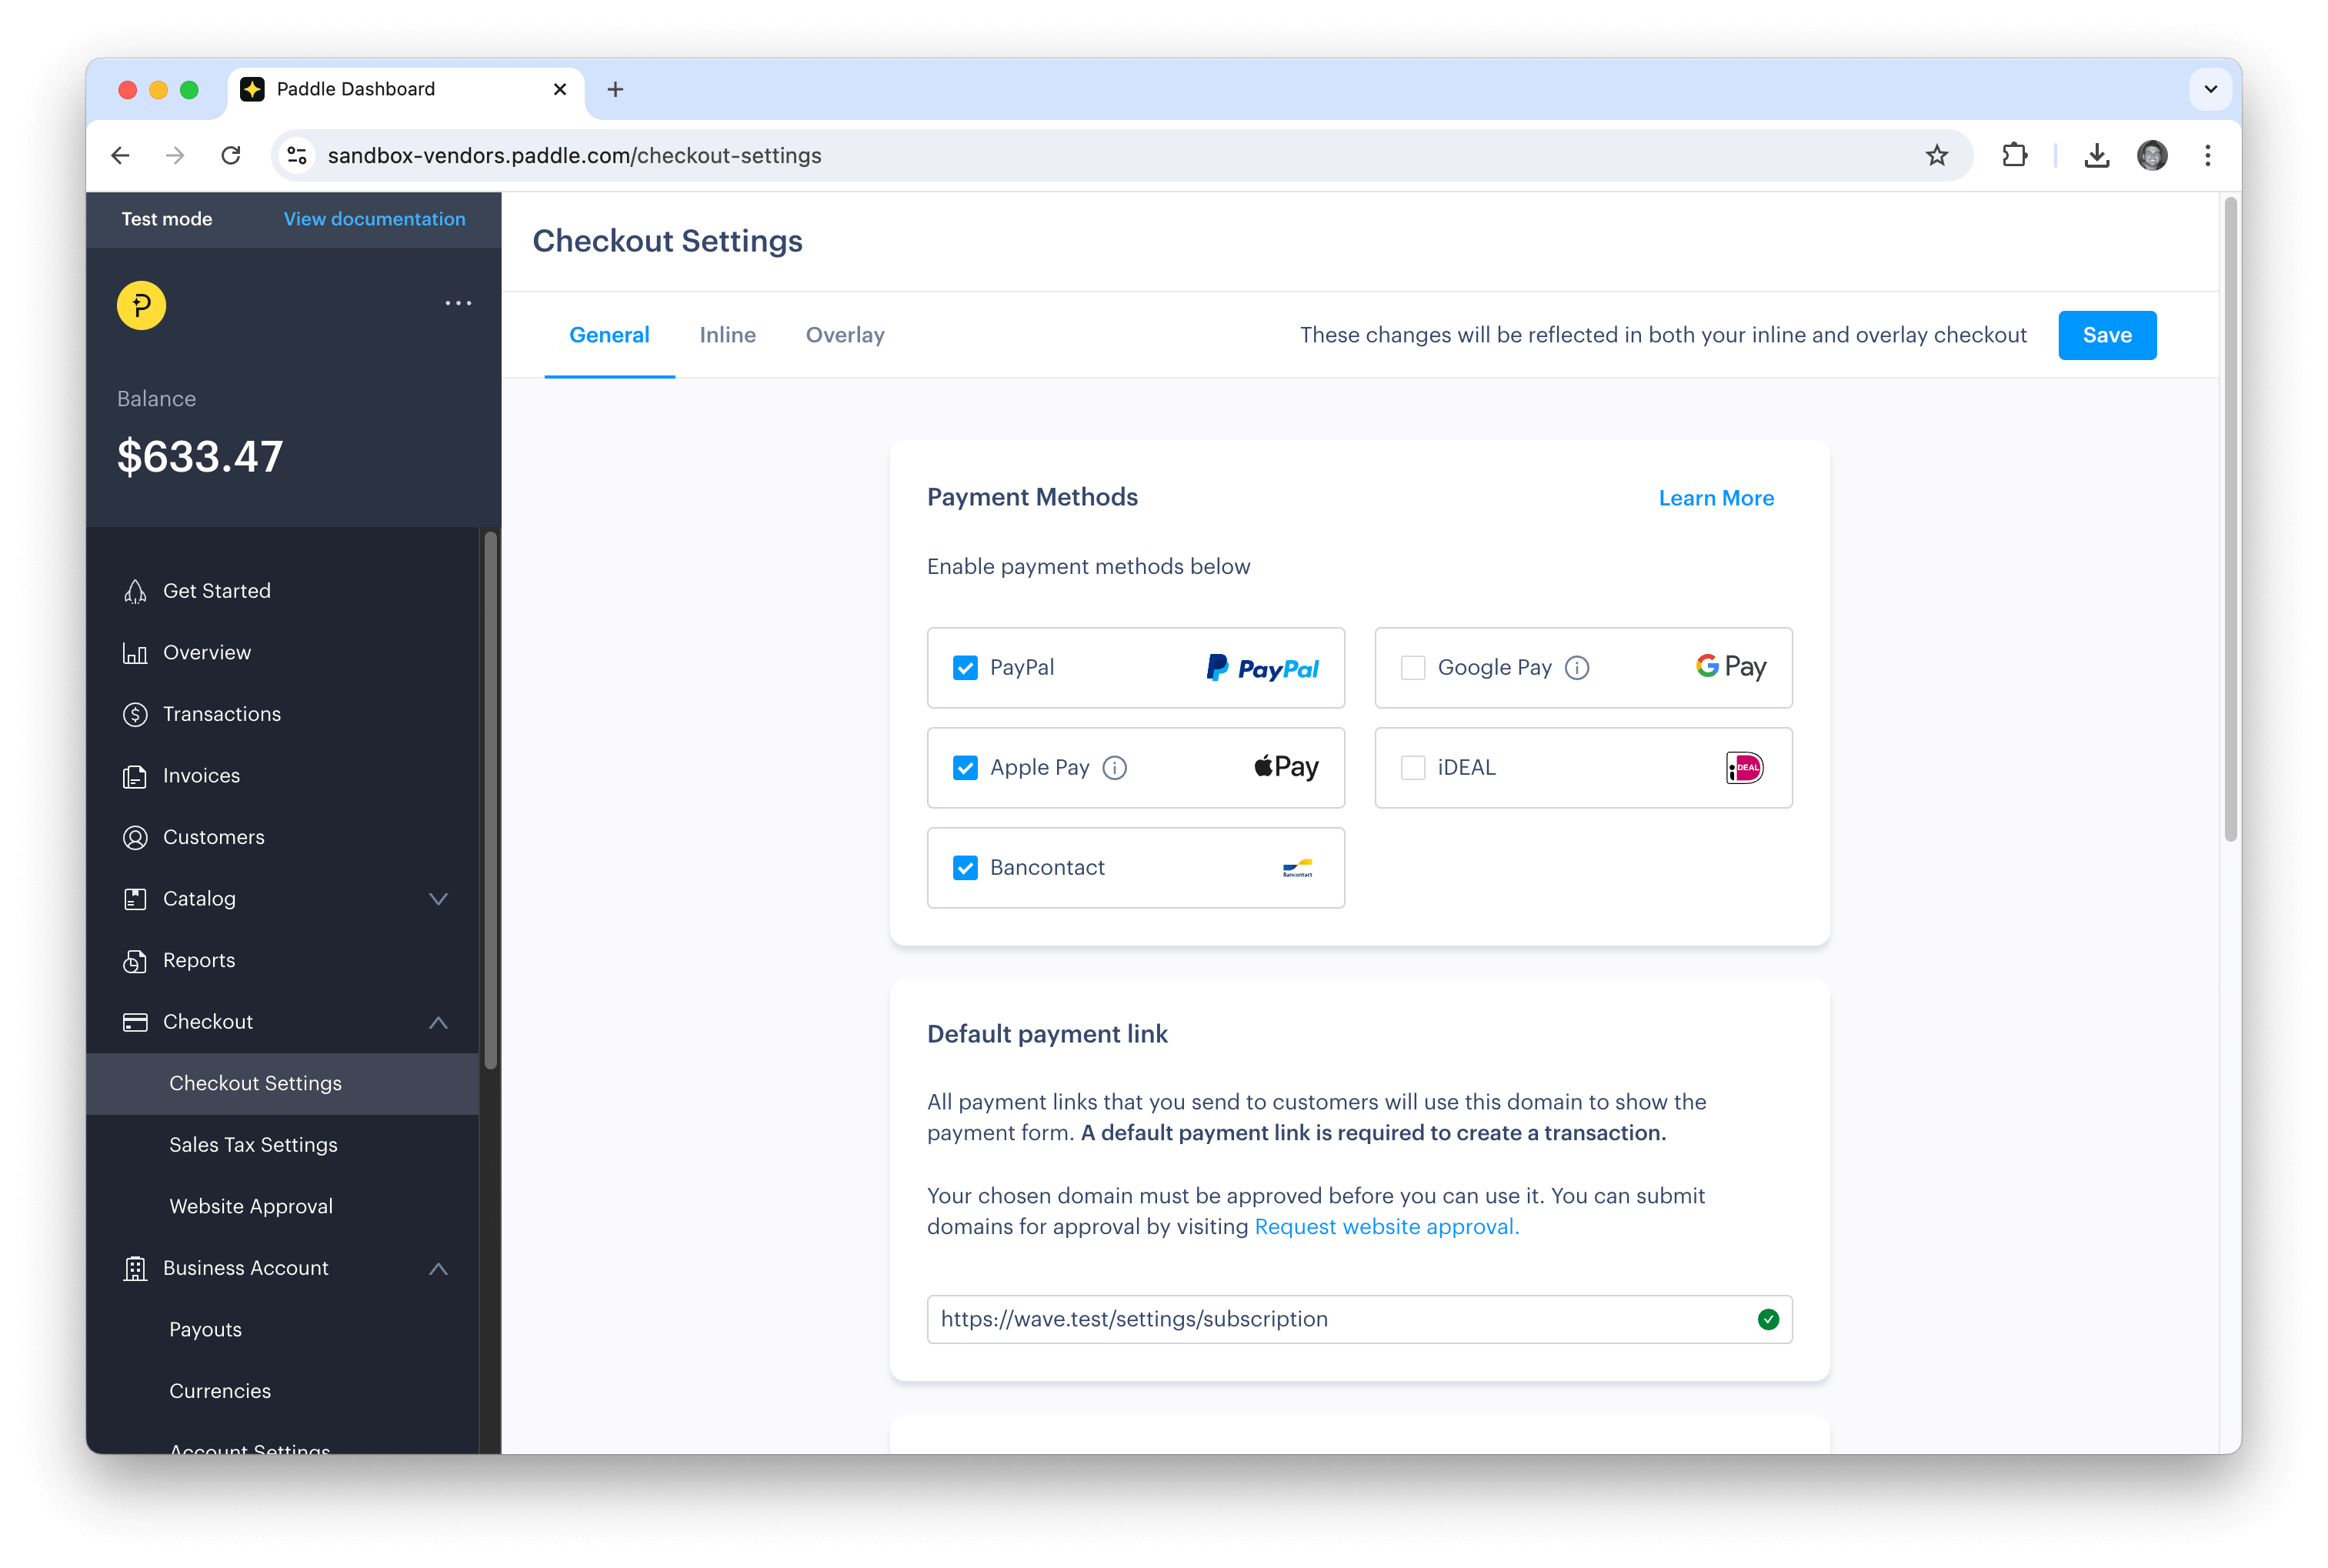
Paddle needs to know your default payment link. This is users will be redirected when they cancel or make upates on Paddles end. To update this payment link, from the left menu under Checkout, click the Checkout Settings button and then scroll down to Payment Links.
The default payment link should be set to http://yourdomain.com/settings/subscription.
Test Billing Process
You can test out the Stripe or Paddle implementation using the following credentials:
More information below about Test Credit Cards for each provider:
Before we can fully test out your integration, you will need to add a few Subscription Plans. We'll cover that next.