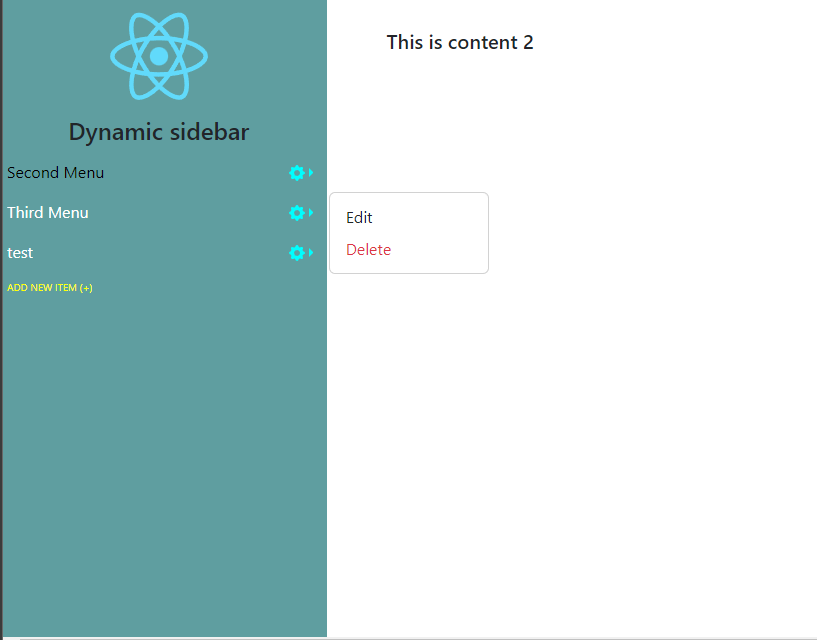
This type of navigation bar can be used by users who can freely add, edit and delete a menu in the sidebar. Before we proceed to the actual code, we need first to install reactJS, react-bootstrap, and react-icons for faster development of this simple app.
So the first step that I did was to display the sidebar. What I used below was a vertical tab component from react-bootstrap.
import "./App.css";
import logo from "./logo.svg";
import Col from 'react-bootstrap/Col';
import Nav from 'react-bootstrap/Nav';
import Row from 'react-bootstrap/Row';
import Tab from 'react-bootstrap/Tab';

function App() {
  return (
    <Tab.Container id="left-tabs-example" defaultActiveKey="first">
      <Row>
        <Col sm={3} id="sidebar">
          <div className="sidebar-title">
            <img src={logo} id="logo" alt="logo" />
            <h4>Dynamic sidebar</h4>
          </div>
          <Nav variant="pills" className="flex-column">
            <Nav.Item>
              <Nav.Link eventKey="first">Tab 1</Nav.Link>
            </Nav.Item>
          </Nav>
        </Col>
        <Col sm={9}>
          <Tab.Content>
            <Tab.Pane eventKey="first">
              first content
            </Tab.Pane>
          </Tab.Content>
        </Col>
      </Row>
    </Tab.Container>
  );
}

export default App;
Then I modified the height of the sidebar to be at the same height as the screen size and center the text and the react's logo inside index.css file. I also changed the appearance of the sidebar.
#sidebar {
  height: 100vh;
  padding: 0px;
  background-color: cadetblue !important;
}

#logo {
  width: 50% !important;
  display: block;
  margin: auto;
}

.sidebar-title h4 {
  text-align: center;
}

/* -- menu items-- */
.nav-item {
  display: flex;
  justify-content: space-between;
}

.nav-item:hover {
  background-color: teal !important;
}

.nav-pills .nav-link {
  border-radius: 0px !important;
  color: white !important;
}

.nav-link.active {
  color: black !important;
  background-color: transparent !important;
}

#settings {
  color: cyan;
}

.add-item.nav-link.active, .nav-link.add-item{
  color: yellow !important;
  font-size: 10px !important;
}

.tab-content {
  padding: 2em 3em;
}
After that, I created a dummy sample menu items. But before doing that I created a generateId() function to return a random sample id for each menu items. I created a folder named util then inserted a new js file, generate.js. Inside this js file contains the generateId().
const generateId = () => {
  return (Math.random() + 1).toString(36).substring(8);
};

export { generateId };
I did this to make my code more organized. Then, I called this function in the App.js to generate id for each sample menu items.
import { useState } from "react";
import { generateId } from "./util/generate";
import { useState } from "react";

function App() {
const defaultVal = [
    {
      id: generateId(),
      title: "First Menu",
      content: "This is content 1",
    },
    {
      id: generateId(),
      title: "Second Menu",
      content: "This is content 2",
    },
    {
      id: generateId(),
      title: "Third Menu",
      content: "This is content 3",
    },
  ];
const [menu, setMenu] = useState(defaultVal);
Next, I went to the Nav component to iterate those items. I also inserted the 'add new item' link below the menu items. Also, take note it is important to put the correct value in the eventKey. It must be equal to the eventKey of the Tab.pane where the contents are being displayed.
<Col sm={3} id="sidebar">
  <div className="sidebar-title">
    <img src={logo} id="logo" alt="logo" />
    <h4>Dynamic sidebar</h4>
  </div>
  <Nav variant="pills" className="flex-column">
    {menu.map((item, index) => (
      <Nav.Item key={item.id}>
        <Nav.Link eventKey={"content-" + item.id}>
          {item.title}
        </Nav.Link>
      </Nav.Item>
    ))}
    <Nav.Item key="add-item">
      <Nav.Link
        eventKey={"none"}
        className="add-item"
      >
        ADD NEW ITEM (+){" "}
      </Nav.Link>
    </Nav.Item>
  </Nav>
</Col>
<Col sm={9}>
  <Tab.Content>
    {menu.map((item) => (
      <Tab.Pane
        eventKey={"content-" + item.id}
        key={"content-" + item.id}
      >
        <h5>{item.content}</h5>
      </Tab.Pane>
    ))}
  </Tab.Content>
</Col>
Next, I made a function that returns a dropdown component that allows user to delete, edit, and add a menu item. But first I need to import the needed components.
import Dropdown from "react-bootstrap/Dropdown";
import DropdownButton from "react-bootstrap/DropdownButton";
import { BsFillGearFill } from "react-icons/bs";
const menuTools = (id) => {
    return (
      <DropdownButton
        key={"setting-" + id}
        drop="end"
        variant="link"
        id="settings"
        title={<BsFillGearFill />}
      >
        <Dropdown.Item eventKey={"edit-" + id} onClick={() => editMenu(id)}>
          Edit
        </Dropdown.Item>
        <Dropdown.Item
          eventKey={"edit-" + id}
          className="text-danger"
          onClick={() => deleteMenu(id)}
        >
          Delete
        </Dropdown.Item>
      </DropdownButton>
    );
}
Of course, I need to create functions to edit and delete an item.
const editMenu = (id) => {
    let title = prompt("Enter new menu title: ");
    setMenu(
      menu.map((item) => {
        if (item.id === id) item.title = title;
        return item;
      })
    );
};

const deleteMenu = (id) => {
    if (window.confirm("Are you sure you want to delete this menu item?")) {
      let newMenu = menu.filter((item) => item.id != id);
      setMenu(newMenu);
      alert("Deleted successfully!");
    }
};

const addMenu = () => {
  let title = prompt("Enter menu title: ");
  let id = generateId();
  let newMenu = {
    id: id,
    title: title,
    content: "This is content of " + title,
  };

  setMenu((menu) => [...menu, newMenu]);
};
Don't forget to call the addMenu() inside the 'add new item' link and insert menuTools() beside the menu items.
 View Website
 View Website
 View Website
<Nav.Item key={item.id}>
  <Nav.Link eventKey={"content-" + item.id}>
    {item.title}
  </Nav.Link>
  {menuTools(item.id)}
</Nav.Item>
...
<Nav.Link
    eventKey={"none"}
    className="add-item"
    onClick={() => addMenu()}
  >
    ADD NEW ITEM (+){" "}
</Nav.Link>
And there you go, you can run your simple web app.


Comments (0)