

Introduction
Welcome to part 5 of my Introduction to Ansible blog post series! If you have not read previous parts of the Introduction to Ansible series, you can find them here:
- Part 1: Here I cover what Ansible is and how to find your way around the Ansible documentation
- Part 2: Here I cover how to install Ansible on Ubuntu on DigitalOcean and some of the main configuration files that you need to keep in mind
- Part 3: Here I covered what Ansible Ad-hoc commands are and we will introduce a few basic commands
- Part 4: Here I covered what Ansible playbooks are, how to create and run a few playbooks
In this last post of the 5 part blog post series I'll give you a quick introduction to the Ansible Facts, some useful tips, and a quick overview of the Ansible handlers.
To make things even better you can use my referral link to get a free $100 credit that you could use to deploy your virtual machines and test the guide yourself on a few DigitalOcean servers:
Digital Ocean $100 Free Credit
What are Ansible Facts
Simply put the Ansible facts are just some data that Ansible would collect for us from the remote system.
 View Website
 View Website
 View Website
In order to gather the facts about the remote hosts, Ansible uses the Ansible setup module.
Ansible automatically calls the module for us whenever we run a playbook, that way we can use the information directly in our playbooks as variables.
This is really handy as Ansible provides a lot of facts about the remote system for us out of the box.
Gathering facts with Ansible
You can gather facts by using the following ad-hoc command:
ansible your_server -m setupThe above command would list all of the information available from the remote host.
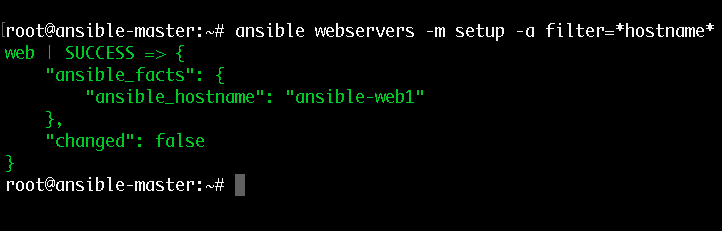
As this would return a lot of information you could use the filter tag to look for a specific thing by adding a filter flag, for example, if you wanted to get the hostname of the remote host you would use the following command:
ansible your_server -m setup -a filter=*hostname*Output:
Using Facts in Playbooks
The best part about the Ansible facts is that you could use this information in your Ansible Playbooks.
For example, if you want to get the information about the hostname of the remote host, just like we did with the ad-hoc command, but directly in your playbook, all you need to do is use the following syntax in your yaml file:
"{{ ansible_hostname }}"You don't have to define this var as this is already available for you via the Ansible facts.
As a side note, you can use the --tree flag to forward the output to a file.
Also as gathering the facts takes some time, we could set the gather_facts to no in our playbook, but by default, it is set to yes:
gather_facts: noThat way you would slightly improve the performance, but you would not have access to the facts anymore.
Useful Ansible Modules
Here are some of the essential Ansible modules which you should know about and take advantage of when creating playbooks and troubleshooting issues with your automation.
Ansible Debug Mode
You could use the debug module to do some troubleshooting. It would print out some debug information about the tasks that are running.
You could use one of the following two arguments but you can not use both at the same time:
msg - this would basically print out a message out while you run the playbook
var - it would print out the variable content on your screen.
Example:
- hosts: webservers
  tasks:

  - debug:
    msg: "System {{ inventory_hostname }} has uuid {{ ansible_product_uuid }}"
The Ansible Register Module
Another important module is the register module. It takes the output of a task and puts it in a variable.
Example:
- hosts: all
tasks:
- name: Register example
shell: cat /etc/os-release
register: os_version_var
- debug:
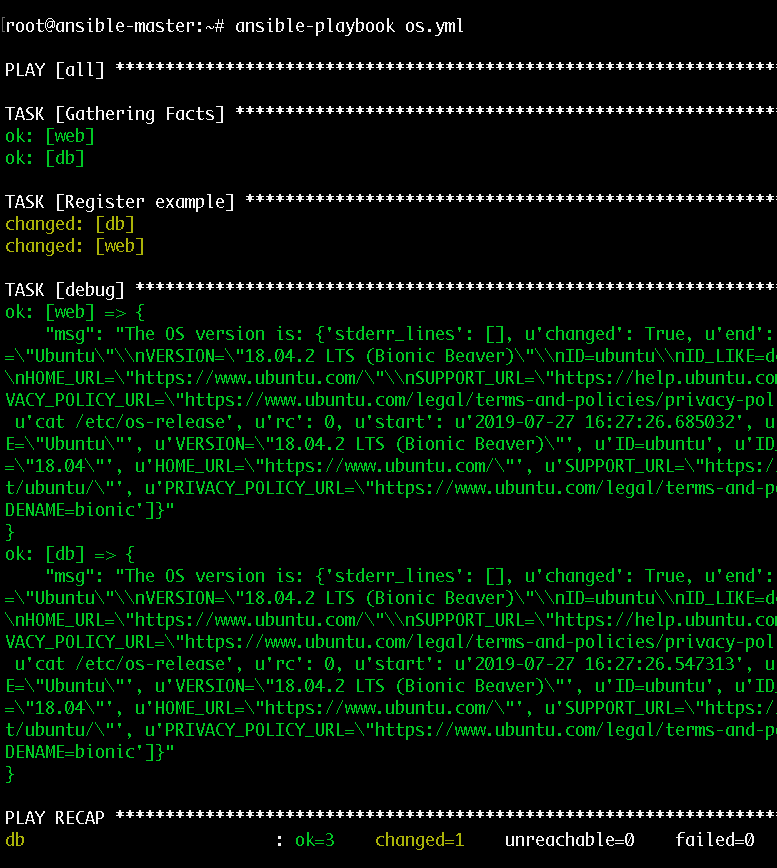
msg: "The OS version is: {{ os_version_var }}"This can be really handy for troubleshooting, you can register the output of a command with register, and then make decisions based on the exit code.
Here's the output that you would get:
Ansible Handlers
One final thing that I think is worth mentioning, in the 5 part introduction to Ansible series, are the ansible handlers.
We can use handlers to restart services only when needed - for example only if a change is made to the apche2 config and not every single time when we run the playbook.
One thing that you have to keep in mind is that the handler should be on the same level as the task and should trigger the name of the action.
Example:
# Example playbook
---
- hosts: webservers
  become: yes
  tasks:
  - name: Install Apache2 Latest
    apt:
      name: apache2
      state: latest
  - name: create index.html
    file:
      name: /var/www/html/index.html
      state: touch
  - name: Add some content to the index.hml file
    lineinfile:
      line: "Bobby Iliev Ansible"
      path: /var/www/html/index.html
    notify: "restart apache2"
  - name: Start Apache2
    service:
      name: apache2
      state: started
  handlers:
    - name: Restart Apache2
      service:
        name: apache2
        state: restarted
      listen: "restart apache2"
The key part here is the listen keyword, this means that the handler task would be triggered only if the "restart apache2" is called with the notify module.

For more information take a look at the official documentation here:
Knowledge Check
Once you've read this post, make sure to test your knowledge with this Ansible Quiz:
https://quizapi.io/predefined-quizzes/search-results-web-results-ansible-quiz-beginner-level
Conclusion
Hopefully, you found this 5 part series helpful! I would strongly recommend deploying a few droplets on DigitalOcean and testing all of the above yourself.
What's next? I would recommend testing all that by yourself so you could get a better feeling of the tool! Also, you could go through more advanced tutorials on the DigitalOcean website:
https://www.digitalocean.com/community/tags/ansible?subtype=tutorial
If you have any questions please feel free to reach out to me!
Comments (0)